ear3
Member
Here's a small quick project that I knocked out over the past few days.
Last week I picked up off Craigslist a small batch of 3/4 pine boards that someone had removed from the outside of their house. The seller hadn't known the species, so I didn't know what to expect when I went to pick it up. Almost didn't take it once I figured out it was pine, and that many of the 11 inch boards were pretty badly cupped, but I negotiated a decent price for the lot, so I decided to take it.
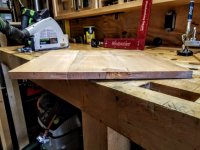
Got it back in the shop and began cleaning the boards with my brush sander. The unexposed side cleaned up beautifully:
[attachimg=1]
[attachimg=2]
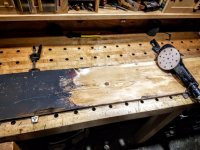
The other side, however, had many coats of paint on it, and I found that the pressure required to remove the paint with the aggressive wire brush mounted was removing way too much of the underlying wood and not preserving the patina
[attachimg=3]
So I gave up and hit the painted sides with the RO150 and 40 grit paper
[attachimg=4]
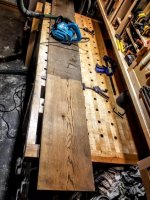
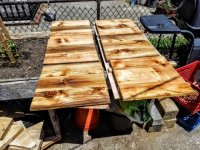
I ended up with enough boards for a tall shelf I've been wanting to build for a narrow empty corner in my house, dimensioned approximately 84x 17.5 x16
[attachimg=5]
There were only two boards that were reasonably flat. The others were severely cupped:
[attachimg=6]
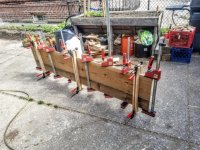
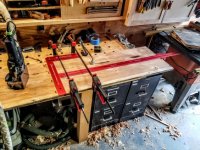
So I dedicated the flat ones to the verticals, then ripped the rest down the middle, and built up the 16 inch wide panels of the carcasse by edge joining multiple boards with dominoes:
[attachimg=7]
[attachimg=8]
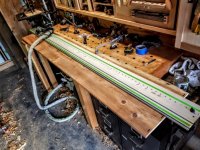
The verticals did cup a bit after the glue-up, so to not end up with an hourglass shape on the case, I dominoed the sides to have a fixed shelf at the center, and then added shelf pin holes with the LR32 to allow for adjustable shelving on the rest of the case:
[attachimg=9]
[attachimg=10]
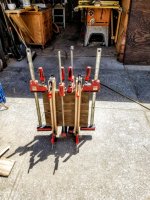
Glue up involved adding bow clamps on the center, fixed shelf so that it was flush to the sides of the case
[attachimg=11]
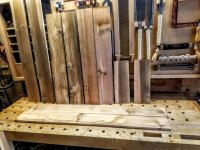
Even after ripping down the wider, cupped boards, the resulting halves still had some cupping, which would have created some problems when gluing them up for the shelves, so I decided to joint and thickness them. Since only the exterior of the case preserved the patina (the interior side having been sanded down to reveal fresh grain), it wasn't really much of a loss to remove the patina completely.
[attachimg=12]
[attachimg=13]
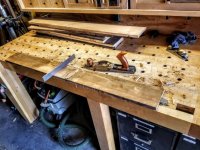
When gluing up the shelves, I made sure to orient the boards with the grain all in the same direction so I could plane them without any tear out:
[attachimg=14]
[attachimg=15]
The resulting grain turned out pretty well after an application of Surfix
[attachimg=16]
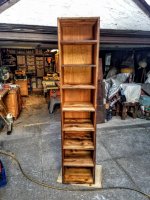
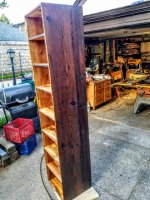
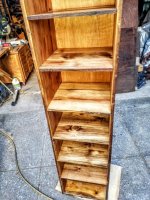
Finished off the case by routing a rabbet into the back for a 5mil underlayment backing panel. Here's the final product:
[attachimg=17]
[attachimg=18]
[attachimg=19]
Last week I picked up off Craigslist a small batch of 3/4 pine boards that someone had removed from the outside of their house. The seller hadn't known the species, so I didn't know what to expect when I went to pick it up. Almost didn't take it once I figured out it was pine, and that many of the 11 inch boards were pretty badly cupped, but I negotiated a decent price for the lot, so I decided to take it.
Got it back in the shop and began cleaning the boards with my brush sander. The unexposed side cleaned up beautifully:
[attachimg=1]
[attachimg=2]
The other side, however, had many coats of paint on it, and I found that the pressure required to remove the paint with the aggressive wire brush mounted was removing way too much of the underlying wood and not preserving the patina
[attachimg=3]
So I gave up and hit the painted sides with the RO150 and 40 grit paper
[attachimg=4]
I ended up with enough boards for a tall shelf I've been wanting to build for a narrow empty corner in my house, dimensioned approximately 84x 17.5 x16
[attachimg=5]
There were only two boards that were reasonably flat. The others were severely cupped:
[attachimg=6]
So I dedicated the flat ones to the verticals, then ripped the rest down the middle, and built up the 16 inch wide panels of the carcasse by edge joining multiple boards with dominoes:
[attachimg=7]
[attachimg=8]
The verticals did cup a bit after the glue-up, so to not end up with an hourglass shape on the case, I dominoed the sides to have a fixed shelf at the center, and then added shelf pin holes with the LR32 to allow for adjustable shelving on the rest of the case:
[attachimg=9]
[attachimg=10]
Glue up involved adding bow clamps on the center, fixed shelf so that it was flush to the sides of the case
[attachimg=11]
Even after ripping down the wider, cupped boards, the resulting halves still had some cupping, which would have created some problems when gluing them up for the shelves, so I decided to joint and thickness them. Since only the exterior of the case preserved the patina (the interior side having been sanded down to reveal fresh grain), it wasn't really much of a loss to remove the patina completely.
[attachimg=12]
[attachimg=13]
When gluing up the shelves, I made sure to orient the boards with the grain all in the same direction so I could plane them without any tear out:
[attachimg=14]
[attachimg=15]
The resulting grain turned out pretty well after an application of Surfix
[attachimg=16]
Finished off the case by routing a rabbet into the back for a 5mil underlayment backing panel. Here's the final product:
[attachimg=17]
[attachimg=18]
[attachimg=19]
Attachments
-
 20200514_150955.jpg59.7 KB · Views: 320
 -
 20200514_151014.jpg229.2 KB · Views: 311
 -
 20200514_151926.jpg278.7 KB · Views: 309
 -
 20200514_153526.jpg228 KB · Views: 277
 -
 20200516_141815.jpg267.3 KB · Views: 275
 -
 20200516_192957.jpg256.1 KB · Views: 276
 -
 20200517_095843.jpg282 KB · Views: 272
 -
 20200517_120706.jpg276.5 KB · Views: 284
 -
 20200518_164448.jpg270.1 KB · Views: 271
 -
 20200518_173648.jpg274.3 KB · Views: 274
 -
 20200518_195352.jpg295.6 KB · Views: 272
 -
 20200519_122527.jpg255.3 KB · Views: 278
 -
 20200519_145707.jpg231.3 KB · Views: 270
 -
 20200520_101459.jpg198.4 KB · Views: 276
 -
 20200520_111656.jpg289.4 KB · Views: 265
 -
 20200520_124654.jpg283.2 KB · Views: 267
 -
 20200520_193234.jpg251.7 KB · Views: 275
 -
 20200520_193311.jpg267.5 KB · Views: 272
 -
 20200520_193252.jpg280.4 KB · Views: 270