Reliably and accurately trimming 3mm off the front of 25 shelves

jiffff

Member
Joined
Feb 5, 2019
Messages
26
Hi,

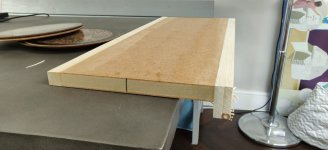
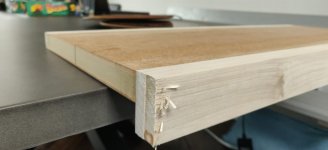
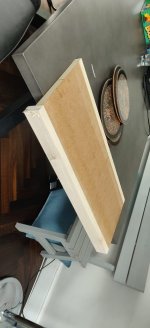
I've been building some shelves out of 25mm MDF lipped with 25mm x 50mm tulip wood. The lipping gives the front of the shelf a chunky look, so the overall construction is basically a narrow L-shape.

I'm seriously messed up and tried routing the edges to level off the lipping with the MDF. This has caused quite a bit of tear out in some of the shelves as per the pic. (The shelves are stacked back to front in the pic, so the face that each is an L-shape is hard to make out.)

I'm trying to remedy my mistake. I can't feasibly get any new materials at the moment, so starting again isn't an option - right now at least. First thought was filling, sanding, planing etc. I've had mixed advice on this, so grateful if anyone thinks this is a viable way through and can recommend any products/techniques I'd be grateful.

I've also wondered about trimming off 3mm of the face of each shelf. This would cut away the tear out and not materially change my design. My question is how???

Each shelf is 720mm x 300mm x 25mm/50mm including the lipping. I want to trim 3mm off the front face of the 50mm tulip lipping.

I have the TS55, MFT3, a long rail, 80cm rail and a ETS 150/RTS400 for potential finishing. I don't have a table saw.

The MFT isn't wide enough to use the built in cross-cut rail, but it is long enough if I was to use my separate 80cm rail. I figure if I put an additional piece of 25mm MDF alongside the lipped shelf, I will turn it from difficult L-shape, into a cuboid stable enough for cutting with a track.

My question is what jig, bench dog setup, accessory, workflow I might use to put a nice clean cut in the face of each shelf. I will need them to be consistent as it will cause each shelf to be set-back from the verticals and I want that to be consistent.

I was looking at the parallel guides, there seems to be a variant being sold in the UK by "Stantools", but I see there are a few on the market.https://www.ebay.co.uk/itm/Parallel...ith-thin-rip/373009716739?hash=item56d91c9603:g:wCAAAOSwNaBdDdek

Is this a job for a new TS55 blade? If so, what would you recommend?

Is thinking I can use the TS55 for this mad?

Any advice greatly appreciated!
 

Attachments

  • WhatsApp Image 2020-04-15 at 17.23.00.jpeg
    WhatsApp Image 2020-04-15 at 17.23.00.jpeg
    97.5 KB · Views: 646
I'm not sure it would have made a lot of difference in the tear out, but it appears to me that your router bit wasn't tightened properly. Looks like it was walking out of the collet.

Don't suppose you have a friend with a table saw you could borrow for half a hour, do you?
 
It appears as if you were routing the wood with the router vertical? The router should have been horizontal. The tear out occurred due to bit rotation.

You want to remove 3mm from the face of the 50mm tall edge? I’d have no issues using a track saw for this. Then again, I haven’t found a cut I couldn’t make with the saw range.  Clamp the shelf to the MFT, set the rail, cut away. At 50 mm you will need to do some clean up, I don’t think you’ll get the full 50 out of the 55.

How about more pictures from a further distance.

Tom
 
I'm not sure my approach had much good to say about it at all sadly.

Yes, I was routing vertical, so tear out was probably quite inevitable.

Attached is a slightly wider picture showing the shelves all clamped together. The are alternating, so the "L" shapes of shelf body and lip and a bit hard to make out. The rear or each shelf is also lipped with 25mm x 25mm tulip. As you can see, there are only a few that a very badly affected, the others I feel comfortable filling and sanding in my usual way, but a few of them take me beyond things I've filled before.

I was thinking of buying the Festool parallel clamps, then using that to reduce the shelf depth by 3mm, effectively slicing off the tear out. I was thinking of trimming 3mm off the rear of the shelves anyway as it will improve the design/aesthetics. Maybe I should just trim 3mm of the damaged shelf faces, and trim 3mm of the rear or the rest where it won't be seen.

Why don't you think I'll get 50mm depth of cut out of the TS55? I thought it had 55mm depth?

I am wondering whether I'll be able to trim these on my 800mm rail though, as I see the parallel guides, it looks like you use 50mm of cutting length off each of the rail. Might need to use my 2700mm rail or get a 1400mm.

Thanks for the help!
 
jiffff said:
I'm not sure my approach had much good to say about it at all sadly.

Yes, I was routing vertical, so tear out was probably quite inevitable.

Attached is a slightly wider picture showing the shelves all clamped together. The are alternating, so the "L" shapes of shelf body and lip and a bit hard to make out. The rear or each shelf is also lipped with 25mm x 25mm tulip. As you can see, there are only a few that a very badly affected, the others I feel comfortable filling and sanding in my usual way, but a few of them take me beyond things I've filled before.

I was thinking of buying the Festool parallel clamps, then using that to reduce the shelf depth by 3mm, effectively slicing off the tear out. I was thinking of trimming 3mm off the rear of the shelves anyway as it will improve the design/aesthetics. Maybe I should just trim 3mm of the damaged shelf faces, and trim 3mm of the rear or the rest where it won't be seen.

Why don't you think I'll get 50mm depth of cut out of the TS55? I thought it had 55mm depth?

I am wondering whether I'll be able to trim these on my 800mm rail though, as I see the parallel guides, it looks like you use 50mm of cutting length off each of the rail. Might need to use my 2700mm rail or get a 1400mm.

Thanks for the help!

I’ll address the 50mm depth first——I’m in the United States, to me 50mm equates to 2", the 55 on the rail cuts 1-15/16".

I’m attaching a video to show how I would set the rail (starts at the 45 second mark). You don’t need parallel guides for this assuming the nose is straight. 


I do not see the overall length of the shelf. You’ll have to make sure the 800 will work at full plunge. I recommend clamping the rail if you have to do a "partial" plunge cut at the start.

What you trim off the rear is a design decision. Your call......

Tom
 
Ah, yes - I hadn't accounted for the rail. Looks like I might be 1mm shy of the thickness I'd need.

Are there any merits in doing say a 2mm score cut, turning the material and then a full depth cut? I'm tempted to but the parallel guides, I would use them for other things and I think I'd get better reputability. The length of the cut will be 725mm, so I think I'll need something longer than the 800mm rail if I use the guides.

Thanks again.
 
I can't figure out what the picture is showing.

Is this a solid wood edge running along the front edge of the shelf? If so how did you end up routing end grain?

Or maybe I don't know what lipping is.

Seth
 
I routed end-grain because I'm inexperienced and wasn't thinking about what I had learned :/

The picture shows a load of shelves, each made our of 25mm MDF, lipped with 25x25mm tulip at one end and 25x50mm tulip at the other. Each self is therefore an "L" shape. They are arranged so that they interlock into a solid block, with the shelf edges facing the ceiling and the shelf faces (of tulip) facing the front.

There was some uneveness in the glue-up between the tulip lengths, so I was trying to use m router to level off by clamping all the shelves together and routing across the end-grain. Disaster I know.

Thanks
 
Actually, it doesn't have to be a disaster, you just should have used the side of the bit instead of the end of the bit.
 
You could hang the shelf over the edge of your bench and trim off 3 mm x maybe 10 mm deep with your tracksaw (you don't need parallel guides, just use adjustable square set at 3mm off edge of lipping back to rail). You could then use a flush trimming router bit working off the cut you made to take the rest off the front of the lipping, do it in a few steps, dropping it down between if you need. You could do the same without the tracksaw, just start off working against an MDF straightedge set 3 mm back from the edge of the lipping.

Easiest way would be to just pass them over the top of a planer (jointer).
 
Ouch! Will your design allow a radius on the ends of the shelves? If you rout a bead and then sand the face you might be able to get rid of the tearout and call it a feature?

Good Luck - Mike
 
Thanks all.

Mike - I'm afraid not. It would be a bit too much of a 'feature' I think!

Doug - For your suggestion of making the 3 x 10mm cut using the "adjustable square" - which one do you mean? For the flush trim router, you mean I'd use a flush trim bit with a guide wheel at the top of the bit? Might have to order one of those I think!
 
jiffff said:
Doug - For your suggestion of making the 3 x 10mm cut using the "adjustable square" - which one do you mean? For the flush trim router, you mean I'd use a flush trim bit with a guide wheel at the top of the bit? Might have to order one of those I think!

I guess I should have used the proper name, a combination square, it was just to set the rail back the same distance at each end of the lipping (or the straight edge for you to run the flush trim bit against if you don't first make a cut with the tracksaw).

And yes a flush trim bit with guide wheel at the top, I saw you asked about this on UK Workshop so you will probably know Wealden Tools is the place for router cutters  [wink]
 
Thanks - yes I have ordered from Wealdon before, but looking at the flush bits with top guide wheels there are so many.

Is there any particular one you would suggest? And what size?https://www.wealdentool.com/acatalog/Trimmers_7.html

I'm presuming my 1400 will be the best for the job in doing this? I have access to a friend's Makita 1/4 trim router too.

Appreciate the help and advice.
 
I've I understand correctly, you need to remove 3mm from a piece that is 700mm long and 50mm deep? IIRC this falls just within the depth capacity of the ts55. I'd remove the fence from the mft3 and use dogs and a spacer block to get the cut line where you want it. The guide rail support brackets on the mft3 are like 800mm apart so your shelf should fit with the fence removed.
 
SRSemenza said:
I can't figure out what the picture is showing.

Is this a solid wood edge running along the front edge of the shelf? If so how did you end up routing end grain?

Or maybe I don't know what lipping is.

Seth

Seth, I'm glad I'm not alone!
 
Jim Kirkpatrick said:
SRSemenza said:
I can't figure out what the picture is showing.

Is this a solid wood edge running along the front edge of the shelf? If so how did you end up routing end grain?

Or maybe I don't know what lipping is.

Seth

Seth, I'm glad I'm not alone!

Same here. Can’t make heads or tails of that photo.

[member=69877]jiffff[/member]  how about a photo of a single shelf by itself right side up?
 
Thanks. I've just tried setting up - it looks like the TS55 will cut all the way through the front of the shelf, even when mounted on the rail. Might be the easiest option?

I've attached a few more pictures of a single shelf.
 

Attachments

  • WhatsApp Image 2020-04-16 at 18.17.49 (2).jpeg
    WhatsApp Image 2020-04-16 at 18.17.49 (2).jpeg
    99.4 KB · Views: 418
  • WhatsApp Image 2020-04-16 at 18.17.49 (1).jpeg
    WhatsApp Image 2020-04-16 at 18.17.49 (1).jpeg
    68.5 KB · Views: 457
  • WhatsApp Image 2020-04-16 at 18.17.49.jpeg
    WhatsApp Image 2020-04-16 at 18.17.49.jpeg
    93.8 KB · Views: 407
Doug - Thanks very much :) Will give it a try tomorrow with the tracksaw and see what clean-up might still be needed.
 
Back
Top