Removing/boring out a snapped screw from hard maple

ear3

Member
Joined
Jul 24, 2014
Messages
4,341
I'm repurposing some of the offcuts from my maple slab, and with one of them, while I was putting in it a 1 1/4" Spax screw, I forgot to engage the torque setting on my T18 and snapped the head off, leaving the entire length of the screw embedded and inaccessible in the wood.

It's not a disaster from a visual standpoint, as the screw was not going to be visible, but I've since decided that I wanted to do something else with the piece that would involve passing a router directly over where the screw is stuck.  I've had to remove screws before whose heads were stripped, but never the decapitated shaft of an embedded screw.  I'm not worried about leaving a gaping hole in the piece (it won't be visible), just as long as it's only on one side -- so is the best method just to bore out the screw with a larger diameter drill bit?  Any other solutions that don't involve sacrificing a drill bit?   
 
Use a plug cutting bit to bore a hole around it.
Go as deep as the bit will allow- which won't be full depth. Remove the maple from around the threads with a narrow chisel or the like. Then extract the screw (the base of which will still be screwed into the maple) with needle nose pliers. Reach down into the hole created with the plug cutting bit and get a purchase on the shank with the pliers and slowly turn it out counterclockwise.
As a last step, you can cut a maple plug for the hole and glue it in. If you pay attention to grain orientation it will blend in pretty well.
 
Good idea.  I know I have some plug cutters lying around somewhere.  Now just have to find them...

Daver said:
Use a plug cutting bit to bore a hole around it.
Go as deep as the bit will allow- which won't be full depth. Remove the maple from around the threads with a narrow chisel or the like. Then extract the screw (the base of which will still be screwed into the maple) with needle nose pliers. Reach down into the hole created with the plug cutting bit and get a purchase on the shank with the pliers and slowly turn it out counterclockwise.
As a last step, you can cut a maple plug for the hole and glue it in. If you pay attention to grain orientation it will blend in pretty well.
 
What Daver said, if you can grab the screw with the jaws of the drill chuck and spin it out. Works amazingly well if you can grab the screw. You may have to back it out with pliers or such at first, eventually you'll be able to grab the screw with the jaws.

Tom
 
Edward A Reno III said:
Good idea.  I know I have some plug cutters lying around somewhere.  Now just have to find them...

If you don't find yours, I know they stock them at HD. Bought a set of 4 for cheap at the 23rd st. store in the city and they've held up well.

Dave
 
Mole grips have always worked for me before, less "slippage". The plug cutter idea was novel though, I'll remember that.
 
Wuffles said:
Mole grips have always worked for me before, less "slippage". The plug cutter idea was novel though, I'll remember that.

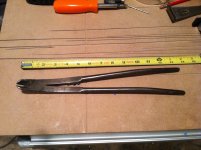
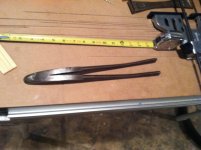
For brads, finish nails, and other metal remains (non-threaded) I have a pair of cobbler's pliers. Made in the 1940s and found on eBay, they have very long handles paired with very short, precise jaws. Tremendous leverage and holding power due to the layout. Just the ticket when only a nub is accessible and you don't want to mar the surface.

Dave
 
Daver said:
For brads, finish nails, and other metal remains (non-threaded) I have a pair of cobbler's pliers. Made in the 1940s and found on eBay, they have very long handles paired with very short, precise jaws. Tremendous leverage and holding power due to the layout. Just the ticket when only a nub is accessible and you don't want to mar the surface.

Dave

I use short head vice grips for this. Slip a putty knife between the vice grip and the workpiece and you are off to the races!

I also like the plug cutter idea. I am going to need that one day!

Cheers. Bryan.
 
I apologize to Edward if this is a thread jack.

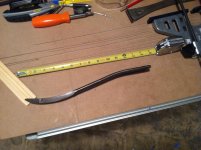
If you can find cobbler's pliers of this style, they're well worth having on hand (particularly for restoration work). I don't think this model has been made in many years but they occasionally pop up online.

The plier is 13 1/2" long. Tip of jaw to fulcrum point is 1 1/2", handle is 12". Ratio of distances (tip to fulcrum vs. handle end to fulcrum) is 8 to 1. This compares to a normal plier where you may be at 2 or 3 to 1 depending on style.
The profile of the plier is in the form of a lever. The underside of the jaws are rounded and effectively transfer the pulling force safely to the wood surface so as to be 'no mar'.

Cheers,
Dave

[attachthumb=1][attachthumb=3]
 

Attachments

  • cobbler 1.JPG
    cobbler 1.JPG
    2.4 MB · Views: 255
  • cobbler 3.JPG
    cobbler 3.JPG
    835.6 KB · Views: 280
  • cobbler 2.JPG
    cobbler 2.JPG
    802.6 KB · Views: 188
Back
Top