ear3
Member
- Joined
- Jul 24, 2014
- Messages
- 4,341
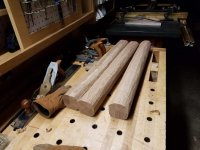
Had to make 4 equally sized, cylindrical table legs for an elm dining room table I'm building, so I thought I'd share the jig I came up with for my lathe.
My turning skills are pretty decent at this point, so I wasn't necessarily intimidated by the prospect of turning 4 identical cylinders by hand. What I was really worried about, though, was getting square ends to secure the table leg hardware, and the danger that any slight tapering that could result from hand turning might skew the cuts even slightly out of square when I trimmed the legs to length.
So I looked into building a jig that would allow me to make the cylinders just with a router. There are a number of versions floating around on the internet, like this one from the woodworkers guild of america:
https://www.wwgoa.com/video/how-to-turn-a-cylinder-with-a-router-000274/
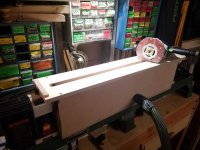
But as I was thinking about it, I realized I could just utilize the center channel and build the jig directly on the lathe bed.
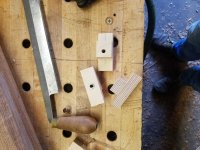
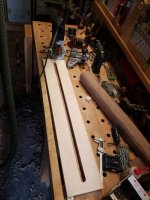
So I constructed a plywood box -- 7" on the bottom and 7.5" on the sides, and manufactured these plywood brackets, drilled through with a 1/4-20 threaded insert. The box was then secured to the bed with 1/4-20 screws, with the brackets providing the necessary gripping power once they were turned perpendicular to the channel:
View attachment 1
View attachment 2
View attachment 5
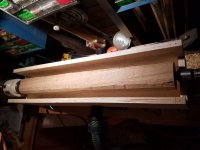
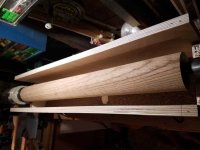
I then routed a center channel in the top of the jig using the edge guide, so I could run the router with a template guide and 1/2" spiral bit and not worry about hitting the chuck on the head stock.
View attachment 3
I knocked off the corners of the laminated legs so I wouldn't have as much routing to do, and also so that I could keep the box height relatively close to the final diameter:
View attachment 6
View attachment 7
View attachment 4
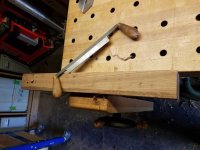
Cut out a hole in the front of the jig for a hose from my CT, and cut some scrap to close off the ends to facilitate slightly better dust collection. Also pinned a stop on the end near the headstock. The top was secured with screws so I could easily take it off and on when doing the legs.
View attachment 8
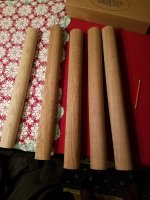
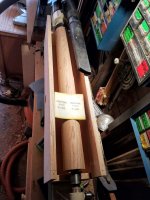
Results were fantastic. Using the spiral bit gave a nice finish that has required only minimal sanding:
View attachment 9
View attachment 10
An unexpected advantage of the box is that I can sand the pieces and suck up most of the dust while following my right hand holding the sandpaper with a hose in my left:
View attachment 11
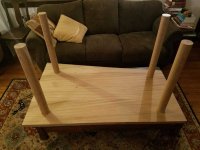
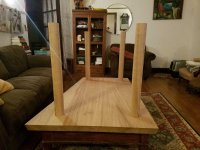
I'm now ready to install he hardware to secure the legs to the table:
View attachment 12
View attachment 13
My turning skills are pretty decent at this point, so I wasn't necessarily intimidated by the prospect of turning 4 identical cylinders by hand. What I was really worried about, though, was getting square ends to secure the table leg hardware, and the danger that any slight tapering that could result from hand turning might skew the cuts even slightly out of square when I trimmed the legs to length.
So I looked into building a jig that would allow me to make the cylinders just with a router. There are a number of versions floating around on the internet, like this one from the woodworkers guild of america:
https://www.wwgoa.com/video/how-to-turn-a-cylinder-with-a-router-000274/
But as I was thinking about it, I realized I could just utilize the center channel and build the jig directly on the lathe bed.
So I constructed a plywood box -- 7" on the bottom and 7.5" on the sides, and manufactured these plywood brackets, drilled through with a 1/4-20 threaded insert. The box was then secured to the bed with 1/4-20 screws, with the brackets providing the necessary gripping power once they were turned perpendicular to the channel:
View attachment 1
View attachment 2
View attachment 5
I then routed a center channel in the top of the jig using the edge guide, so I could run the router with a template guide and 1/2" spiral bit and not worry about hitting the chuck on the head stock.
View attachment 3
I knocked off the corners of the laminated legs so I wouldn't have as much routing to do, and also so that I could keep the box height relatively close to the final diameter:
View attachment 6
View attachment 7
View attachment 4
Cut out a hole in the front of the jig for a hose from my CT, and cut some scrap to close off the ends to facilitate slightly better dust collection. Also pinned a stop on the end near the headstock. The top was secured with screws so I could easily take it off and on when doing the legs.
View attachment 8
Results were fantastic. Using the spiral bit gave a nice finish that has required only minimal sanding:
View attachment 9
View attachment 10
An unexpected advantage of the box is that I can sand the pieces and suck up most of the dust while following my right hand holding the sandpaper with a hose in my left:
View attachment 11
I'm now ready to install he hardware to secure the legs to the table:
View attachment 12
View attachment 13
Attachments
-
 20190126_140852.jpg95.9 KB · Views: 412
 -
 20190126_143803.jpg81.5 KB · Views: 417
 -
 20190126_152451.jpg221.4 KB · Views: 401
 -
 20190126_174301.jpg73.4 KB · Views: 378
 -
 20190126_144651.jpg192.7 KB · Views: 547
 -
 20190125_112921.jpg81.3 KB · Views: 368
 -
 20190125_193445.jpg79.8 KB · Views: 337
 -
 20190126_171752.jpg92.4 KB · Views: 437
 -
 20190126_172647.jpg71.8 KB · Views: 377
 -
 20190126_185558.jpg234.1 KB · Views: 317
 -
 20190127_121139.jpg82.7 KB · Views: 404
 -
 20190126_204207.jpg73.7 KB · Views: 341
 -
 20190126_204225.jpg79.5 KB · Views: 346