Repeatable/sustainable narrow stock jig?

mattbyington

Member
Joined
Mar 11, 2018
Messages
796
Hey team! Hope you're all doing well!

As a result of this thread from a week or two ago:http://festoolownersgroup.com/festool-tools-accessories/how-to-cut-narrow-stock-on-mft3/

I built myself a jig as we discussed (thanks everyone for the input!)

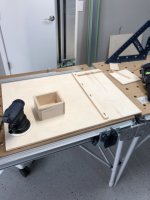
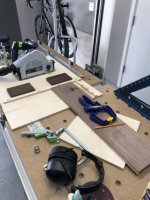
The jig works pretty well. One of the things I did, is for the left hand guide that the stock butts up against, I used the domino along the guide rail so I knew that it was perfectly 90 degrees to the fence (I did this of course after putting a straight cut against the fence).

That got me thinking - one of the issues I am having (see pictures) is that after a handful of cuts of just a few different widths, the top rail that the piece pushes against gets really cut up and starts to deteriorate quickly.

The jig works well but I fear it won't last much longer at least not accurately. How do people solve this?

I am wondering if I use dominos but no glue, I could make the top section removable and replaceable with any straight piece of wood?

Thoughts? Cheers!

Matt

[attachimg=1][attachimg=2]
 

Attachments

  • IMG_0850.jpeg
    IMG_0850.jpeg
    1 MB · Views: 517
  • IMG_0853.jpeg
    IMG_0853.jpeg
    1.3 MB · Views: 520
mattbyington said:
... one of the issues I am having (see pictures) is that after a handful of cuts of just a few different widths, the top rail that the piece pushes against gets really cut up and starts to deteriorate quickly.

The jig works well but I fear it won't last much longer at least not accurately. How do people solve this?

I am wondering if I use dominos but no glue, I could make the top section removable and replaceable with any straight piece of wood?

I've made a different fence with replaceable inserts, so what I use won't help. Yet, couldn't you simply place a new front fence in front of the cut up fence you have already installed? Maybe some double stick tape if it doesn't want to stay in place.

Then again, you might elect to cut a dado in the base to accept a replaceable front fence. You could cut the dado as wide as the thickness of the material you use for the front fence -- that way you can cut different width pieces from the stock to make different height fences as needed.

If you are using this setup just for narrow cuts, then you may not need your front fence. But, I can see where your front fence is useful for smaller pieces.
 
Thanks [member=182]Corwin[/member] appreciate it!

Yeah that's what I was thinking. I'll have to stick with the domino method for now (I don't own a router yet...), I have been trying to be creative with just the TS 55 for cutting.

Although I guess actually I could make a dado w/ the track saw.

In any case, thanks for all your inspiration - really helped!
 
Don't really need a dado. You could simply place a front fence between the jig's base and the MFT's fence. And, instead of the MFT's stock fence, replace with a narrow (could be around 2" or so) strip of material the thickness of your jig's base (or less) that runs the length of your MFT. My fence is built off of such a piece that spans beyond the length of my MFT -- it runs under the guide rail and provides support behind the replaceable insert.
 
Do you really need the top fence? If your left fence is square, I would simply rely on that reference and make the cut. Another option would be to have your top fence adjustable left / right but yet it will not be very accurate.

If you really want to keep the top fence to quickly set your board in place, make it a few inches long. Just enough to get the board square with your jig.
 
Corwin said:
Don't really need a dado. You could simply place a front fence between the jig's base and the MFT's fence. And, instead of the MFT's stock fence, replace with a narrow (could be around 2" or so) strip of material the thickness of your jig's base (or less) that runs the length of your MFT. My fence is built off of such a piece that spans beyond the length of my MFT -- it runs under the guide rail and provides support behind the replaceable insert.

Moving your "top" fence off the jig and instead mount it to the table (like I describe above or you see in my YouTube animation) has the advantage that the kerf cut into the fence provides a reference to where your cut will be. So, when using for small parts, you can simply mark the first part, place on the jig and then position the jig along the fence to where the mark aligns with the edge of the kerf. Simple, and a pleasure to use. And you won't have the need to replace the fence very often, as you have with a "top" fence mounted on the jig.

Anyway, glad to see your jig and I'm sure you will figure out a way to get the best use out of it.  [big grin]
 
[member=66597]Mario Turcot[/member] and [member=182]Corwin[/member] thanks so much! That makes perfect sense.

I also have in my head some crazy world where I re-make the jig out of 3/8 ply instead of 1/2, and have a replaceable sheet to the right of the left fence that's 1/4 thick so as the bottom gets cut up, I can just replace it and not re-make the jig.

For some reason I'm thinking about the whole sustainability thing.

i Think I just need to put the music back on, cut and stop worrying, and remake it if I need to. It's so fast to make anyways.

Thanks so much for all the input!
 
mattbyington said:
I also have in my head some crazy world where I re-make the jig out of 3/8 ply instead of 1/2, and have a replaceable sheet to the right of the left fence that's 1/4 thick so as the bottom gets cut up, I can just replace it and not re-make the jig.

You would also need a 1/4" sheet to the left of the fence in order to make the jig useful for cutting material that is narrower than the guide rail -- you know, placing same-thickness material on either side of the fence to fully support the guide rail.... I just don't think this replaceable sheet is worth it.
 
[member=182]Corwin[/member] makes perfect sense. you're right. thanks again! off to the shop to tinker...
 
Back
Top