Request for advice table build

Bertotti

Member
Joined
Oct 18, 2020
Messages
384
I am finally starting my table build. I have Cherry ruff sawn some live edge slightly thicker than 8/4 and 4/4. My goal is a new dining room table. I hope to do a spin on a trestle table but my first question is about the top. I was going to glue up some Cherry like a butcher block top but have since wondered if maybe that is a good idea. My 8/4 planks vary in width from 6" to just over 10" in width. Just glue them up but should I use a spline or some other method of alignment? I have never worked pieces this thick. I will use some c channels on the bottom with slots to allow some movement. But other than that what other considerations should I make? I know it will be a heavy beast, and that is my intention. The style I hope to be similar to an RPG guild hall table, if any of you are gamers, with a very large inlay on top. Tools at my disposal are a small contractors table saw, Jet 14" band saw, TS55, OF1400, Powermatic 6" jointer and 14" planer helical heads, Shaper Origin and various hand planes finger-sized up to long jointer hand planes, a RO90 and 150, and other assorted hand tools you would expect from someone doing woodworking for 50 years or so. All the fancy stuff is new in the last few years, before that it was all hand tools. I thought of adding a ts75 for this project because of the cutting depth but I do have a long compression bit the OF1400 that should be able to spin but I wonder about deflection in it. Any thoughts or considerations I should make that I have missed would be greatly appreciated. Thanks!

I would rather not buy a new tool, but, if the consensus is the larger TS is a better way to cut rather than use the TS55 and the OF with the compression bit, I will give it some consideration. I want this to be a one-and-done project. No redo's or covering up mistakes. My goal is to be as close to perfect as I can on the first try. Thanks again!
 
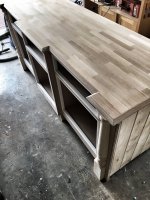
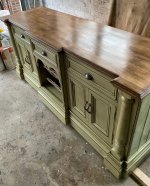
So just to be clear - are you thinking about a top made from 8/4 like this? Plus - how wide and how long?

[attachimg=1]
[attachimg=2]
 

Attachments

  • 4463CBF8-605E-4884-A64B-C1192344E0E9.jpeg
    4463CBF8-605E-4884-A64B-C1192344E0E9.jpeg
    666.9 KB · Views: 285
  • 4E409197-1A73-42FF-B0B0-7CDAFE694926.jpeg
    4E409197-1A73-42FF-B0B0-7CDAFE694926.jpeg
    568.6 KB · Views: 285
That was my original concept but I later decided to use varying width planks. All the wood was kiln dried to 7% but has set in my house now for over a year. My average humidity is about 35% it swings from high teens in the winter to 50 in my house in the summer for a few weeks to a month.

I will be using planks now of 8/4 or 4/4, would prefer 8/4, widths will vary from 6" to 14" in width or I can rip them all the same width. I'm ok with that. I just thought the varying widths might fit my old world guild hall concept a bit better. My overall dimensions are not cast in stone the room it will go can handle up to an 8' long 5" wide table with room to spare around it. I am thinking the final dimensions will be 40x78.

I have never worked with lumber this big except in framing buildings. I have never attempted indoor furniture with lumber this big. I want to make sure I am not overlooking anything. I'm confident the lumber is stable but understand cupping bowing twisting and windage can occur when least desired. I may or may not leave a live edge on the outside of the long sides. I have no intention of covering the end grain, I like the look without and it will be my table not one for sale. Thanks again!

Oh, I also intend to over the tenons with brass so I can make a nice knock-down table and use wedges to hold it together. Brass or bronze just because, no other reason than the look I have in my head.
 
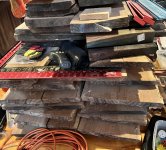
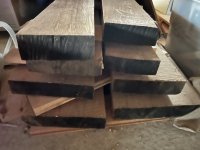
The big pile is the end of the 4/4 pile some checking and cupping on some boards but the stuff I want to use is the second picture of the smaller thicker 8/4 pile. It is 100bdft each board is about 10' long.

[attachimg=1][attachimg=2]
 

Attachments

  • IMG_6069.jpeg
    IMG_6069.jpeg
    1.3 MB · Views: 275
  • IMG_6070.jpeg
    IMG_6070.jpeg
    1.3 MB · Views: 273
Thanks for the pics - very helpful. That 8/4 will make a fabulous top for sure. So ........

1 Don't have any fears about working with thicker material. If anything - it's way easier to work with, because you have much bigger contact surfaces for joints, plus thicker material is way more resistant to subsequent movement. Look at what's already happened to your 4/4 by comparison. Yeah it's heavy to move around, but 40 x 78 (1016mm x 1981mm) shouldn't be difficult. It's certainly not into forklift territory for sure. There's no need to rip the boards down apart from generating straight edges for jointing - and by the time the material is planed, a TS55 should go through it just fine. If not - finish the cut using a fine handsaw. Use a proper ripping blade such as the 12-tooth Panther. And I agree that various different board widths are the coolest-looking way to go. Tools-wise - you have everything you need, apart from 48-inch sash clamps which you didn't mention. You're going to need at least 5 of them. And it maybe sounds stupid - but I'm guessing you have rails for your TS55.

2 There are four golden keys to success for making a top like this;

a) The lumber must be planed on its faces to exactly the same thickness
b) The edges must be planed dead square and dead flat
c) You must use cawls during clamp-up (see below)
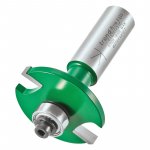
d) And you're right - board alignment is critical unless you're fortunate enough to have access to a $30k planer/jointer/thicknesser which will flatten the top after it's all fixed together. Given the skill and experience you obviously have - the easiest way to align your boards during glue-up is to buy a bearing-guided biscuit/spline-jointing bit for your OF1400, like this;

[attachimg=1]

The advantage with this method is that the cutter will be perfectly-sized to cut snug slots for standard no.20 beech biscuits, saving you the time and hassle of machining grooves and cutting your own splines. These don't add any strength to the joint (that's what the glue's there for) - but they do a really good job at aligning the board faces to within a whisker. I'd suggest biscuits every foot or so - and I'd also suggest two biscuits per location for 8/4 - spaced so that you're splitting the thickness of the board into thirds. Set the plunge depth to cut the first slot a third of the way down the thickness, then flip the board over and repeat from the opposite face. When routing, you can just cut out slots which are a little wider than the width of the biscuit - some sideways movement of the biscuit in the slot is perfectly OK.

All you need to do then is flood your slots with glue, insert the biscuits, spead a heavy layer of glue on the edge faces of each adjacent board, and knock them together using either a rubber or wooden mallet until the two glued faces are in contact with each other. I'd suggest a glue with a fairly long open time - something like Titebond II is ideal. Continue this process until all of your boards are jointed together - then clamp up tightly and wipe off any squeeze-out with a damp cloth. Once your boards have been pulled into close contact and all the biscuits are pulled tightly into their slots, temporarily back off the clamps by 1/4".

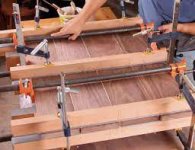
Now here's where cawls are important. They're just blocks of material which are clamped across opposite faces of the top to ensure it stays flat when you reapply pressure using the main clamps. Even if you use clamps on both faces of the top to try and even the pressure out, it's so, so easy to end up with a top having a distinct curve it it. Cawls fix that;

[attachimg=2]

This guy over-complicates it a bit with his planed tapers, but explains it pretty well. Plenty of other cawl videos on YT;


Cawls also come in very useful during the knock-together process - if one of your boards has a slight warp in it and its biscuits won't engage, you can use a set of cawls to temporarily pull the two halves of your joint into line so that the biscuits engage in their slots. I'd suggest that you use 4 sets for a 78" top - one set at either end, plus two more evenly spread across the top's length. Place them in position, clamp up tightly, re-tighten your main clamps, then go around again and get every clamp as tight as you can. Wait 24 hours, remove your clamps, stand back and admire your new top.

I hope that helps.


Attachments

  • 98173-1.jpg
    98173-1.jpg
    120.3 KB · Views: 262
  • cawl.jpg
    cawl.jpg
    9.3 KB · Views: 259
Yes sir that helps! Thanks! I have been planning on building a clamping tablet at about a 60-degree angle. Maybe it's time to do so.
I do love that top you posted a picture of. The 4/4 is going to be used for kitchen shelves and cabinets. I got a good deal on it and am sick and tired of these expensive cabinets from cabinet shops using all sorts of pressboard and or particle board where you can't see it or using a very veneer over garbage to make it look good. My kitchen will be solid after I'm through with it! I will look into a biscuit bit for the router. I have a porter cable biscuit joiner but it leaves the slots too loose and there is still a lot of play so it doesn't line the surfaces up very well. I might try to make my own dominos and rout that in. I should be able to knock together a jig with the Shaper Origin to do this on the boards edges.
 
[member=74149]Bertotti[/member] you're most welcome - hope the build goes OK.

Oh - and remember this is the FOG. Pictures, or it didn't happen .......
 
I ran into my equipment store and got a bit to use to make domino-shaped holes and tenons I can cut off and use as homemade biscuits. I think I can get a better fit this way.
 
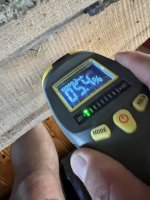
[member=74149]Bertotti[/member] Might want to see about a checking your wood with a moisture meter to see what it reads. Last time a listened to the "yeah we pull them at 7%" speech I was away on a weekend trip with my wife and didn't have my meter. The folks seemed to know what they were doing and said all the right stuff. Metered at 19% when I got home  [eek]

It's still hanging out in my wood rack to see if it will come down to a useable level sometime in the next year.

Ron
 
The picture[attachimg=1] is a bit blurry the meter drops to 5% then goes blank. I used pin more but I question if I am using it correctly sometimes.
 

Attachments

  • IMG_6072.jpeg
    IMG_6072.jpeg
    811.9 KB · Views: 185
Don't get too hung up on moisture levels. Surface meter readings are largely meaningless, since you're only measuring the level on the outer face which has been in contact with the air since it was first sawn - and will therefore be way drier anyway. You already said that the cherry was kiln-dried and that it's then been around indoors for a good while. The cracking and splitting on your 4/4 pictures says it all. It's dry enough, trust me.

I've built 100+ tops, plus around 3x that number of doors & gates using infills built using the same method as described above. As long as you're below 10-12% in the centre (which you 99% will be, given what you've said), you'll be fine. I also build a lot of traditional, pegged frames and canopies from green oak which is up near the 60-70% level. They're good for 10 years before there's the slightest hint of movement. The key to avoid problems on dried stock is to ensure that your finished top is oiled/finished/waxed equally on all faces, and that any endgrain is totally sealed. The most common cause of movement is one face absorbing more moisture than the other face, causing the entire top to cup along its length.

It's a natural material. It's gonna expand, contract and move a tiny bit no matter what you do. So just chill, quit worrying, be happy, and enjoy the ride.
 
Yea, I'm not too worried but I did have part of my house take on some water several times over the last 6 weeks. We've had really bad weather and tornadoes. House hit 60% for a day or two until the dehumidifier caught up. I had to go buy one because it has been so dry in my house I haven't had to replace one that went bad. I'm looking forward to getting started!
 
Back
Top