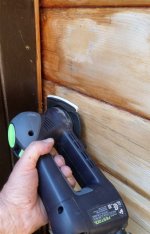
Restoring the Exterior of a Cedar Cabin Using Three Festool Sanders

Michael, I am thinking of getting exactly those ear protectors with built-in radio.

I have a genertor (Honda) for electricity.  It is only used with tools.  In the future (next year?) , I plan to experiment with solar and wind power.
 
2008:

I am happy ;D to be able to report that I have now completed the fourth and final side of the cabin.  I spent the bulk of the summer at Pellow's Camp but so many other things were going on that I only completed the task three days ago.

It was the turn of the south side to be finished this year.  This is the side that gets the most weather wear and so the one that was in the worst shape.  Here are two before photos:

[attachimg=#1]      [attachimg=#2]    

Early this year, I found a much better scraper made by Bacho in Sweden, so I am doing very much more scraping before sanding than I did on the other three sides:

 [attachimg=#5]  

Notice that I also acquired something much better to stand upon than me precarious footing   :-[ of prior years.

There were dome spot that were two small for any of my Festool sanders and I had to resort to a Dremel:

 [attachimg=#3]  

Here is a photo of the the completed job:

 [attachimg=#4]  

The combined scraping and sanding took a little longer than the other three sides.  Each of them took 19 hours. I sraped the south wall for 7.5 hours and sanded it for 14 hours -thus totalling 21.5 hours this time.

I ran out of time to finish the two cabinets (and they stand out like sore thumbs  :(
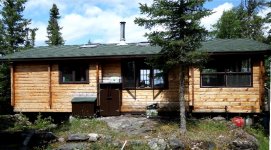
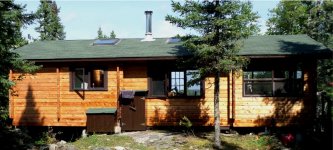
).   Next year I will paint them both brown.

Also, next year I plan to lightly sand the north side and give it a "refresher" coat.  But that job should only take about half a day.
 
Great work Frank.    I hope you do some fishing around there (I would  ;))  --- but I wouldn't know where to start without muddy water, lily pads and bayous  :D ---- beautiful place you have there.

Justin
 
Thanks Justin.  Yes we do some fishing.  For instance, here is my brother-in-law Jeff Barker with a pike that he caught (then let go) a couple of weeks ago.

[attachimg=#1]

The pike was exactly one metre long.
 
Man oh man! ----- Frank , I'll be using your place for my next mid-day fishing daydream if you don't mind.  (Leave the Festools out, I'll give them a whirl also  ;)).  Thanks for the pics.

Justin
 
I sit here in shocked awe :o
Your endurance levels are amazing - just thinking about the hours of work involved just leaves me stunned
I've got a job of sanding down a piddley little 8x4 shed (!) which I steadfastly put off month after month in the hope that my wife will eventually relinquish, and let me rip it down.
I will never show these photos to my wife - I couldn't bear the comments that would be heaped upon me :)
Because of you I now live in fear ;D ;D ;D

 
Eastbourne Handyman said:
I sit here in shocked awe :o
Your endurance levels are amazing - just thinking about the hours of work involved just leaves me stunned
I've got a job of sanding down a piddley little 8x4 shed (!) which I steadfastly put off month after month in the hope that my wife will eventually relinquish, and let me rip it down.
I will never show these photos to my wife - I couldn't bear the comments that would be heaped upon me :)
Because of you I now live in fear ;D ;D ;D
I also restore sheds.  [smile]  Here is a shed that I fixed up at my daughter Kathleen's place 5 years ago:

Before:

[attachimg=#2]

During:

[attachimg=#1]

After:

[attachimg=#3]

 
Frank Pellow said:
Eastbourne Handyman said:
I sit here in shocked awe :o
Your endurance levels are amazing - just thinking about the hours of work involved just leaves me stunned
I've got a job of sanding down a piddley little 8x4 shed (!) which I steadfastly put off month after month in the hope that my wife will eventually relinquish, and let me rip it down.
I will never show these photos to my wife - I couldn't bear the comments that would be heaped upon me :)
Because of you I now live in fear ;D ;D ;D
I also restore sheds.  [smile]  Here is a shed that I fixed up at my daughter Kathleen's place 5 years ago:

Before:

[attachimg=#2]

During:

[attachimg=#1]

After:

[attachimg=#3]

For the rough sanding and finish removal, what do you use?  I assume a rotex but what abrasive and grits to you like the best?  I have only had a rotex for a few months and I'm still getting used to it.

 
Hoover said:
For the rough sanding and finish removal, what do you use?  I assume a rotex but what abrasive and grits to you like the best?  I have only had a rotex for a few months and I'm still getting used to it.
I describe the sanders and sandpapers that I used in detail in the first post in this thread.
 
Frank Pellow said:
Hoover said:
For the rough sanding and finish removal, what do you use?  I assume a rotex but what abrasive and grits to you like the best?  I have only had a rotex for a few months and I'm still getting used to it.
I describe the sanders and sandpapers that I used in detail in the first post in this thread.

Thanks.  Where the thread is older, I just skimmed the various posts and did not notice the abrasive choices, etc.

How do you find the Saphire paper vs. Cristal.  I have not used the Saphire but used some agressive grit Cristal and although it performed well, it didn't last as long as I expected.  I think I might pick up some Saphire for the rough material removal.

 
Hoover said:
...

How do you find the Saphire paper vs. Cristal.  I have not used the Saphire but used some agressive grit Cristal and although it performed well, it didn't last as long as I expected.  I think I might pick up some Saphire for the rough material removal.
I find that the Saphire lasts much longer than Cristal, particularly when subjected to rough use.  I could be wrong but, it appears to me that the Saphire is cloth backed whereas Cristal is paper-backed.
 
Frank Pellow said:
I find that the Saphire lasts much longer than Cristal, particularly when subjected to rough use.  I could be wrong but, it appears to me that the Saphire is cloth backed whereas Cristal is paper-backed.

The Festool Abrasives Brochure is a good source of information about the composition of the various abrasives that Festool make available.

Cristal:
Grit: aluminum oxide
Bonding: phenolic resin
Impregnation: special bonding agent
Backing: b-wt, c-wt paper
Grit range: P24 - P120
Grit coating: open coated
Bonding level: open leveled

Saphir:
Grit: aluminum oxide
Bonding: synthetic resin
Backing: Fabric reinforced
Grit range: P24 - P120
Grit coating: semi-closed coated
Bonding level: closed leveled

About the various types of backing, it says:

Backing Material
Festool has different backings to match a broad
range of applications, from rapid material removal
to superior surface quality. Backing materials are:

Paper
Festool uses only top-grade paper of varying
weights to assure high tear resistance, durability
and superior surface quality. Using only high quality
materials assures the best and most reliable
work results; this saves you time and money. The
different paper weights we use are:
b-wt - 115 g/m2
c-wt - 130 g/m2 -
d-wt - 165 g/m2
e-wt - 185 g/m2

Fabric
Festool uses a special x-type woven fabric which
ensures its abrasives are long-lasting when used
under tough conditions and on uneven surfaces.
The fiber increases strength and prevents the
abrasive from tearing at the edges. This backing is
excellent for heavy duty jobs and results in a very
long operational life and considerable cost savings.

Fiber
Festool uses a special elastic fiber mat. This mat
is embedded with abrasive particles. Festool?s
name for this abrasive mat is Vlies. With Vlies, it?s
easier to achieve consistent results on complicated
contours.

Foam and fiber
A foam backing compensates for uneven pressure
to protect the surface and allow you to
achieve perfect results. Foam and fiber works
great on transitions, too. The foam efficiently
adapts to the work piece contour. This produces
reliable work results and high surface qualities.
The special velour on top of the foam assures the
best grit bonding and prevents the edges from
tearing. Like the foam, it is air permeable and
open pored. It extracts almost 100% of the particulate
through the backing and ensures a clear view
of the work piece. You will achieve better, more
reliable work results and less reworking.

Forrest

 
Forrest Anderson said:
Frank Pellow said:
I find that the Saphire lasts much longer than Cristal, particularly when subjected to rough use.  I could be wrong but, it appears to me that the Saphire is cloth backed whereas Cristal is paper-backed.

The Festool Abrasives Brochure is a good source of information about the composition of the various abrasives that Festool make available.

Cristal:
Grit: aluminum oxide
Bonding: phenolic resin
Impregnation: special bonding agent
Backing: b-wt, c-wt paper
Grit range: P24 - P120
Grit coating: open coated
Bonding level: open leveled

Saphir:
Grit: aluminum oxide
Bonding: synthetic resin
Backing: Fabric reinforced
Grit range: P24 - P120
Grit coating: semi-closed coated
Bonding level: closed leveled

About the various types of backing, it says:

Backing Material
Festool has different backings to match a broad
range of applications, from rapid material removal
to superior surface quality. Backing materials are:

Paper
Festool uses only top-grade paper of varying
weights to assure high tear resistance, durability
and superior surface quality. Using only high quality
materials assures the best and most reliable
work results; this saves you time and money. The
different paper weights we use are:
b-wt - 115 g/m2
c-wt - 130 g/m2 -
d-wt - 165 g/m2
e-wt - 185 g/m2

Fabric
Festool uses a special x-type woven fabric which
ensures its abrasives are long-lasting when used
under tough conditions and on uneven surfaces.
The fiber increases strength and prevents the
abrasive from tearing at the edges. This backing is
excellent for heavy duty jobs and results in a very
long operational life and considerable cost savings.

Fiber
Festool uses a special elastic fiber mat. This mat
is embedded with abrasive particles. Festool?s
name for this abrasive mat is Vlies. With Vlies, it?s
easier to achieve consistent results on complicated
contours.

Foam and fiber
A foam backing compensates for uneven pressure
to protect the surface and allow you to
achieve perfect results. Foam and fiber works
great on transitions, too. The foam efficiently
adapts to the work piece contour. This produces
reliable work results and high surface qualities.
The special velour on top of the foam assures the
best grit bonding and prevents the edges from
tearing. Like the foam, it is air permeable and
open pored. It extracts almost 100% of the particulate
through the backing and ensures a clear view
of the work piece. You will achieve better, more
reliable work results and less reworking.

Forrest

Thanks, and Thanks to Frank.

The Cristal worked great, it just didn't last as long as I'd thought it would.  I'll probably get a smaller pack of Saphire and give that a go.  I'm not concerned with the surface as much with this, I just want rapid material removal then move on to the Rubin, etc. and clean it up.

thanks
 
There were photos missing in  this thread.  [sad]  I have now restored them all from my computer backup disks.  [smile] 
 
Well good job on bumping this post up as well. With any luck Spring will raise it's lovely head soon and cottage season can start!! Great work! Beautiful camp!
 
GhostFist said:
Well good job on bumping this post up as well. With any luck Spring will raise it's lovely head soon and cottage season can start!! Great work! Beautiful camp!
Well, I guess it works as a bump as well.  There will be a number of such bumps as I restore the missing photos to many of my posts.

Thanks for the compliments about my camp and my work on same.  This summer, I am going to start the cycle over again with the north wall -but I will not need to sand the wall  down to the bare wood again -I just need to buff it up a bit before applying a coat of stain.
 
Sept 2011 Update:

As I said in the above post, this year the cycle starts all over again.  It is the north wall's turn and, this year, that has been a very busy site, because I am also replacing a set of windows with French doors, building a small porch outside the doors and building a ramp up to the porch.  I will describe those projects in other threads and will confine this update to the restoring of the logs on the north wall.  As usual, this post will be crafted fromextracts from my weekly journal.

Aug 6:  I made a very small start on the task of re-finishing the north wall of the cabin by buffing then staining the skirting board that is under the new doorway:

[attachthumb=#1]

Aug 9: Before going into Hearst in the morning, I sanded some of the north wall in preparation for re-finishing.  For the first time, I used what Festool calls an “interface pad” on my Rotex 150 sander.  This is a thick sponge that attaches to the sanding pad where one usually attached the sandpaper then, in turn, the sandpaper is applied to the other side of the interface pad.  

[attachthumb=#2]
 
It works well on the somewhat rounded logs.

For the most part, I am lightly sanding the logs, but there is a part of the wall below the removable screen/window frame that I made many years ago that has very bad drip marks.  I am sanding that part right down to the wood:

[attachthumb=#3]

I don't remember this region being as bad in the past and it is not nearly as bad below the other three screen/window frames on the porch.  I will devise some sort of sill/ trough near the bottom of the opening in an attempt to prevent this in the future.

Sept 5:  I finished sanding the logs today.  The total time for the sanding job was 6 hours.  Compare this with the 19 hours that it took to do the job 6 years ago.  This time I only used my Rotex and Deltex sanders and only used Saphir 80 grit abrasive.  I cleaned the abrasives occasionally with a crepe block.  They lasted very well as witnessed by the photo of the only two pads that I used after completion of the job:

[attachthumb=#4]

The Deltex pad has pretty well had it, but there is still some life in the Rotex pad.

Sept 6:  I applied the first coat of preservative today.  It took about 3 hours (a lot of which was spent moveing stands and ladders).  Here is photo taken part way throough the job:

[attachthumb=#5]

Sept 7:  I applied the final coat of preservative today.  It took about 2.5 hours.  Here is photo taken after completion:

[attachimg=#6]
 
You have that annual refinishing down to a science Frank!

That really improves the look.

Curious if you built the cabin originally?  How old is it?  The wood has really held up!

neil
 
Neil, yes, I built the cabin. 

There was a larger cabin on the site built my Dad and friends in the 1930s, but it burned down in the early 1960s.  I built the current cabin (again with the help of family and friends) in 1975.  This cabin is smaller than the original, but I positioned it so that it uses some of the original foundation.

So the wood (red cedar from British Columbia) is 36 years old.
 
Sept 2013 Update:

It is the south wall's to be refinished this year.  This year, I have a new tool in my arsenal, that is a Festool Rotex 90 sander.  Previously the main sander that I used was my much larger Rotex 150.  I will still use the 150 but I am hoping that the smaller sander will be easier to operate when aggressively removing material from blacked and greyed segments of the logs.  

Here is a photo of the south wall before commencing work:

[attachthumb=#1]

and here is a close-up after some material has been removed:

[attachthumb=#2]

Using Rubin 2 P60 abrasives with frequent cleaning on a crepe block it took just under and hour to remove the bulk of the greyed and blackened material.  Only two “rounds” (what do you call these things –it seems wrong to call them sheets?) were required for the job.  Total time taken was just under 2 hours.

It only took me about 20 minutes to clean up in hard to reach places using the Delta pad on my new Rotex 90 sander,

[attachthumb=#3]

For this step I used 80 grit abrasive.

The final sanding was done with my Rotex 150 using Rubin 120.  This time, I also made use of the thick soft interface pad (496 647) so that the sander could easily adapt to the contour of the logs.  It took only a little more than an hour to sand the entire wall (and about a quarter of that time was spent moving ladders and supports).

So the total time taken to sand the wall in preparation for re-staining was between 3 and 4 hours.  That's great!  It probably means that I can pass the annual touch-up  job over to one of my children or grandchildren in a few years.

After sanding, some parts required one coat of stain, some required two.

Here is a photo of the refinished south wall:

[attachthumb=#4]


Attachments

  • South wall of the cabin -before -small.JPG
    South wall of the cabin -before -small.JPG
    179.1 KB · Views: 173
  • Sanding with the Festool Rotex 90 -small.JPG
    Sanding with the Festool Rotex 90 -small.JPG
    164.9 KB · Views: 176
  • Sanding in the corners with the Delta pad in the Rotex 90 -small.JPG
    Sanding in the corners with the Delta pad in the Rotex 90 -small.JPG
    87.1 KB · Views: 163
  • Refinished south wall of cabin 2013 -small.JPG
    Refinished south wall of cabin 2013 -small.JPG
    134.5 KB · Views: 171
Back
Top