Riding Helmet Shelving

slopjock78

Member
Joined
Sep 25, 2014
Messages
65
Through work, i take part in a volunteer program called Rebuilding Together.  Its a volunteer based group that helps local families/community groups that are unable to help themselves due to money or physical limitations.

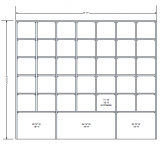
This years project is a horseback riding center for handicapped children. I have been given the task of creating a set of shelves to hold the riding helmets:

[attachimg=2]

I can use either pine 1x12 or 3/4" ply.  If i use ply, I will need to either create a face frame, or veneer the ply edges.  The back will be open, but up against and secured to a wall.  Clearly there will be very little weight on each individual "cubby hole"

My main questions are: 

1.  Should I use ply or pine?  i will be purchasing the materials to donate,  so wont be using $125 sheets of hickory ply, but quality material will be used

2.  Should i use dado's or "cleats" the create the individual shelves?

If you have any questions in order to give me some advice, please ask away.  thanks for any and all input


Attachments

  • 2015-03-23 12-48-02_Helmet Shelf Sketch V2.pdf - Adobe Acrobat.png
    2015-03-23 12-48-02_Helmet Shelf Sketch V2.pdf - Adobe Acrobat.png
    11.7 KB · Views: 293
If it were me, I would use the plywood and just edge band the plywood with the pine.  I would probably rip the pine down to maybe 5/8, attach it to the faces (nailed here) and flush trim .  I would make each cubby a fixed dimension and instead of dados, I might put it together with the Domino.  I like using plywood because I know that when I am finished cutting it, I know that it will be straight and free of knots.
 
I just built something very similar but for parts bins. Let me start off by saying dont do what i did. I made a deck frame out of 2x12's. I used 16 gauge brads to put shelf rest on the column. used 3/4" ply for shelf bottoms. And nailed 1x4 pine to the front to keep fittings from rolling out of the bins. I made it this way for 3 reasons half the material was on hand it was for a warehouse and so I could use my 2 newest tools a kapex and a 16 gauge grex nailer.

That being said If I were to do it again I would use 3/4 ply with dado cuts top and sides and dowels in the middle columns if you dont have domino to do through tennons and perhaps something decent for facing material
 
Thanks for the comments so far guys.

I do have a domino, and using that is clearly an option that I had not yet considered.  If I were to use a domino, would you put a thru-hole in the vertical piece that extending into both of the opposing shelves?  Or, use separate dominos for each shelf, spaced differently on the vertical piece?
 
Hi Slopjock,

Just speaking for myself, and I do a lot of volunteer work for my daughters school, remember the KISS principle: Keep It Simple Silly.

It needs to be decent looking, not great.  Maybe not even "nice".  It needs to be reasonably sturdy to survive years of holding riding helmets, not overbuilt to hold saddles. 

And remember that the $$ are coming out of your pocket.

And the people you build this for will be grateful for your time & effort.

Take care,

edg
 
Through holes vs alternating a pattern - I would keep it simple which means through holes if necessary. If you try to alternate, you are more likely to mess up the pattern and put a hole in the wrong place.  Put the same pattern of mortises everywhere.  If the mortises end up going through to the other side it won't hurt anything unless it is on the bottom or top [crying]
 
The cubby holes reminde me a lot of famous the Ikea cubby hole system (now called KALLAX). I assembled it once and they use dowels for the upright pieces, and from memory the tops of the vertical dividers have dowels at one spacing, and the bottoms have them at another spacing. I could be wrong though. Some ideas from the official instructions here.

But if you were willing to do dadoes, then I thought that would have been faster to do on a tablesaw and line them up easily.
 
So i finally got rolling on this project this weekend.  I got all the plywood pieces cut, and started the domino work.  Thats where i ran into a few questions. for reference, i'm using the 6x40 dominos

1.  Do you think that two dominoes is enough for each shelf? There will be very minimal weight on each shelf, but who know what might get stuffed into a shelf from time to time.

2.  For the middle shelves, how should i do the dominos?  if i use through domino holes on the inner verticle pieces, should i use one 6mm domino that extends into each adjacent shelf, or use a domino for each shelf, which i believe would require me to trim the domino for lengh to allow space

thank for the help.  if i'm not being clear or need for description, please let me know
 
Does anyone have any advice on the interior dominos in the shelving?  I'm going to get rolling on cutting all the domino slots tonight and was wondering what others thoughts were on the domino spacing as well as through dominos vs. domino for each side.

thanks for any advice
 
How are you going to put the shelves in with dominos if the frame is already built? Are you going to assemble it from left to right and then finish with the top cap and bottom?

Two dominos are plenty, I would go for through dominos to make it easier. Mortise one domino on each shelf on the wider setting to make assembly easier. If you are concerned about the domino not being long enough, you can put dados in the vertical pieces to thin them.

To be honest, however, this is not how I would build this project. I would cut halved joints on every intersecting joint, and use dados and dominos for the frame. Very simple to set up, and very strong.
 
RL said:
How are you going to put the shelves in with dominos if the frame is already built? Are you going to assemble it from left to right and then finish with the top cap and bottom?

Two dominos are plenty, I would go for through dominos to make it easier. Mortise one domino on each shelf on the wider setting to make assembly easier. If you are concerned about the domino not being long enough, you can put dados in the vertical pieces to thin them.

To be honest, however, this is not how I would build this project. I would cut halved joints on every intersecting joint, and use dados and dominos for the frame. Very simple to set up, and very strong.

thanks for the comments RL.  To answer your question, yes, i had planned on assembling bascially like you said, top to bottom more or less.

however, i am still open to other suggestions.  can you please explain your method a bit more?  what do you mean by "halved joints"?
 
Ditto on RL's method ( like you'd see in a cardboard box re:wine or most bottles, both slotted and fit together at right angle) it also makes for EZ finishing as you can finish then assemble then instal as a unit in your frame/carcass .
 
Here's a halved joint link. The advantage to using it for your particular project is that once you have set up your stops and/or fence, you can cut all the slots for each row and column without moving anything. Then you set it up for the second row etc. You'll have perfect squares.

http://en.wikipedia.org/wiki/Halved_joint

 
oh sure, i've done those before.  I made a wine rack for my wife using that method.

the problem that i would see for this build is that the shelf is 11" deep.  what method of cutting would you use to cut a slot 5.5" deep?
 
1) I'd use my tracksaw to make two parallel stopped cuts and then knock out the waste with a chisel, or 2) drill a hole and cut to the hole.

I suppose you could also use a router, but that's a lot more effort and dust, and you would still have to square it off with a chisel.
 
Before I was a carpenter, I was a saddle trapp for years, we alway hung our hunt caps on wooden dowels. I had built many over the years. I know that they work with both the old style straps and the new fuller style of straps. One of the stable we were at had a rehab centre, they do wonderful work with those who need and it's nice to see your helping with your work. Thank You
 
For the interior shelves, I'd be tempted to cut through-holes on the verticals, and use a long domino, which would protrude out both sides, instead of two dominoes butting into the same hole. Register the domino at the same heights for all the verticals, and plunge through into scrap to avoid blow-out.  Use the spacer pins to set the mortises a constant distance from the front and rear edges.  Two per shelf, one front and one back, should be plenty.

The outside verticals will use the same settings, but the mortises will not go through.

Cut the shelves to identical sizes, and you can use the registering pins to set the domino mortises back from the edge an equal distance. Cut the front holes on the narrow setting to ensure perfect alignment on the front edges, and the rear holes on the wide setting, to allow for variance in width.

To assemble, work from one side to the other. Lay one of the outside verticals on the floor.  Glue in shorter dominoes of a length to go into the vertical and into the shelf mortises. Glue in the first column of shelves. Glue long dominoes into the other shelf mortises.  Fit the next vertical (the first interior vertical) over the dominoes without glue.  The long dominoes should protrude through the verticals and be ready to glue into the next column of shelves.

You may have to nip the assembly here and there, or whack it with a mallet, to get the dominoes to seat in their mortises. Beware of accumulating errors.  Work your way up, repeating the process.

Never tried it, of course.  Just dreaming. Has anybody?

Cheers,
Crox G
 
Crox G said:
For the interior shelves, I'd be tempted to cut through-holes on the verticals, and use a long domino, which would protrude out both sides, instead of two dominoes butting into the same hole. Register the domino at the same heights for all the verticals, and plunge through into scrap to avoid blow-out.  Use the spacer pins to set the mortises a constant distance from the front and rear edges.  Two per shelf, one front and one back, should be plenty.

The outside verticals will use the same settings, but the mortises will not go through.

Cut the shelves to identical sizes, and you can use the registering pins to set the domino mortises back from the edge an equal distance. Cut the front holes on the narrow setting to ensure perfect alignment on the front edges, and the rear holes on the wide setting, to allow for variance in width.

To assemble, work from one side to the other. Lay one of the outside verticals on the floor.  Glue in shorter dominoes of a length to go into the vertical and into the shelf mortises. Glue in the first column of shelves. Glue long dominoes into the other shelf mortises.  Fit the next vertical (the first interior vertical) over the dominoes without glue.  The long dominoes should protrude through the verticals and be ready to glue into the next column of shelves.

You may have to nip the assembly here and there, or whack it with a mallet, to get the dominoes to seat in their mortises. Beware of accumulating errors.  Work your way up, repeating the process.

Never tried it, of course.  Just dreaming. Has anybody?

Cheers,
Crox G

thats exactly the plan that i have in my mind right now.  i have all the pieces cut.  I used the TS55 and parallel guids, so the parts should be extremely close.  Tonight i'm starting the domino mortises and will start assembly as soon as that is done.

if it goes half as smooth in reality as it does in my head, i'll be happy
 
Yes, I tried it for my 15' x 8' bookcase and it was really a nightmare. Three fixed shelves running the width of the bookcase plus a top and bottom all dominoed together. Assembled it on the floor and lifted it into position with help from two other people. Fortunately the remaining shelves were all floating.

Why a nightmare? Trying to get all those dominos to fit whilst locking in the top and bottom caps. Dados, tight tolerances, heavy timbers, racking etc.

It all looked good on paper but it was horrible in practice.
 
Back
Top