Rounded Corner Build Suggestions

SoonerFan

Member
Joined
Jan 27, 2014
Messages
844
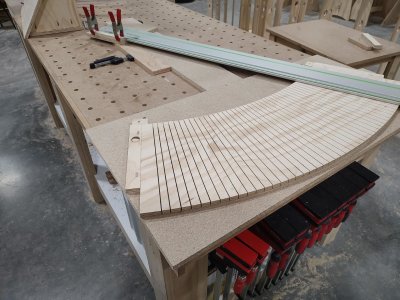
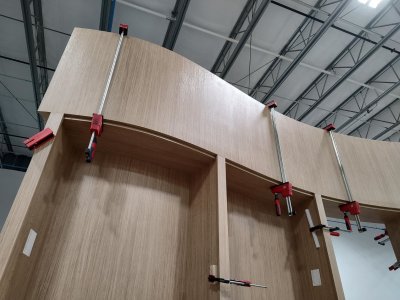
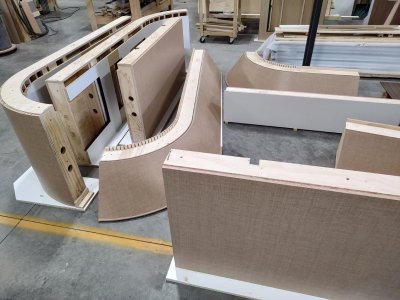
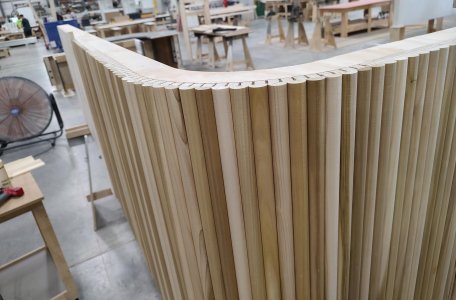
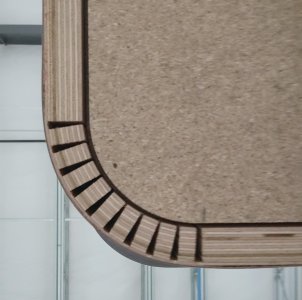
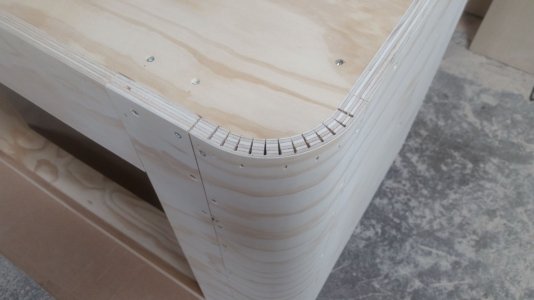
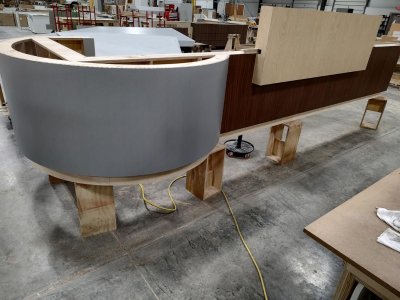
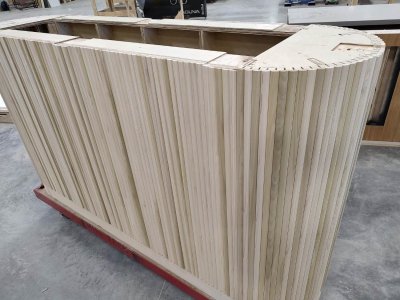
I am planning to build a floating "shelf" that is 300mm wide and 600mm tall and will be about 2700mm long. Although construction is more like a cabinet, the piece will not have doors that open so it's basically a large floating shelf. It will be attached to the wall with a French Cleat. It will look something like the attached only floating. I am planning to add half round dowels or another similar accent. The plan is to paint everything and have a couple mm gap between the dowels or whatever is used as accents. I would like to round the front two corners something like is done in the attached but with a radius of 80-90mm.

Any suggestions on how I could round the front corners with something that is paintable and something I could glue half round dowels or something similar to before painting? I have looked at the sheets of half round dowels but unsure how these might look painted and whether these a firm enough to hold shape in the size self I am building. Ideal for me is to add a white oak top but have nothing showing below the dowels/accents at the bottom.

Thanks in advance.


IMG_9735.JPG
 
Consider maple tambour for the corners.


Tom
 
It kind of depends on what you call "a couple of millimeters." You could literally glue them to a kerf-bent plywood substrate, though Tom's suggestion of tambour would be far easier. Spacing them apart, to wrap around something, is not nearly as easy as it seems like it should be.

You say similar to the pic, meaning curved ends and open shelves between them? Rather than the doors?
By a couple mm I mean about 2mm spacing. How might I kerf bend the plywood sub straight? I tried but was unsuccessful no mater the number of kerfs I used or the spacing.

It will just have the top and either open shelves or maybe just a solid front (plywood/painted).

Tom idea was good and worth looking into as well.
 
I would count on the half-round stock for structure.

1. Make your cabinet box.
2. Attach your top panel and bottom panel to your box.
3. Cut two pieces of stock for each end smaller than the top & bottom panels by the thickness of your half-stock. Attach to the top and bottom panels on the inside of the cabinet.
4. Pin and glue the half round to the stock top and bottom.

Applying the finish prior to attaching the half round pieces may make sense. Certainly staining the half-round pieces prior to assembly does.

No bent panels involved. You may glue some veneer to the interior to prevent light showing through, though if tightly assembled, it should not be required.
 
I have half a sheet of the stuff Tom is talking about in my basement I wish I could give you. Your 90mm curve might be too tight, but perhaps with a few kerfs, it might make it.
 
The bending ply I have always used is called 3/8", but it's not. It actually measures 8mm, so the two layers only add up to 5/8" (16mm)
A 90mm radius is fairly tight, for the thicker bendy, but it is available in 3mm too.
The main problem with it is that requires a form, to be shaped around. It also has a tendency to twist. It usually tries to follow the grain, which may not wrap squarely around. It will work out ok, but requires extra steps of, cutting over size and trimming back to square (or parallel)
Kerf-ply doesn't do that. It will follow the kerfs. Plus, it only needs one piece. It is more work though.
With the addition of a machine that made the kerfing easy, I gave up on the bending ply.
Besides that, the bending stuff will fight you every second of the time, if you try to make a cone shape.
Kerf-ply can do that easily. In the last pic below, you can see the jig I made to do it with a track saw.
I've done both ways a time or hundred ;)
The gap, in the 4th pic, is because that is a removable access panel. That is the bottom of a wall-hanging shelf.
 

Attachments

  • 222 table base bead.jpg
    222 table base bead.jpg
    196.3 KB · Views: 6
  • 22156k.jpg
    22156k.jpg
    312.2 KB · Views: 5
  • aquarium stand rad.jpg
    aquarium stand rad.jpg
    129.2 KB · Views: 6
  • Radius apron.jpg
    Radius apron.jpg
    577.7 KB · Views: 6
  • Tea shop 3.jpg
    Tea shop 3.jpg
    265.6 KB · Views: 6
  • TVBHC2.jpg
    TVBHC2.jpg
    298 KB · Views: 6
  • TVlibrary3.jpg
    TVlibrary3.jpg
    276.6 KB · Views: 6
  • Twin5.jpg
    Twin5.jpg
    321.9 KB · Views: 6
Last edited:
By a couple mm I mean about 2mm spacing. How might I kerf bend the plywood sub straight? I tried but was unsuccessful no mater the number of kerfs I used or the spacing.
The 2mm spacing is a double-edged sword and it eliminates the tambor's easiness.
The spacing requires individual pieces and careful spacing. It will tend to get out of square, but at the same time, allows you to compensate.
The main thing with kerf cutting is depth of cut, along with even spacing. With a good structure, the spacing is less important. The depth is very important.
Your kerfs need to go across the grain, and it works best with thicker laminates. This is a case where BB is not your friend. You need to cut all the way to the last layer. Spacing depends on the radius, but getting it so perfect that the kerfs actually close, to the point of touching. With really small radii, it's impossible anyway.
 
Back
Top