I though I'd share my upgrade to my router planning apparatus in case anyone was interested.
I work with slabs a lot and use a regular router sled set up to flatten and surface the slabs before sanding. I had been using the regular made from plywood u channel with a slot in the bottom to move the router across the slab. What prompted my upgrade was finding what I think is a really nice bit for the process. I have used regular straight bits in larger diameters, bottom cleaning dado bits and bowl bits but kept getting some tear out. This new bit doesn't have the amount of tear out I have been experiencing.
Here's the bit:
http://www.amanatool.com/products/router-bits/solid-surface-router-bits/counter-top-trim-router-bits/57136-carbide-tipped-countertop-countertop-trim-6-wing-solid-surface-2-1-16-dia-x-1-4-x-1-2-inch-shank.html
It's from Amana and designed to rout shallow trays in solid surface material, probably drain boards and soap dishes etc. It leaves a smooth almost polished surface on the walnut I've tried it on. It's not cheap at about $80 and you need to make shallow passes, but it works great.
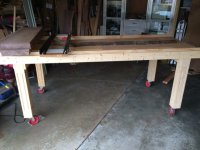
So I thought I'd upgrade the actual sled the router ran on. The plan was to use 80/20 extrusions and have a platform run on wheel brackets and more extrusions. It was going to be nice. Richard from Ripdogs was kind enough to let me bounce some ideas off him and point me to some span and deflection calcs. Everything was perfect until I started pricing what I needed, even with prices from the 80/20 ebay store, I figured I'd still have $300-350 in the thing. [eek] and that's the price of another Festool.
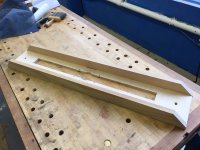
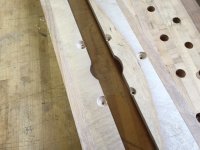
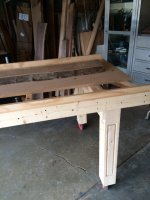
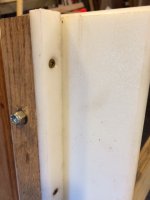
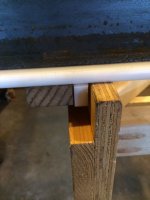
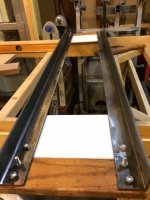
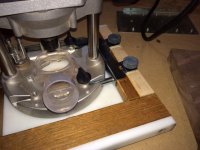
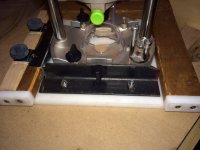
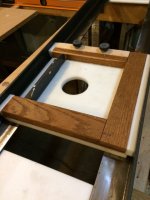
So it was fall back and punt and see what I had laying around the shop. The photos show what I came up with and I only had to buy few extra bolts. The runner are 2 inch angle iron left over from another project the platform and slide were made from some oak I'd recued from a dumpster a few years about and some UHMW plastic I had laying around. I polished up the angle iron and threw some paste wax on it and it slides smoothly.
I work with slabs a lot and use a regular router sled set up to flatten and surface the slabs before sanding. I had been using the regular made from plywood u channel with a slot in the bottom to move the router across the slab. What prompted my upgrade was finding what I think is a really nice bit for the process. I have used regular straight bits in larger diameters, bottom cleaning dado bits and bowl bits but kept getting some tear out. This new bit doesn't have the amount of tear out I have been experiencing.
Here's the bit:
http://www.amanatool.com/products/router-bits/solid-surface-router-bits/counter-top-trim-router-bits/57136-carbide-tipped-countertop-countertop-trim-6-wing-solid-surface-2-1-16-dia-x-1-4-x-1-2-inch-shank.html
It's from Amana and designed to rout shallow trays in solid surface material, probably drain boards and soap dishes etc. It leaves a smooth almost polished surface on the walnut I've tried it on. It's not cheap at about $80 and you need to make shallow passes, but it works great.
So I thought I'd upgrade the actual sled the router ran on. The plan was to use 80/20 extrusions and have a platform run on wheel brackets and more extrusions. It was going to be nice. Richard from Ripdogs was kind enough to let me bounce some ideas off him and point me to some span and deflection calcs. Everything was perfect until I started pricing what I needed, even with prices from the 80/20 ebay store, I figured I'd still have $300-350 in the thing. [eek] and that's the price of another Festool.
So it was fall back and punt and see what I had laying around the shop. The photos show what I came up with and I only had to buy few extra bolts. The runner are 2 inch angle iron left over from another project the platform and slide were made from some oak I'd recued from a dumpster a few years about and some UHMW plastic I had laying around. I polished up the angle iron and threw some paste wax on it and it slides smoothly.
Attachments
-
 IMG_1540.JPG117.1 KB · Views: 24,858
 -
 IMG_1554.JPG121.8 KB · Views: 10,164
 -
 IMG_1553.JPG119.4 KB · Views: 11,098
 -
 IMG_1552.JPG119 KB · Views: 9,110
 -
 IMG_1549.JPG92.5 KB · Views: 8,381
 -
 IMG_1548.JPG107.2 KB · Views: 9,028
 -
 IMG_1546.JPG123 KB · Views: 14,150
 -
 IMG_1544.JPG129.6 KB · Views: 9,748
 -
 IMG_1543.JPG122.2 KB · Views: 10,455
 -
 IMG_1542.JPG125.9 KB · Views: 14,113
 -
 IMG_1541.JPG116.3 KB · Views: 11,995