Cheese
Member
This is another article on routing aluminum. The angle will be attached to the MFS and then the MFS will be clamped to a Simpson wood door to enlarge the hinge mortises. The original 8020 post is below for reference.
http://festoolownersgroup.com/festo...amps-using-an-mfs-a-1010/msg573098/#msg573098
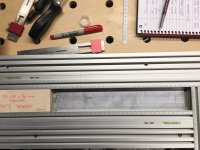
The aluminum uneven leg angle I chose is sold by 8020. It's 60mm X 30mm X 4mm thick and 18" long. 8020 sells the stuff by the inch. This pretty well matches the original size of the steel MFS brackets. I just needed something longer for clamping purposes than the steel brackets which are only 3" long.
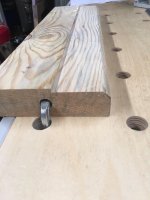
First I need a fixture to hold the angle, hold the MFS and be able to be held down to the table. I decided on using an extra chunk of 2 x 6 that was floating around.
Run it through the planer to make sure the bottom & top surfaces are flat.
Run it through the table saw to make sure one edge, the clamping edge, is flat & straight.
Route a 4mm thick rebate on the top to receive the 4mm thick angle.
Take it to the band saw and add a 45º chamfer to the edge to clear the radius on the angle.
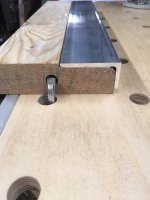
Bore a 1/2" diameter in both ends so it can be clamped to the MFT top.
[attachimg=1]
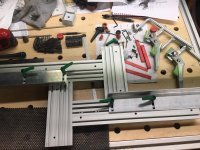
The 2 x 6 is clamped to the MFT top and the aluminum angle is put in place.
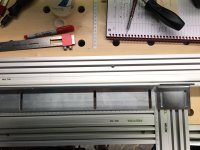
[attachimg=2]
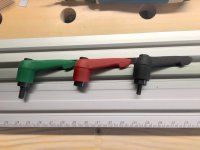
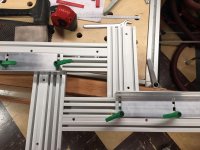
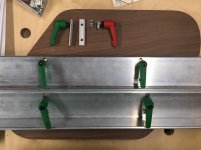
I used 2 Festool clamps to clamp the angle to the 2 x 6 fixture.
[attachimg=3]
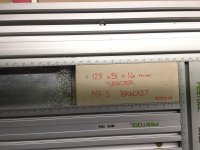
You can see the red alignment marks that are made on both ends of the aluminum angle to properly position the MFS. The MFS is then screwed into the 2 x 6. The idea is to mill 4 slots into the aluminum angle, remove the 2 Festool clamps holding the angle, pry/remove the angle and install a fresh piece of angle and reinstall the clamps. The 2 x 6 is 18" long as is the aluminum angle so registration of the fresh piece of angle is simple. Just align the edges and the slots for both angles will be in the same locations.
[attachimg=4]
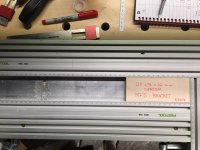
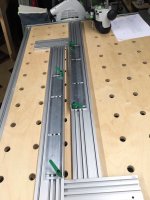
I'm using M5 Kipp quick release handles so I chose a 7/32" Amana aluminum end mill, #HSS 1632. I also used a 10.8 mm bushing on the 1010 router. Turned down the router speed to 2 and used some lubricant. The slots are 40mm long and on the RH side of the photo you can see one machined out. The process is to mill the far LH slot pushing the router forward and then mill the far RH slot pulling the router back towards you. Install a 129 mm spacer on the LH side, repeat the milling process for slot 3, slide the spacer over to the right and complete the 4th slot.
[attachimg=5]
In this photo the 2 LH slots have already been milled and the spacer is moved over in preparation to produce the 4th slot.
[attachimg=6]
The 4th slot after milling.
[attachimg=7]
Here's the aluminum angle next to the MFS steel angle.
[attachimg=8]
And here are the 2 aluminum angles finished. There's now 18" of real estate on each angle for placement of clamps.
[attachimg=9]
http://festoolownersgroup.com/festo...amps-using-an-mfs-a-1010/msg573098/#msg573098
The aluminum uneven leg angle I chose is sold by 8020. It's 60mm X 30mm X 4mm thick and 18" long. 8020 sells the stuff by the inch. This pretty well matches the original size of the steel MFS brackets. I just needed something longer for clamping purposes than the steel brackets which are only 3" long.
First I need a fixture to hold the angle, hold the MFS and be able to be held down to the table. I decided on using an extra chunk of 2 x 6 that was floating around.
Run it through the planer to make sure the bottom & top surfaces are flat.
Run it through the table saw to make sure one edge, the clamping edge, is flat & straight.
Route a 4mm thick rebate on the top to receive the 4mm thick angle.
Take it to the band saw and add a 45º chamfer to the edge to clear the radius on the angle.
Bore a 1/2" diameter in both ends so it can be clamped to the MFT top.
[attachimg=1]
The 2 x 6 is clamped to the MFT top and the aluminum angle is put in place.
[attachimg=2]
I used 2 Festool clamps to clamp the angle to the 2 x 6 fixture.
[attachimg=3]
You can see the red alignment marks that are made on both ends of the aluminum angle to properly position the MFS. The MFS is then screwed into the 2 x 6. The idea is to mill 4 slots into the aluminum angle, remove the 2 Festool clamps holding the angle, pry/remove the angle and install a fresh piece of angle and reinstall the clamps. The 2 x 6 is 18" long as is the aluminum angle so registration of the fresh piece of angle is simple. Just align the edges and the slots for both angles will be in the same locations.
[attachimg=4]
I'm using M5 Kipp quick release handles so I chose a 7/32" Amana aluminum end mill, #HSS 1632. I also used a 10.8 mm bushing on the 1010 router. Turned down the router speed to 2 and used some lubricant. The slots are 40mm long and on the RH side of the photo you can see one machined out. The process is to mill the far LH slot pushing the router forward and then mill the far RH slot pulling the router back towards you. Install a 129 mm spacer on the LH side, repeat the milling process for slot 3, slide the spacer over to the right and complete the 4th slot.
[attachimg=5]
In this photo the 2 LH slots have already been milled and the spacer is moved over in preparation to produce the 4th slot.
[attachimg=6]
The 4th slot after milling.
[attachimg=7]
Here's the aluminum angle next to the MFS steel angle.
[attachimg=8]
And here are the 2 aluminum angles finished. There's now 18" of real estate on each angle for placement of clamps.
[attachimg=9]