Rubio Workbench

Mismarked

Member
Joined
Oct 8, 2014
Messages
139
The "Split-Top Rubio" will, of course, be a petite Roubo hybrid (an affectionate, descriptive term, not a political statement).

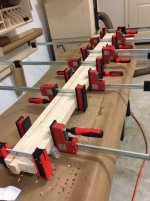
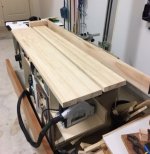
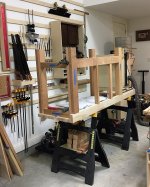
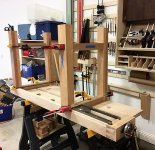
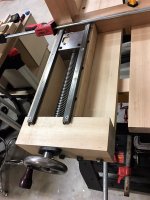
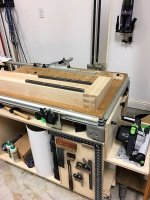
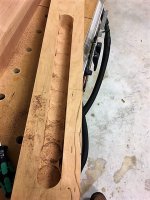
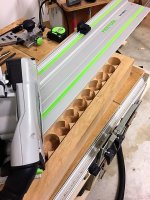
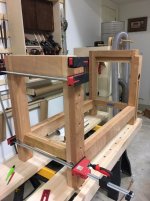
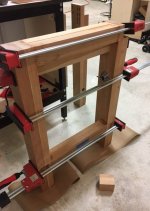
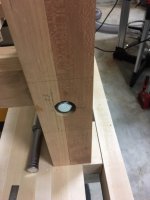
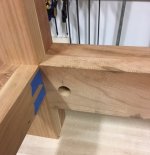
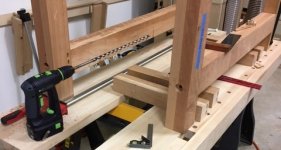
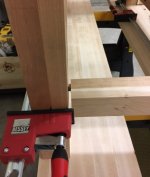
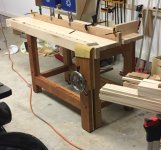
Inspired by Edward Reno's hybrid workbench post, I went with a 1.5 inch top and both of the benchcrafted vises.  It will be about 6' long.  Here is the current state of affairs.
[attachimg=4]

[attachimg=5]

[attachimg=6]

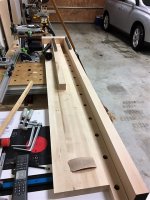
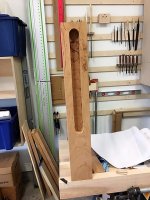
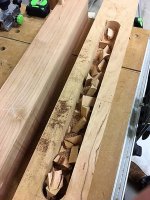
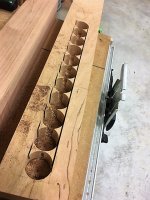
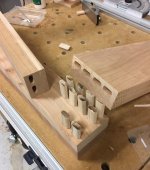
As seen in the last photo, I am about ready to make and glue up the dog hole strip before trying to tackle the "condor tails" and end cap.  I assume/think the benchtop is too thin for square dogs, and I am trying to choose between 20mm and 3/4" (or maybe re-think the square holes if that is preferable and doable with a 1.5" top).

In Guido Henn's article on the Roubohttps://www.fine-tools.com/pdf/roubo-hobelbank-bauplan-en.pdf (at p. 28), he opted for "the standard 19mm round holes," saying that there was much more hardware available.  I understand that the holdfasts are mostly 3/4" as well.

On the other hand, I already have the MFT, Festool low profile clamps, some Quas and Precision dogs and will hopefully be getting some Parf stuff soon.  So maybe that route would be more cohesive, and just have a few 3/4" holes for the holdfasts.

Would be interested in any comments on which direction to go.  As mentioned in a previous post, I don't have experience with a tail vise, or for that matter any dog holes other than the ones on the MFT.

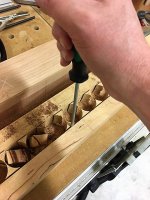
Also, if I am going to drill round holes on the drill press with a Forstner, should I go with a 3/4" bit for a 3/4" dog (or 20mm bit for 20mm dogs), or something slightly larger.

Lastly, if I go with round holes, should I try to put a slight chamfer in the top of the hole (how would one even do that?)
 

Attachments

  • IMG_0699.JPG
    IMG_0699.JPG
    91.2 KB · Views: 550
  • IMG_0700.JPG
    IMG_0700.JPG
    83.3 KB · Views: 696
  • IMG_0703.JPG
    IMG_0703.JPG
    94.3 KB · Views: 601
I don't have much to add, I just say good luck with the project. I want to do a similar build, and I would also want to use the festool compatible 20mm holes. I think you can even make a fitting that could fit over a parf dog to make it into a square dog. There are also 20mm dogs with one flat side that  would do the same thing.
 
A few more progress photos.  Hopefully these will be oriented properly.  Have been reviewing iamnothin's roubo build thread and saw that he posted his mistakes, so I might show a couple.

Decided to go with 20mm dog holes.  Used the 20mm festool forstner.  Tight fit.  The quas dogs make a slight zipping sound when I pull them out.

[attachimg=1]

Everything ready to cut the grooves for the tail vise.  Learned that if I am bad at cutting small dovetails, large dovetails will look slightly worse.  I did the tails on the bandsaw and for some reason decided to do the pins with chisels instead of the router method and ended up with some gaps.  Hopefully I can fill those in.

[attachimg=2]

For the tail vise, I think it was easier to install on a thinner top, which eliminated the need to rout the cavity.

[attachimg=3]

I decided to finish the top first and put both pieces upside down on sawhorses so I would have a flat surface larger than my mft to work on the base.  I actually started on the workbench before deciding to buy the benchcrafted hardware, and once I got the plans they called for much larger legs than I had glued up.  I re-purposed those to be the short rails.

[attachimg=4]

Now working on the long front and back rails.  The two middle uprights are temporary supports to make sure the long rails are the same height as the short side rails.  The short rails are temporarily attached with 10mm dominos.  Trying to figure out if I need to add barrel bolts for stability, but will probably wait until the bench is done to make that decision.  The long rails will have mortise and tenon and barrel bolts.

[attachimg=5]
 

Attachments

  • Preparing long rails.JPG
    Preparing long rails.JPG
    259.8 KB · Views: 3,049
  • Building base.JPG
    Building base.JPG
    124.3 KB · Views: 3,350
  • Tail vise installed.JPG
    Tail vise installed.JPG
    106.1 KB · Views: 3,506
  • Laying out tail vise rails.JPG
    Laying out tail vise rails.JPG
    114.3 KB · Views: 3,251
  • Dog hole strip.JPG
    Dog hole strip.JPG
    114.8 KB · Views: 3,353
I started cutting the mortise for the crisscross this morning, which needs to be 1 7/16" deep and 1 3/4" wide.  The plans suggested starting with a forstner and then routing out the remnants. 
After drilling, I was going to use the OF1400 on the track, but once I had the track sitting on the leg, it seemed like a lot less effort to just use the TS55 set to the proper depth of cut.  Just eyeballed the track placement and used a stop in front and behind the saw.  Used a second leg to support the track, and no clamping was necessary.
View attachment 1
View attachment 2
It took all of 20 seconds to pop the remants out with a screwdriver
[attachimg=3]
[attachimg=4]
Most broke off cleanly at the bottom.  Just the corners and a few spots on the bottom to clean up.
[attachimg=5]
[attachimg=6]
 

Attachments

  • IMG_0787.JPG
    IMG_0787.JPG
    120.2 KB · Views: 2,680
  • IMG_0786.JPG
    IMG_0786.JPG
    129.4 KB · Views: 2,632
  • IMG_0785.JPG
    IMG_0785.JPG
    143.1 KB · Views: 2,940
  • IMG_0784.JPG
    IMG_0784.JPG
    125.7 KB · Views: 2,645
  • IMG_0783.JPG
    IMG_0783.JPG
    131.4 KB · Views: 333
  • IMG_0782.JPG
    IMG_0782.JPG
    139.9 KB · Views: 366
Great build!  You're going to love that bench.  Thanks for the detailed photos. 

Standing by for more!
 
Sweet.  I like that you've gone for the dovetail on the front laminate to end cap joint.  You're right that the tail vise installation seems to be a lot simpler with the thinner top.  Just wait till you get to the crisscross leg vise installation though -- I'll be interested to hear how long you go before you say screw it, throw out the manual, ,and just install the darn thing -- instead of flipping back and forth between different sections of the manual trying to figure out what exactly they're asking you to do.

One note -- I think I wrote in a previous thread how I wish I had made the dog strip a bit larger than the 1.75" that was spec-ed in the Benchcrafted Tailvise manual.  I was just looking at my own vise again, and realized that 1.75 is actually the max width you can get without exposing the acme screw.

I think 20mm is the way to go if you already have the MFT hardware.  At this point though I rely a lot more on wooden dogs I turned on my lathe for clamping things in the tail vise.  They won't bite into the material the way the metal does (I used a sander to produce a flat edge), and there's no worries about chipping a plan blade.  I did find it helpful to chamfer the holes on mine.  I just mounted a small radius round over bit on the router and went at it.

You'll have to get some longer M8 screws to secure the clamping knobs you might normally use on the MFT, as well as grind off the nib on the end of any festool clamps so you can separate them -- on this thicker bench you have to insert the rod from underneath then reattach the screw/lever mechanism on top.   
 
Edward A Reno III said:
Just wait till you get to the crisscross leg vise installation though -- I'll be interested to hear how long you go before you say screw it, throw out the manual, ,and just install the darn thing -- instead of flipping back and forth between different sections of the manual trying to figure out what exactly they're asking you to do.

Funny, for the past couple of days I have been flipping back and forth through the criscross manual (and crossing out all of the paragraphs relating to the retro), the general tips pamphlet, the glide materials, and the actual plans  [scared], and was thinking it might just be easier to cut and paste everything into a new document so that all information is in one place and in order. 

I had not even gotten to thinking about the Festool clamps.
 
I will post some photos tomorrow from my office computer so I can save them with the proper orientation.  Some good progress along with a few more mistakes, but working through it.
I tried to follow the instructions to "find the center" on the screw and thought I'd nailed it but after installing the nut I saw that by leaving the other split washer off of the crisscross as the plans suggested it slid to one side and was way off center. I then removed the nut and bushing and started over but just eyeballed it, and it now seems perfect.
 
Nice work so far. I'm going to make one in the not too distant future. Already have the wood for the top. I'm not sure about the tail vise though. I might go with the veritas end vise instead.
 
Lol.  That's exactly what I ended up doing.  The "finding the center" protocol was just kind of mysterious.  The glide action works just fine on mine without having followed it.

Mismarked said:
I will post some photos tomorrow from my office computer so I can save them with the proper orientation.  Some good progress along with a few more mistakes, but working through it.
I tried to follow the instructions to "find the center" on the screw and thought I'd nailed it but after installing the nut I saw that by leaving the other split washer off of the crisscross as the plans suggested it slid to one side and was way off center. I then removed the nut and bushing and started over but just eyeballed it, and it now seems perfect.
 
Here are some more progress photos and some more “teaching moments.”  I am going to inject some of my philosophy at this point, as many will understandably think it is a bad idea to trying to build a proper workbench before getting a few more years of experience and skill.  Everyone seems to recommend against doing that.  My experience might help another fairly new woodworker decide when they have reached that point, and maybe others could add their views.  For me, this bench is a real stretch, but I am having a blast doing it, mistakes and all.

As mentioned earlier, I had originally started the bench before deciding to go with the Benchcrafted leg vise.  Although I didn’t buy Chris Schwarz’s workbench book (which I do regret), I did read several books and did a lot of research on the Internet before figuring out which way to go.  I wanted to start with something modest and use it to learn.  A hard maple top, but fairly thin.  A sturdy but not massive base.

At some point, the Roubo caught my eye, mostly because I could visualize using the leg vise.  My prior attempt to hand plane on the MFT was awful and short lived, and I have not done much in terms of clamping things to the front of it.  I got the Sjoberg portable moxon vise thing, which is really nice, but that device sitting on top of the MFT still wasn’t doing it for me.

So, I decided to get the Benchcrafted leg vise.  Yes, it is expensive.  But it was no more expensive than the mistake I made when I bought a benchtop jointer (my first jointer) that was out of warranty by the time I figured out how to use it and realized it had a bent table that couldn’t be adjusted.  I figured I could build a bench with the leg vise now, and in a few years build a better one with the same hardware.  The “buy once” concept.

Once I reviewed their construction tips and got the plans, I realized my legs were WAY too small, and repurposed them for the upper and lower short side rails.  They were a little less than 3” by 3”.  I repurposed the lower long rails into legs, which were still smaller than the Benchcrafted Roubo plans.  At that point, I decided to make the leg for the leg vise larger than the other three.  Of course, changing the plans created its own set of problems.

After seeing Edward’s post on his bench, I decided to go with the wagon vise as well.  They say every vise has benefits and disadvantages.  My thought was to just pick one of the many types and learn to use it, just like I bought and learned to use (and still learning) the Domino after never having cut a mortise.

After doing the new legs, I cut mortises to accept the long rails, using a Forstener bit followed by Japanese bench chisels.  That experience made me think Dominos would be better to join the short side rails to the legs.  I had not discovered the mortise chisel by that point.

Here is a photo of where I ended up. 

[attachimg=1]

As you can see, the 10x50 Dominos on the lower rails didn’t have enough clearance for the large that joined the long rails to the legs.  So I cut them off by about ¼”.  That made me think the Dominos would be too weak to prevent racking, but I put that on hold.

I then installed bed bolts to join the long rails to the legs.  Drilled the pilot holes on the bench press and then a really long auger bit:

[attachimg=2]
[attachimg=3]
[attachimg=4]

Back to the racking issue, I decided that the overall frame strength would be much better if I used wider upper rails rather than the 3”x3” ones I had.  The Domino 500 also didn’t have enough depth to drill mortises on both sides of those rails while referencing from the same inside edge of the leg, and I was not too sure of my skill to do the second row without referencing from the same edge.  This was my solution.

[attachimg=5]

I trimmed the 3x3 on the band saw so that both parts would be flush with the edges of the leg.  When doing the glue up, I also glued the two rails together for added strength.

Obviously, there is a problem with that photo.  Two sets of Dominos for the wide rail, but only one set of holes.  Had to go back and fix that.  But, this is how it ended up on the dry fit.

[attachimg=6]

I did the dry fit using full length Dominos, and you can see them peeking into the mortise near the top of the photo.

For the life of me, I couldn’t figure out how one of the upper rails was crooked in relation to the leg for the leg vice, when pretty much every corner was at 90 degrees, having measured several times.  Finally I remembered that I had made that leg wider than the others, so the upper rail wasn’t flush with the outside edge of the leg.  Fortunately, I figured that out before I drilled the Domino mortises into the leg or began planing the end of the rail.

Last night, I glued up the end with the leg vise.  Everything was square, right off the bat.  Large mortises on large legs seem to be much easier to square than the shop cabinets I had previously built.

[attachimg=7]

This morning, I chamfered the bottoms of the legs, drilled pilot holes on the bench press for the three holdfast holes on the one leg (need to buy a long ¾ auger bit), glued it up, installed the bed bolts and tightened up the entire base unit, and clamped the newly glued end. 

[attachimg=8]

Everything seems rock solid.

Tomorrow morning, I will finally be ready to move the base off the sawhorses and onto the floor, put the two tops onto the base, and then re-install the leg vise chop so I can cut it down to the proper height.  For now, I am planning to rest it on top of those slider things that furniture movers use, so that I can slide the workbench around the garage until I can see where it will work best.


Attachments

  • IMG_0828.JPG
    IMG_0828.JPG
    112.7 KB · Views: 2,376
  • IMG_0826.JPG
    IMG_0826.JPG
    97.7 KB · Views: 2,535
  • IMG_0827.JPG
    IMG_0827.JPG
    91.8 KB · Views: 2,459
  • IMG_0825.JPG
    IMG_0825.JPG
    101.3 KB · Views: 2,193
  • IMG_0817.JPG
    IMG_0817.JPG
    74.9 KB · Views: 2,114
  • IMG_0816.JPG
    IMG_0816.JPG
    76.9 KB · Views: 2,066
  • IMG_0815.JPG
    IMG_0815.JPG
    66.3 KB · Views: 2,297
  • IMG_0814.JPG
    IMG_0814.JPG
    66.3 KB · Views: 2,111
Nice progress.  Those are some big mortises you got for the long rails.  Seeing your build, I'm glad I only had to do the legs and front laminate/rail on my bench rather than a full base -- it looks like the base ends up taking more time than the top to build.

Are you left handed?  I'm just assuming that since the leg vise is on the right leg, that means the wagon vise will be on the left side of the bench, which is usually the way lefties set it up.
 
I am left handed, so that wasn't one of the many mistakes. [big grin]

The top did go pretty fast.  This was my first attempt at laminating boards.  It is easier watching videos than actually doing it. 

I don't have a table saw, which is why I didn't want to do a 4" thick top.  The TS55 struggled a little on the hard maple, which I think was 6/4.  I bought a 12" jointer/planer combo a couple of months ago, which helped a lot.  Got everything to size, glued it up (without using dominos for reference as I got in a hurry) and then ran the two split tops over the jointer and then through the planer.  The dog hole strip was added later and needs some planing to make it flush.  Even after cutting the maple, it seemed like every strip had grain going in two different directions, so planing is going to be interesting.  Hopefully I will learn how to use the low angle jack plane before the top ends up half an inch thick.

Both tops seemed flat coming off the jointer, but sitting on the base they are not 100% co-planar, and the rear one rocks very slightly.  After gluing up the base, the upper rails are slightly proud of the tops of the legs, so I think I need to work on those first, and then see how the tops look.

Yesterday, I put boiled linseed oil on the base.  A photo is below.

[attachimg=2]

I was startled by how much the grain came out.  You can see that the laminated long rails and legs have a darker cherry on the outside and lighter on the inside.  I bought the lumber at different times months apart, and while I had noticed the difference in color, I didn't really focus on the difference in the grain.  I showed a photo to the guy at the lumber yard, and he said they might have had a piece of curly cherry mixed in with their regular cherry.  If I had anticipated how good it would look, I might have kept it for a different project.  This was just supposed to be a workbench.  But, SWMBO likes it.

The Benchcrafted plans do have really large mortises and tenons on the long rails, and they cover about 3/4s of the surface area.  IT seats really well with the bed bolts.  The lower short rails on the sides are intended to be fairly thin, with thin mortises on the remaining part of the leg.  But because I had re-purposed the legs from the original design and used dominos, it created a bunch of problems, sorry, "opportunities" to re-design.

If you look at that last photo near the wagon vise, you will see the most glaring mistake, which is the groove for the vise rails that I cut on the front of the front laminate, and was too cheap/lazy to start from scratch with a new piece.  Haven't figured out how to fix it yet.  Either a strip of maple that won't match, or maybe a strip of cherry that will look important.  I am thinking that if I do the cherry strip and put in a couple of flush cut maple dowels, I can call it "housing for the SRM" (stupid router mistake) and no one will ask me what that means.


Attachments

  • IMG_0832.jpg
    IMG_0832.jpg
    122.5 KB · Views: 842
I did a very similar build over the last few months as well, but with very little Domino joinery.  By the time it was all done, I'd say I build ~2 complete benches.  The joinery in the plan (dovetails, drawbores, etc) was awful tricky...
 
I forget if I mentioned it in my original build thread, but yeah, when laminating the top, it was good that I remembered to standardize the grain direction on all the pieces so I didn't run into massive tear out when finishing the top with the jointer plane. You can work around this some by going diagonal, but ideally you will want to do some pure east west runs with the plane on the finishing passes. Maybe investigate high angle frog? Or fiddling with the chip breaker to avoid tearout.
 
Back
Top