Sanding swirls ETS150 and cherry

prjones

Member
Joined
Apr 5, 2024
Messages
30
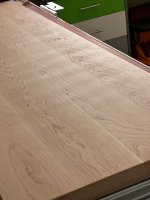
I've heard folks talk about getting sanding "swirls" in their finishes over the years, but I've never experienced it until now. I glued up an 8/4 cherry panel and sanded through the grits 80-120-220 with ETS150 and Granat paper, extractor turned down low, and moving slow with the weight of the sander. It feels smooth to the touch, but when light is raked over the surface, there are definite swirl marks:

View attachment 1

View attachment 2

Any idea what could be causing it and the solution? Thanks!
 

Attachments

  • IMG_3980.jpeg
    IMG_3980.jpeg
    1.3 MB · Views: 87
  • IMG_3981.jpeg
    IMG_3981.jpeg
    1.5 MB · Views: 92
You have some really nice figure in that cherry!

Would be weird to criticize your technique since you have years of experience and haven’t seen this before.

Clearly somewhere between 80 and 220 the swirls were established but was it from a random grit particle that didn’t get swept away or…?

I can only say the jump from 120 to 220 is too large in my experience. I think it’s ok to jump 50% from one grit to the next. From 120 I’ll use 180 and after that go to 240 if it’s on hand, otherwise 220.

When restocking abrasives I start with the grit I’ll want to end with and then fill in the blanks below that in 50% increments so if I want to finish with 220 I’ll also order 150, 100, 80 if starting with smooth wood.
 
Michael Kellough said:
You have some really nice figure in that cherry!

Would be weird to criticize your technique since you have years of experience and haven’t seen this before.

I can only say the jump from 120 to 220 is too large in my experience. I think it’s ok to jump 50% from one grit to the next. From 120 I’ll use 180 and after that go to 240 if it’s on hand, otherwise 220.

Not weird at all, brother - I love feedback! And you're absolutely right. I think I've just gotten lucky over the years, or am patient enough now to actually pay attention.  [big grin]

Good call - off to Woodcraft I go!
 
Go over the cherry with a slightly damp cloth to raise the grain, when it's dry lightly run the 220 grit over it again, if you still have swirl marks you need to go to a higher grit.
 
[member=81653]prjones[/member] some pieces of wood are sometimes just prone to get swirlies easily.

My sanding station is set up with a couple of LED work lights that throw low angle raking light over the workpiece. It becomes easy to inspect from these marks as you go along than to find them after the final sanding and have to drop back several grits and redo.

I have been following a method suggested by Allan Little for years now with good results.

"sand the sequence" 80-100-120-150-180-220-320
https://vsctools.com/important-sanding-tip-for-all-woodworkers/

Is it overkill? probably Does it take a little extra time? Yes but not as much as all the time I have spent fabricating the piece.

Ron

 
While the jump from 120 to 220 is too big, that doesn't explain why the swirl marks are there. If you had stopped on 120 would you still be seeing swirls? If so, maybe a 180 could sand them out, but would that also leave you 180 grit swirls?

I'd try turning the extractor up a bit. You want enough extraction to get the dust and any loose sand particles out of there before they scratch the wood. Also, check your paper before and after for anything that might have gotten encased in there.

BTW, the "full sequence" is, IMO, a waste of time and effort. While the description that each grit after the first is to get the sanding marks out is correct, doing it with just slightly finer sandpaper is a waste. You can see this yourself using the pencil method (lightly draw on the wood and then sand the pencil marks out). This is especially true at the finer grits, going from 180 to 220 or 220 to 240.

What you want in subsequent grits is rough enough to take out enough material to remove the scratch marks, but fine enough that you don't have to do that over and over and over and over again. I believe in the 50% rule, and have had good success with that.
 
I've had this effect appear on items I've sanded.  But I was using a Rotex 125.
Most of the stuff I work on is pine, but the worst was a teak table top I recycled for my inlaws.  (It still looks awful, but they like it).

The pattern appears to be parallel "lines" running across the boards.  It looks like waves to me.
Did you move the sander left to right over the work piece?  Can you tell which direction matches with which part of the wave?  I bet the swirls are clockwise in one pass and anticlockwise in the other pass.

Edit: I don't mean clockwise/anticlockwise, the sanding pad is always turning in the same direction. [doh]
I mean, I bet the swirls appear to be in different segments of a circle.  I.e. one line is running from 9 to 12, and the other is running from 3 to 6.  Like the pressure point on the sanding pad is shifting from left to right as you move the sander left to right over the work piece.

The reason I'm asking is I *think* this is due to the sander not sitting flat on the surface.  As you move it you apply pressure to one side of the pad, then you reverse direction and apply pressure to the other side.

Are you using a soft pad on your ETS?  What about interface/protector pads?  I've had better results just using the hard pad with the low grits and then switching to the soft pad as the high grits.

In the end I bought an ETS125.  Now I hold the hose and allow the sander to float over the surface with very little force to hold it.  So far, so good.

Regards
Bob
 
“The pattern appears to be parallel "lines" running across the boards.  It looks like waves to me.”

I think that washboard pattern is just the wavy nature of cherry grain, although it is remarkable that the waves sync across all three boards. I can’t imagine a sander larger than an RO-90 making waves like that and the op used the ETS150.
 
One possibility not mentioned here is that some of the coarser grit might have remained on the workpiece between changing grits and then got caught by subsequent paper.  Try brushing off or vacuuming between grit changes.
 
Peter Halle said:
One possibility not mentioned here is that some of the coarser grit might have remained on the workpiece between changing grits and then got caught by subsequent paper.  Try brushing off or vacuuming between grit changes.

If you can mimic your intended finish on a scrap piece from the same board(s), check to see if the scratches are visible.  I've experienced swirl marks with cherry too.  Sometimes, depending on the specific piece I'm sanding, the swirl marks are impossible to remove (for me, at least).  When this occurs, I remind myself of the intense, raking light I'm viewing them with and accept them.  I don't often stain or dye cherry, so these fine swirl marks are not visible in the film finish.  And on those rare times where I stain or dye, they have not been visible either.

If they are visible, I second what Peter stated; clean well between grits.  Microfiber works well to "pull" the grit/dust off the surface.  Refresh paper often.  I would also consider not reusing any of the finer grit when you resand.  There may be some grit embedded in the paper that is difficult to see.  Also, ensure your sanding pad is clean.  Good luck.
 
I don't do any furniture grade type work so I am not the expert on fine sanding. However, I've sanded a lot of Cherry. I use a 150/3 for the most part.
I go 80, 120, 180, 220 or 240. I've found that wiping down very well with mineral spirit after 180 before sanding with 220 works for me. I have to use the mineral spirit lightly and/or let the wood dry out before the 220 sanding to avoid blotching. Not a problem for me since I'm not in a rush. As others have mentioned turning up dust extraction, I would agree with that. I keep mine as high as possible without sucking down the sander.
 
Just another approach, while the FEPA P Grit Chart was divided to be fairly uniform, it can be misleading as the percentage change in the P number is not necessarily the same percentage change in grit particle size.

For instance, the difference in the P36 and P40 paper designation is only 10% yet the difference in the grit particle size is 22%.

Typically, the % difference in paper designation numbers is smaller than the % difference in grit particle sizes. That's the reason why for critical work, I'll step through the paper changes based on particle size rather than on P number.

In this application going from P120 to P180 is a 33% designation difference yet it's a 39% difference in grit diameter, while going from P120 to P220 is a 48% difference in grit diameter.
 
Cheese said:
Just another approach, while the FEPA P Grit Chart was divided to be fairly uniform, it can be misleading as the percentage change in the P number is not necessarily the same percentage change in grit particle size.

Oh man, you just sent me down a deep rabbit hole. I found this:https://www.gritomatic.com/pages/grit-fundamentals

It's not just the size of the particles, it's the range of particle size, since they're never all exactly the same. Apparently, shape of the particles matter, too.
https://uama.org/abrasives-101/

This chart shows the overlap of grits:
[attachimg=1]

Which also shows that going from 100 grit to 120 is very wasteful as there is about 50% overlap in actual particle sizes.


Attachments

  • Screenshot 2024-10-29 at 10.46.22 AM.png
    Screenshot 2024-10-29 at 10.46.22 AM.png
    85 KB · Views: 122
Back
Top