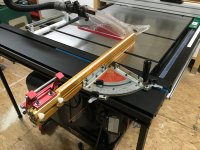
I really like the Sawstop Sliding Table. However, that isn't to say it is without its warts. The biggest wart, in my opinion, is the fence. It has some really nice features but the lack of positive stops for common angles, including 90 degrees from the blade, is a significant downside to the entire sliding table system.
Before installing the sliding table I used an Incra Miter Gauge with my Sawstop. I really like the Incra Miter Gauge so I went on a path to try and find a way to retrofit it to the sliding table. It turned out it wasn't all that hard.
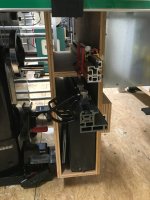
The miter gauge slots in the sliding table are reasonably standard sized. One issue is that there isn't a flat button to the miter slot. There is an extra depression that is around 5/8" wide and 1/8" deep. First thing I did was to cut a strip of oak that fits snugly in that depression and gave the miter slot a flat bottom. Next I replaced the steel miter bar with an aluminum one from Rockler.
http://www.rockler.com/rockler-18-24-aluminum-miter-bar
I did this for 2 reasons. First, if I ever decide to sell the Incra Miter Gauge I can put back the original bar and it won't have a bunch of holes drilled in it. Second, it is much easier for me to drill and tap the additional holes I needed in an aluminum bar vs. a steel bar.
Next I drilled and tapped 2 additional holes in the miter bar that match up with the mounting holes for the Incra Bar. Next i cut another piece of oak that would fit between the miter gauge and the bar since the slot in the sliding table has a flange. I drilled 2 over-sized holes in this 2nd piece of oak that match up with the mounting holes between the gauge and the bar. I drilled these pieces over-sized to allow for aligning everything. Finally, I installed 3 set screws in the 3 holes in the miter bar that come from the factory. These will be used to lock the miter bar in place.
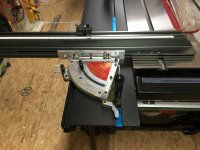
Now it was just a matter of fitting everything. There are 5 set screws in the miter bar for side adjustment. I adjusted these for a tight fit (side to side) in the miter slot. This pushes the bar to one side of the slot which is why I needed to drill the holes in the 2nd piece of wood over-sized. Next I dropped the 2nd piece of oak into place and screwed down the miter gauges to the bar. Next I tightened the 3 set screws that lock everything into the miter slot. After doing a standard alignment of the miter gauge to be 90 degrees to the saw blade I was done.
I still have to use an allen wrench to remove the miter gauge from the siding table but in many cases I can just slide the table all the way back and it is out of the way enough for many ripping operations.
Thanks
Before installing the sliding table I used an Incra Miter Gauge with my Sawstop. I really like the Incra Miter Gauge so I went on a path to try and find a way to retrofit it to the sliding table. It turned out it wasn't all that hard.
The miter gauge slots in the sliding table are reasonably standard sized. One issue is that there isn't a flat button to the miter slot. There is an extra depression that is around 5/8" wide and 1/8" deep. First thing I did was to cut a strip of oak that fits snugly in that depression and gave the miter slot a flat bottom. Next I replaced the steel miter bar with an aluminum one from Rockler.
http://www.rockler.com/rockler-18-24-aluminum-miter-bar
I did this for 2 reasons. First, if I ever decide to sell the Incra Miter Gauge I can put back the original bar and it won't have a bunch of holes drilled in it. Second, it is much easier for me to drill and tap the additional holes I needed in an aluminum bar vs. a steel bar.
Next I drilled and tapped 2 additional holes in the miter bar that match up with the mounting holes for the Incra Bar. Next i cut another piece of oak that would fit between the miter gauge and the bar since the slot in the sliding table has a flange. I drilled 2 over-sized holes in this 2nd piece of oak that match up with the mounting holes between the gauge and the bar. I drilled these pieces over-sized to allow for aligning everything. Finally, I installed 3 set screws in the 3 holes in the miter bar that come from the factory. These will be used to lock the miter bar in place.
Now it was just a matter of fitting everything. There are 5 set screws in the miter bar for side adjustment. I adjusted these for a tight fit (side to side) in the miter slot. This pushes the bar to one side of the slot which is why I needed to drill the holes in the 2nd piece of wood over-sized. Next I dropped the 2nd piece of oak into place and screwed down the miter gauges to the bar. Next I tightened the 3 set screws that lock everything into the miter slot. After doing a standard alignment of the miter gauge to be 90 degrees to the saw blade I was done.
I still have to use an allen wrench to remove the miter gauge from the siding table but in many cases I can just slide the table all the way back and it is out of the way enough for many ripping operations.
Thanks