You are using an out of date browser. It may not display this or other websites correctly.
You should upgrade or use an alternative browser.
You should upgrade or use an alternative browser.
Schmitt 32 System
- Thread starter linnlp12
- Start date
I was looking for an idea to steal to rig up my LR32 for better turnaround. And I encountered the Schmitt system this afternoon. I was curious if other Festool people had found it. So I searched the FOG and found only your post.
I'm not shopping but if I was it looks very interesting.
Pretty cool deal. Just a guy with an idea. I hope he makes a billion dollars.
I'm going to call him tomorrow. If get to talk to him I'll report back.
The obvious question I'll ask is about compatibility with the 1010 and the 1400. Festool isn't mentioned or shown. Could it be that he's unaware of the finest line of plunge routers on the planet? Unlikely. Certainly he knows about the LR32.
Looks like it'd be compatible with just about any plunge router. They're just mounted to a piece of MDF along with the pawls. You'd just have to do some figuring for whatever offset your model has from the base edge to the centerline of the bit.
A neat piece of tooling if you want to make cabinets using HIS system. The jig isn't very versatile though. Can't take it to a jobsite like LR32, as S32 requires a fixed base. And, a large one if you want to make tall cabinets.
Nice to have choices though.
A neat piece of tooling if you want to make cabinets using HIS system. The jig isn't very versatile though. Can't take it to a jobsite like LR32, as S32 requires a fixed base. And, a large one if you want to make tall cabinets.
Nice to have choices though.
I can see faster - it's a fixed based system.
I can see more accurate - for the same reason
I don't see more flexible - what am I missing ?
Cheaper ?
Perhaps - Depending on which version you get; it could be more expensive. Even more so if you already have a track saw and don't have to buy a guide rail. If you already have one , an LR32 setup with 5mm bit can be had for less than $300.
I agree with the previous poster as the Schmitt seems better than my LR32. Was going to order the all metal today until I saw it only can use the Dewalt 621 on the metal base. I have 4 routers and for now holding off on the all metal. A Milwaukee, Bosch and 2 Festool. I may order the mini system, it's seem so much easier and repeatable. I wish the LR32 had guides that allow one to position to drill all the holes in the panel front to back based off the front edge of the work piece.
Thinking more about it Schmitt's concept is better in a number of ways. But perhaps we LR32 people can have it both ways. We can adapt our holey rails and sleds into a fixed system solution.
We just utilize the holes at each end of the holey rail where the linear stop goes! Build a big U shaped thing like Schmitt's with holes in the arms just like he did. We mount pins in the last hole at each end of the rail. Bingo!
If I was starting from scratch I might be inclined (probably be inclined?) to just go with the Schmitt solution. But I'm not starting from scratch. I've got several hundred invested in my LR32. Plus I have the finest mid-size router on the planet which plunges so easy and smooth. Heck, if you just give it a stern look from across the room it bores a hole.
Here's a rough diagram - not to scale.
View attachment 1
Attachments

- Joined
- Feb 22, 2016
- Messages
- 2,858
"... Can't take it to a jobsite like LR32..."
Why not? Just mount it on a piece of plywood and take it with you.
Pull it out and toss it on top of your MFT or other table and you're
good to go I think or am I missing something. Once you mount the
jig it's pretty much self-contained. Maybe a little bulkier than the
LR32 system, and it does one job so not as versatile as the LR32
rails, but it seems like it could be taken on the road without much
trouble.
For me the upsides of the Schmitz32 seem to be the horizontal (depth, in relation to the front of the workpiece) rails with index notches for the vertical rail, the numbering for the holes, the registration which -as long as you stay in one direction- dosn't need you to press some button, the single point clamping and the ability to easily lift the vertical rail away from the workpiece.
Downsides seems to be that the workpiece needs to be smaller than the vertical rail for the horizontal ones to be useable at all and the need to have it installed onto a surface to keep it aligned (I don't see me carrying the system to a jobsite as me being more of a 'hobbyist' lacking a large van to move it in an assembled state).
The LR32 has the upside of being mobile with the bulkiest part of it (the rail) most likely being at hand anyway (for use with a TS).
Downsides are the horizontal (relative to workpiece) depth arms (SA-LR 32, which are strange compared to nearly all other festool stuff: overly thick and heavy) which are short so you can't reference everything from one edge for deep workpieces, the hazzle to change depts on them (no index notches to catch at default depths) and the need to always clamp the rail after positioning (to make sure it won't move while boring the holes).
As the SA-LR are relatively cheap (at least for festool standards -70€ incl. VAT for two-) and once they're setup they seem to hold their setting (as long as you only detach them on the rail side) one could get an additional pair to use for registering from the back of the workpiece (requires to rotate the FS which is cumbersome) -or- the back of the workpiece and the FS (instead of toward the splinter guard side, giving the SA-LR more reach as the ridge they connect to is near the back of the FS - way harder to setup correctly though as you can't use the notch in the LR32 baseplate to zero the SA-LR scale in this configuration). But more columns of holes are not really fun to make, as you either need more of the SA-LR, need to reset them repeatedly (with the likeliness of introducing errors) or need to use them to index from the last column of holes created (with the possibility to introduce cumulative errors).
So as long as you only need two colummns of holes (you would need to be ok with boring additional holes between the two columns created with the LR32 for heavy duty drawer with a self-centering drill with the drawer rails already installed - another can of worms as this might contaminate the drawer rail with shavings) simply getting more of them could be a way to go. But the need to rotate the FS 180° and/or register with the SA-LR out to the back of the FS is cumbersome and still might fall short on deep cabinets.
The missing hole numbering could be added using a sharpie and I think I can live with having to actuate the release button on the sled.
Bottom line: the limitation of the Schmitz regarding workpiece size is a real downside, as is the limitation (for me) to stationary use - for the LR32 it's the hazzle with depth positioning and repeated clamping (and the positioning of the clamps as they need to be removed to lift the rail from the workpiece).
The best plan - at least for me as I already have the LR32 - would be to retrofit the quick and easy depth registration from the Schmitz32 to the LR32 (using a small and somewhat simple jig, ideally without the limitation on workpiece length should one not have a long enough holey rail)... I have some ideas how to pull that off but want to test them in practice first (no need to send others onto a snark hunt") ) - might take a while...
) - might take a while...
Downsides seems to be that the workpiece needs to be smaller than the vertical rail for the horizontal ones to be useable at all and the need to have it installed onto a surface to keep it aligned (I don't see me carrying the system to a jobsite as me being more of a 'hobbyist' lacking a large van to move it in an assembled state).
The LR32 has the upside of being mobile with the bulkiest part of it (the rail) most likely being at hand anyway (for use with a TS).
Downsides are the horizontal (relative to workpiece) depth arms (SA-LR 32, which are strange compared to nearly all other festool stuff: overly thick and heavy) which are short so you can't reference everything from one edge for deep workpieces, the hazzle to change depts on them (no index notches to catch at default depths) and the need to always clamp the rail after positioning (to make sure it won't move while boring the holes).
As the SA-LR are relatively cheap (at least for festool standards -70€ incl. VAT for two-) and once they're setup they seem to hold their setting (as long as you only detach them on the rail side) one could get an additional pair to use for registering from the back of the workpiece (requires to rotate the FS which is cumbersome) -or- the back of the workpiece and the FS (instead of toward the splinter guard side, giving the SA-LR more reach as the ridge they connect to is near the back of the FS - way harder to setup correctly though as you can't use the notch in the LR32 baseplate to zero the SA-LR scale in this configuration). But more columns of holes are not really fun to make, as you either need more of the SA-LR, need to reset them repeatedly (with the likeliness of introducing errors) or need to use them to index from the last column of holes created (with the possibility to introduce cumulative errors).
So as long as you only need two colummns of holes (you would need to be ok with boring additional holes between the two columns created with the LR32 for heavy duty drawer with a self-centering drill with the drawer rails already installed - another can of worms as this might contaminate the drawer rail with shavings) simply getting more of them could be a way to go. But the need to rotate the FS 180° and/or register with the SA-LR out to the back of the FS is cumbersome and still might fall short on deep cabinets.
The missing hole numbering could be added using a sharpie and I think I can live with having to actuate the release button on the sled.
Bottom line: the limitation of the Schmitz regarding workpiece size is a real downside, as is the limitation (for me) to stationary use - for the LR32 it's the hazzle with depth positioning and repeated clamping (and the positioning of the clamps as they need to be removed to lift the rail from the workpiece).
The best plan - at least for me as I already have the LR32 - would be to retrofit the quick and easy depth registration from the Schmitz32 to the LR32 (using a small and somewhat simple jig, ideally without the limitation on workpiece length should one not have a long enough holey rail)... I have some ideas how to pull that off but want to test them in practice first (no need to send others onto a snark hunt
) - might take a while...Gregor said:The best plan - at least for me as I already have the LR32 - would be to retrofit the quick and easy depth registration from the Schmitz32 to the LR32 (using a small and somewhat simple jig, ideally without the limitation on workpiece length should one not have a long enough holey rail)... I have some ideas how to pull that off but want to test them in practice first (no need to send others onto a snark hunt
I love snark hunts so knock yourself out!
The jig would indeed be very simple. But it would need to be very, very accurate.
fshanno said:The jig would indeed be very simple. But it would need to be very, very accurate.
Could you please quantify 'very, very'?
1/10mm, 1/100mm, 1/1000mm?
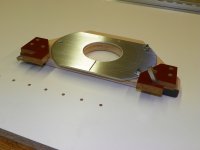
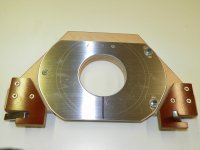
I traveled to his workshop today and purchased the system. Great guy. He spent a long time explaining the system and showing me how to set it up. We drilled a few holes. Once you get it dialed in it's so easy and repeatable. Probably won't use my LR32 very much anymore. It's a lot more fiddly than the Schmitt and as stated before, I don't have to keep changing the setting stops and the holes for drawer slides are right on. I purchased the all metal so I needed the Dewalt 621 which was just on sale. I highly recommend this tool.
Mr. Schmitt has an alternative base that I'm almost certain will fit the 1400. I'm sure the 1010 will fit.
View attachment 1 View attachment 2
Still, it's probably better to dedicate a router, or at least an extra plunge base to the hole jig. I think one of the problems with the LR32 is alignment on the sled from use to use. I do the whole centering mandrel thing with my 1400 and it can't be too far off. But still. Having to flip the rig around to do different columns doubles whatever error there may be.
I'm going to try to figure out a productive platform solution for my LR32 that allows all registration to be from the bottom and front of the panel. No flipping things around. Build in the ability to zero out any discrepancy in centering up the router AFTER the router is locked in. If I can't figure something out I may be placing an order for the Schmitt jig.
Attachments
Bohdan
Member
[member=2018]fshanno[/member]
Version 1 of a jig to use the LR32 in the same way as the Schmitt system has been built and is being tested. It is designed to fit on a 96 mm pattern top with dogs and can be lifted off and replaced at will. Centering of the router cutter can be adjusted with a grub screw on the jig so that the left and right sides of a cabinet are a perfect match.
Accuracy is fine but I have already spotted some improvements which will make it more user friendly and easier to build so version 2 is under construction.
I am using the standard LR32 rail which is longer than the MFT/3 so it overhangs the table and makes life hard.
A version to fit on the MFT/3 is possible but it will limit the height of the side that can be processed to about 900 mm. For now I am working on one that will fit on an extended 96 mm pattern top or a pair of MFTs locked together.
I will post photos and instructions as soon as ver 2 is finished and tested.
Bohdan
Member
Need an 8 mm dowelling drill bit for the OF1010 to finish the new version. Bought one via the net last week and dealer just informed me that it would be at least another 2 weeks as Festool Aust need to import one.
Would have been quicker and probably cheaper to have bought it in Europe and imported it myself but now I have to sit and wait.
Would have been quicker and probably cheaper to have bought it in Europe and imported it myself but now I have to sit and wait.
Richard/RMW
Member
- Joined
- Jul 11, 2010
- Messages
- 2,947
[member=36526]Bohdan[/member] - really curious to see your setup. I was noodling a similar-sounding MFT/DOG/LR32 setup last summer and never came up with anything I liked. Post some photos when you have time.
Thanks,
RMW
Thanks,
RMW
Bohdan said:[member=2018]fshanno[/member]
Version 1 of a jig to use the LR32 in the same way as the Schmitt system has been built and is being tested. It is designed to fit on a 96 mm pattern top with dogs and can be lifted off and replaced at will. Centering of the router cutter can be adjusted with a grub screw on the jig so that the left and right sides of a cabinet are a perfect match.
Accuracy is fine but I have already spotted some improvements which will make it more user friendly and easier to build so version 2 is under construction.
I am using the standard LR32 rail which is longer than the MFT/3 so it overhangs the table and makes life hard.
A version to fit on the MFT/3 is possible but it will limit the height of the side that can be processed to about 900 mm. For now I am working on one that will fit on an extended 96 mm pattern top or a pair of MFTs locked together.
I will post photos and instructions as soon as ver 2 is finished and tested.
Bohdan
Member
[member=8712]Richard/RMW[/member]
I am up to version 3 already but can't show pics until I get the 8 mm dowel drill. Version 3 can be mounted on a drilled flat board and will be able to be used with the long rail if necessary. It also works for a 32 or 16 mm offset and can be adjusted to use any other offset.
I am up to version 3 already but can't show pics until I get the 8 mm dowel drill. Version 3 can be mounted on a drilled flat board and will be able to be used with the long rail if necessary. It also works for a 32 or 16 mm offset and can be adjusted to use any other offset.
Bohdan
Member
I have started a new post on the jig build.
http://festoolownersgroup.com/festool-jigs-tool-enhancements/lr32-jig-that-drills-all-of-the-holes-with-one-setup/new/#new
http://festoolownersgroup.com/festool-jigs-tool-enhancements/lr32-jig-that-drills-all-of-the-holes-with-one-setup/new/#new
Similar threads
- Replies
- 27
- Views
- 2K
- Replies
- 4
- Views
- 391