Scratching my head about this chute (3-D printed?)

ChuckM

Member
Joined
Sep 7, 2015
Messages
5,732
I came across this on Etsy that is supposed to improve dust collection on the table saw:

[attachimg=1]

But I really can't tell when this chute could be used or how it will help as shown. Perhaps the seller should prove its effectiveness or usefulness with some sample cuts (before and after) in a video.


Attachments

  • dust guard.JPG
    dust guard.JPG
    46.9 KB · Views: 666
I did see the chute in full without the hose before, but my point was when the SawStop dust guard is put down on the table and the chute positioned away from where it is shown on the photo, the effectiveness of the chute becomes questionable. It'd be more convincing if the seller included some real shop shots to show the difference/results.
 
I do like the slot design on the sides so you can more accurately place the chute. I'm not sure how much it will catch if you're edge-jointing a board with a non-captured cut.

I crufted up this solution when I had a lot of boards to joint for my kitchen. The dust chute from Veritas has a magnetic base. The 'fan' on it was taken from one of those wall outlets for passing wire. Hot-melt glued it inside. The chute perfectly fits the D50 so I put it on my CT-22. The photo was a setup I did just now to explain; maybe I can run a board another day.


Attachments

  • 2023-12-22 02.00.19.jpeg
    2023-12-22 02.00.19.jpeg
    414.9 KB · Views: 139
  • 2023-12-22 02.00.27.jpeg
    2023-12-22 02.00.27.jpeg
    425.4 KB · Views: 119
Thanks for sharing your photos, Paul. I did something similar (but without the bristles) using a shop vac accessory instead of a Veritas chute. I got a better result but not satisfactory enough for me.

I happen to have lots and lots of strips (100?) to make next month. I'll fashion something out of wood similar to the Etsy's (very easy to do with a block, cavity routed on the bottom, hole drilled on the top (or actually on the side or end} for the hose and some magnets added for attachment to the table) and find out how such design works in practice instead of theory. I'll share my observations here idc.
 
Edge cutting dust capture can also maximised by laying a board along the table and very close to the cut area under the hood. The saw dust hits it, stops, and the hood has time to capture the dust that would have been ejected at high speed.
 
Mini Me said:
Edge cutting dust capture can also maximised by laying a board along the table and very close to the cut area under the hood. The saw dust hits it, stops, and the hood has time to capture the dust that would have been ejected at high speed.

Good idea.

This method probably will work well with the SawStop dust guard which is very effective in collecting dust in non-edge rip cuts -- 99% or higher (if the guard is directly connected to an auxiliary vac). I'll give it a try with the strips before considering to explore the dust chute idea further as discussed above. Only the last few cuts are edge cuts, so it won't be too troublesome to place/adjust a board there.
 
My dust collection was effective with Delta’s supplied metal inserts.  But when I installed a zero clearance insert, it was far less effective.  That device might improve the effectiveness.

 
Packard said:
Snip. But when I installed a zero clearance insert, Snip.
The SawStop comes with a ZCI. To keep my ZCI in shape after prolonged use, I "refresh" it with Bondo. A new ZCI from SS is pretty pricey.

[attachimg=1]


Attachments

  • ZCI bondo1.JPG
    ZCI bondo1.JPG
    20.6 KB · Views: 561
Many years ago, I made a blade guard that was suspended above the saw and held in place from the floor joists above the saw in my basement. 

I had dust collection in the guard that I could lower or raise according to the need.

It worked pretty well.  I don’t remember why I stopped using it.  It was interfering with something, but I don’t remember what.

There are pricy commercially available versions, some with integrated dust collection.
https://www.google.com/search?q=ove...le saw&ie=utf-8&oe=utf-8&client=firefox-b-1-m

Mine was manually set for height and angle, not counterbalanced. I used an old height-adjustable light stand to hold it in place.  I mounted the stand to the overhead floor joist, and the guard to the tip of the stand.  A thumb nut allowed me to lock it in place or lift it out of place.  It was easy to use.  I wish I knew why I tossed it.

I used this type of stand.  I removed the tripod section and used U-bolts to attach it to the floor joists.

neewer_66600322_300cm_stainless_steel_light_1669222807_1733547.jpg
 
SawStop offers two types of  overhead dust collection, and I've used both of them, one on my PCS and one on an ICS at another place for an extended period of time.

The much more expensive Excalibur type requires manual adjustments in clearance every time a stock of different thickness is ripped while the dust collection tube guard requires no adjustments. The latter also performs better in terms of effectiveness. Lastly, the tube guard is narrower, allowing the ripping of thinner stock than the Excalibur type.
 
In virtually every cut I make on the table saw, I have stock on both sides of the blade.  That stock will:

A.  Force the blue gadget too far from the blade to be useful/

B.  And except when ripping 1/4” or thinner material, will block the entrance to the dust collection gadget.

I would call this device useless, unless you are cutting dowels to length or similar stock.
 
ChuckS said:
I came across this on Etsy that is supposed to improve dust collection on the table saw:

[attachimg=1]

But I really can't tell when this chute could be used or how it will help as shown. Perhaps the seller should prove its effectiveness or usefulness with some sample cuts (before and after) in a video.

Hi!  Etsy brought me to this forum and your post (it tracks where clicks come from).  I am the seller of these dust chutes, and I found all the comments in this short thread very helpful to me so I thought I would post. 

As I've been using these dust chutes for years, it never occurred to me that its effectiveness wouldn't be obvious.  Thanks to your comment, I will make a video and post it.

There are also several different versions there in my store.    The horizontal hose attachment is the best seller at woodworking shows I go to.  There are also versions that use the mag-jig magnets.

As pointed out above, the point of this chute is for when the cut doesn't have enough material left on the other side of the blade to force the sawdust down.  Yes, any other cuts that are wider will see little benefit. 

If you are willing to continue this thread and post your results (good or bad) I would be willing to send you the chute for free if you will pay the shipping cost.    Send me a message here or on etsy to work out the details.  Offer is good for anyone here willing to continue the conversation and help me improve the design.  On that note, I take custom design requests too (yes its 3d printed)
 
fournierwoodcraft said:
Hi!  Etsy brought me to this forum and your post (it tracks where clicks come from).  I am the seller of these dust chutes, and I found all the comments in this short thread very helpful to me so I thought I would post.Snip.
Thanks for chiming in with a video to follow. When I first saw your photo with the corner of the chute directly in front of the ripping line of the blade, I couldn't but wonder how it'd function:

[attachimg=1]

My shop is right now too cold (we've been in a deep freeze), but I plan to fashion this accessory into a chute to see how it'd work with a shop vac in comparison to [member=58818]Mini Me[/member] 's suggestion when the warmer days return:

[attachimg=2]


Attachments

  • blocking1.JPG
    blocking1.JPG
    31.6 KB · Views: 454
  • ss chute.JPG
    ss chute.JPG
    28.3 KB · Views: 448
ChuckS said:
fournierwoodcraft said:
Hi!  Etsy brought me to this forum and your post (it tracks where clicks come from).  I am the seller of these dust chutes, and I found all the comments in this short thread very helpful to me so I thought I would post.Snip.
Thanks for chiming in with a video to follow. When I first saw your photo with the corner of the chute directly in front of the ripping line of the blade, I couldn't but wonder how it'd function:
Wow, you are right, that is a terrible picture now that you mention it.  The purpose was more to show that it could be positioned at whatever angle worked the best. I didn't even notice it was in front of the blade. 
 

It's hard to tell how much was really improved based on the video alone, using a shop vac (split into two ports). It'd have helped if the video had provided some visual clues on the before- and after- results. Some suction is, of course, better than no suction.

I've used both the SawStop overarm dust collection blade guard (https://www.leevalley.com/en-ca/shop/tools/workshop/dust-collection/parts-and-accessories/72180-overarm-dust-collection-accessory-for-sawstop-contractor-professional-and-industrial-table-saws?item=95T0540)  and the equivalent of the dust collection floating overarm (https://www.leevalley.com/en-ca/sho...tm_campaign=shopping_feed&utm_campaign=CAN-EN|PLA|Shopping|Tools|Non-displayItems&gad_source=1&gclid=EAIaIQobChMIpPPruKrTgwMVoBCtBh3xMwrJEAQYASABEgKWT_D_BwE) for a few years on an ICS.

The collection blade guard outperformed the floating arm in several aspects with no questions.

If I were to improve dust collection on a non SawStop cabinet saw, I'd fashion something like the Euro saw blade guard (some YouTubers have done that) instead of an overhang arm.
 
I made a video.  Works well for this situation where you want to pickup the dust off a cut with little waste and/or the blade guard is not grabbing it.  I still need footage from a bandsaw.
 
Thanks for your update.

The tests I'd be doing* will cover cuts done with the SawStop overarm dust collection blade guard in place (partly for safety reasons) as the majority of saw cuts are performed on my PCS like that in real life. The dust collection equipment to be used is a 1HP HEPA DC connected to the 4" port on the saw and a shop vac hooked to the dust collection blade guard.
 
Mini Me said:
Edge cutting dust capture can also maximised by laying a board along the table and very close to the cut area under the hood. The saw dust hits it, stops, and the hood has time to capture the dust that would have been ejected at high speed.
Ok. After an hour, my shop finally was warmed to 10C by a 220V electric garage heater. and for the first time in 2024, I stepped into the shop to work on some project preparation. I took the opportunity to find out how the strip and a table-mounted dust shroud worked against each other.

Executive Summary:

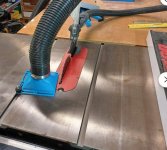
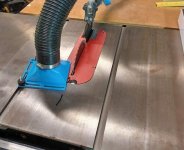
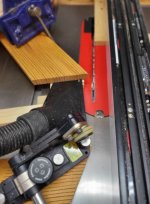
1) The strip worked perfectly well with the dust collection blade guard for edge cuts -- no surprise here because we all know the SawStop's blade guard excels in non-edge cuts (Photos 1 & 2)

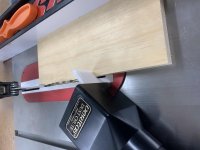
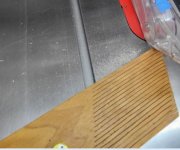
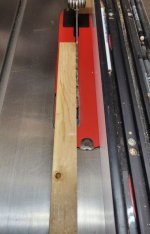
2) What surprised me was that with the strip in place, even when the blade guard was not engaged (i.e. the guard was lifted up), little dust was observed on the table (suggesting the 1 HP dust collector was effective in doing the under-the-table dust collection. (Photo 3) But I always use the blade guard whenever possible.

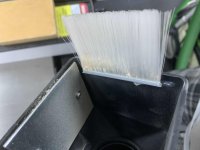
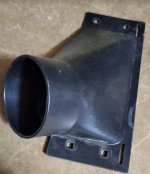
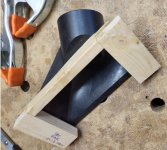
3) The shop-made dust guard (not the commercial version) worked in collecting some dust, but some escaped (see the dust particles on the dust shroud). Be cautioned that the test was done using the dust collection hose from the dust collection guard, not some central dust collection system. (Photos 4 & 5) If a very powerful dust extraction was used, the result might be different, but such an option was no available or practical in my shop .

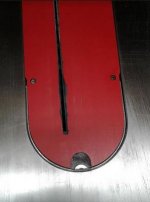
4) The dust collection blade guard and dust collector (for under-the-table collection) performed the worst -- again, no surprise here. (Photo 6).

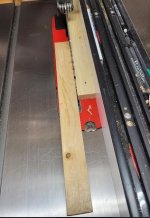
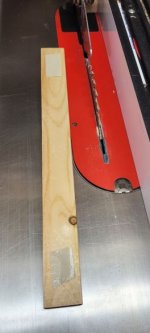
This was a user test using some pine pieces (Photo 7) based on my shop's normal operating conditions (1 HP dc, shop vac attached to the dust collection blade guard or to the shop-made dust shroud). Its findings may apply or may not apply to other shop settings.

Photo 1                Photo 2
[attachimg=1]      [attachimg=2]

Photo 3
[attachimg=6]

Photo 4                Photo 5
[attachimg=3]      [attachimg=4]

Photo 6
[attachimg=7]

Photo 7
[attachimg=5]

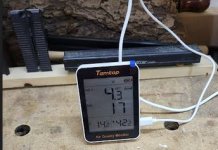
After all the cutting (including sawing the thin strips seen in photo 7), my shop's air quality started from good and ended at fair (the air filltraton system was not turned on).

Edit After the two air filtration systems ran for the desired duration, the shop's air quality returned to normal (Good):

[attachimg=8]
 

Attachments

  • edge cut dust blade guard only only.JPG
    edge cut dust blade guard only only.JPG
    27.3 KB · Views: 331
  • edge cut dust blade guard only.JPG
    edge cut dust blade guard only.JPG
    29.3 KB · Views: 331
  • edge cut dust blade guard test.JPG
    edge cut dust blade guard test.JPG
    91.6 KB · Views: 331
  • edge cut dust shroud.JPG
    edge cut dust shroud.JPG
    44.7 KB · Views: 327
  • edge cut dust shroud00.JPG
    edge cut dust shroud00.JPG
    64.6 KB · Views: 331
  • edge cut dust blade guard plus strip.JPG
    edge cut dust blade guard plus strip.JPG
    36.8 KB · Views: 334
  • edge cut dust blde gard strip.JPG
    edge cut dust blde gard strip.JPG
    22.8 KB · Views: 332
  • shop air quality.JPG
    shop air quality.JPG
    21.2 KB · Views: 317
Back
Top