Sealing edges of particle board b4 edge banding (?)

Banana

Member
Joined
Dec 21, 2019
Messages
89
Is there a sealant that works for the exposed particle board edges of Melamine panels 'before' I edge band them ?

Great client want's some cheap materials at one of their rental properties.  I know that these drawer / door fronts in a kitchen will eventually receive water dripping down.  Melamine panels bloom/explode as they wick in the water at the seams of edge banding.

So I was thinking I could seal the exposed edges first to build in some life then edge band but I'm concerned that whatever I use will either react with the hot melt adhesive or react to the iron heat or both.

Any experience would be appreciated.
 
I’ve never tried this, but SealCoat (de waxed shellac) will seal.  And dewaxed shellac has the reputation of sticking to almost any substrate and almost any finish, adhesive, etc. will stick to shellac. 

I do use SealCoat to seal the cut and machined edges of MDF to prevent expanding when applying water based finishes.  It works very well.  It dries in about 10 minutes and the odor dissipates quickly.  For small jobs, a foam brush works fine.  But it will get soft from the shellac after about 10 minutes, so not so good for larger jobs.  For sealing the edges of MDF, the foam brush should do fine.  I would apply two coats. 
 
I suppose it depends on what you are using for edgebanding and how you are attaching it.
The typical PVC edgebanding that is used with melamine doesn't have any issue with water, so the adhesive is the only real variable. The hot adhesive that comes from machine application should be plenty good. Even the iron-on stuff that is used by many hobby woodworkers should be good enough too. The only one that might concern me is the self-adhesive (peel & stick) material. That stuff never seats as hard as the other methods and might cause the problem you are concerned about.
Of the thousands of cabinets that I have built over the years, the only times there is ever a water problem is when there is a plumbing leak under the sink. The water lays on the bottom of the cabinet and where they fail is when it gets into the dado that holds the back in place.
Doors are killed way more often by impact damage or someone overstressing the hinges, than you will ever get with water damage in sink cabinets.
 
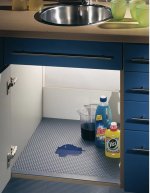
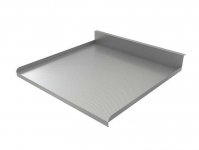
I got into the habit of angling the deck of sink bases 1-2 degrees downhill from back to front. If there’s a slow leak underneath the sink, the water will (theoretically) roll out between the doors at the front making it obvious to the homeowner that there’s an issue.
 
Thanks guys.

[member=74278]Packard[/member]
Thanks for pointing me towards the de waxed benefits of seal coat.  I’ll get a fresh quart to test.  Sounds about as good as I can do.

[member=58857]Crazyraceguy[/member]
The panels I’m concerned about (in this case) are usually the ones in front of sink. Dead front and doors. People leave wet rags etc. hanging over or water splashes out over the counter.  The cheap Melamine sheet here is less mdf core and more particle board and the water can eventually wick at the seams of the edge banding. Though, at first, the hot melt adhesive does do a good job of sealing. (yes good point, definitely wouldn’t use the peel & stick as they should call it ‘peel & stick & peels off’).

[member=15972]Peter Kelly[/member]
Yeah, the smallest leaks over time just destroy the base, there should be some code requirement as to how these are assembled to address protection. Whenever I have any scrap of white vertical grade laminate on ply I will use it under the sink.  But if none is around I still seal the edges before assembly with anything handy and lay down a tiny thin fillet bead of polyurethane sealant around the three sides after assembly.  I tell the clients the bead may turn in color over time but they will thank me in the long run.  Never thought of pitching the angle though, might have to add that into the mix.
 
I built “back room” cabinets for my picture framing business.  To store the many colors of mat board, I made cabinets that had moveable vertical partitions. The partitions were made from 1/4” hard board, and I cut dadoes every 2” on the top and bottom for the hard board to slide into.  It made adjusting the size of the segments easy.

However, when I closed the business and moved upstate, these cabinets went into the basement. Within 6 months, those “movable” partitions were “welded” in place.  Even grabbing them wit a vise grip was insufficient to make those panels move.

The particle board does not need to get wet to swell.  Humidity will do it just as well.  I had paint on the particle board (but not in the grooves).  The Masonite had no finish.  I assume that that Masonite and the particle board swelled causing them to bind.

It is not a disaster, but my best design feature was thwarted.
 
I swear by sign board / Extira mdf for a lot of projects now because of it’s low moisture absorption even though cost puts it near BB.
Had a client that wanted custom oversized acoustic absorbers with Guilford of Maine linear woven fabric stretched / wrapped across.  All panel edges were to abut to look like a fabric wall. 
Like an idiot I made boxes/frames (lattice network inside) out of UltraLite (or maybe reg mdf), stretched fabric to perfection and covered the huge wall that's faced when at mix boards.  Very proud of how sharp / precise it all turned out and a happy client.
Went back to job years later and the fabric was less than tight.  I was horrified, no one ever told me. 
Found out that it only does it for about a month each year then everything tightens back up again. 
Very nice client so I asked to come back next month to see for myself and sure enough it all looked good as new.  Told him I would replace every one of them but he said he was too happy with the room sound as it is and said not to worry about it. 
I originally built on site but should have cranked up the heat higher.  Oh the shame.
 
We offered clients the option of using Extira or marine ply for the base of sink cabinets, with plastic laminate that matched the melamine.  You could do the same where you think there might be a problem. You need to laminate the panel's on both sides to keep them flat.


Attachments

  • 94BDCB76-36E1-4861-876F-7E6CAE45F51C.jpeg
    94BDCB76-36E1-4861-876F-7E6CAE45F51C.jpeg
    119 KB · Views: 1,839
  • 53017CDA-9FBF-409E-A1EE-18B4F5317A39.jpeg
    53017CDA-9FBF-409E-A1EE-18B4F5317A39.jpeg
    59.8 KB · Views: 1,840
Spoke with Zinsser support and they saw no problem with using SealCoat.  They felt hot melt adhesive would bond and hot melt temp should not lift or change shellac.
They also suggested I experiment with an Oil Based Poly or even a Spar Varnish (low wax). 
Two of these 3 are drying now on scrap then will test banding pull off strength.  I only coated half of each scarp length so the banding would also adhere to unsealed material so that I can gauge any differences when I rip it off.
 
In my experience shellac will raise the grain a little bit, more so on mdf and particle board, but it dries so fast a few swipes with a sanding block will make the edges good to cover with banding.

To really avoid swelling fibers you need use the oil based stuff that was also recommended. But that will take so long to dry I wouldn’t bother.
 
Peter Kelly said:
I got into the habit of angling the deck of sink bases 1-2 degrees downhill from back to front. If there’s a slow leak underneath the sink, the water will (theoretically) roll out between the doors at the front making it obvious to the homeowner that there’s an issue.
Peter Kelly said:
The Häfele dimple mat also works pretty well for containing a really slow leak. Easy enough to trim to fit the sink’s deck as well.

Thanks [member=15972]Peter Kelly[/member] for posting both of these suggestions. Both are great ideas.  [smile]
 
On a similar thought (but a different application), I see people caulk around the base of newly installed toilets.

I never do that.

If the wax ring leaks, I want to see a telltale on the floor around the toilet.  I don’t want to discover that the toilet was leaking for years, but the caulking kept it hidden.

Note:  I do run about a 2” bead of silicone sealant at the front of the bowl to keep it from shifting from right to left.

The wax ring won’t anchor it, and if you tighten the bolts enough to do so, you risk cracking the porcelain.
 
Yup, finding the oil taking too long to cure.  Too cheap a job to use anything that isn't a very quick task.

This is the oil poly below.  Prob not fully cured as I swiped on two coats within minutes of each other hours ago.  The adhesive is perhaps slightly bonding better to the unsealed side.  But nothing that would make any long term difference i think. When I take a knife to get under banding more glue stays behind on unsealed side, though I'm trying to dig down, with only the pvc coming off.  With poly side it's more like a thinner layer of glue is left and the pvc comes off with some glue left on.

After taking photo I just looked back and of course poly side water is still beaded and unsealed side absorbed, no surprise there. 

BSnyXG.jpg
 
Packard said:
On a similar thought (but a different application), I see people caulk around the base of newly installed toilets.

I never do that.

If the wax ring leaks, I want to see a telltale on the floor around the toilet.  I don’t want to discover that the toilet was leaking for years, but the caulking kept it hidden.

Note:  I do run about a 2” bead of silicone sealant at the front of the bowl to keep it from shifting from right to left.

The wax ring won’t anchor it, and if you tighten the bolts enough to do so, you risk cracking the porcelain.

Yes, I was taught that during the first toilet replacement job I ever did. Sound advice, but I have seen it done countless times.
 
I have used both Bondo and PL Premium to fill the open grain structure of particle board before edge-banding.
 
I built a small book shelf unit a few years ago for the local Starbucks.  They used it for the free exchange library (“take a book;leave a book”).

Knowing it was for a retail environment I tried to make the piece as robust as possible.  I used white melamine clad particle board, edge banded with white resin edge banding (heat applied).

Three years later the daily mopping had taken a toll, and the edge banding was peeling off in spots. 

I picked up the book shelf unit and added PVC trim around the base of the unit to protect against the wet mops. 

I removed the edge banding (easily done with a heated iron) and replaced it with oak (real wood) edge banding.  I stained it after installation and I applied three coats of oil based poly.

Five years later the wood edge banding is all in good shape.

I don’t know why the wood edge banding stood up so much better.  The application method is the same. 

In my opinion the contrasting color wood edge banding improves the appearance of the book case.  If that is not acceptable, I would use wood filler to smooth out the edges and paint with oil based enamel.

In the future I would go the wood filler + paint method.  Nothing to peel off and a small brush and paint to make “repairs”.

I use Park’s grain filler to fill the edges of MDF an particle board.  It applies like shoe polish with a rag, dries quickly and sands easily.  It accepts paint.  You find it in the floor refinishing department.  It is usually used to fill the grain in oak flooring prior to finishing.
 
Packard said:
... years later the wood edge banding is all in good shape.

This was my hope, that the poly (or shellac) when applied wicks into or at least seal overlaps the edges of banding. Which I 'assume' is why the real wood banding you applied has held up (besides being turned into plastic). 

The technique I'm looking for is really only for the few doors and drawers under any sink/basin.  Economy melamine banded lasts quite a while on its own due to the banding adhesive squishing out a bit.  At least long enough to cash the check.  So for long term moisture exposure it may be as simple as applying / rubbing in a wax at the seams 'after' edge banding.

*ok, as I was blabbing here I reached over to my test piece to ponder and dug my nails in to try and lift banding.  Maybe I should have let the oil poly dry longer (about 3 hours but I did use a blow dryer to help it along and strip was quite thin) but I'm able now, a day later, to pull up banding surface (easier) with just my finger nail (on oil poly side). But not on untreated side (not easily). I can also scratch off glue on poly side as well (much easier) but not the same on untreated side (not so easy). (exposed glue on untreated side was previously cut off with knife).  I'll experiment with shellac next.
CC4ajp.jpg
     
 
Packard said:
On a similar thought (but a different application), I see people caulk around the base of newly installed toilets.

I never do that.

If the wax ring leaks, I want to see a telltale on the floor around the toilet.  I don’t want to discover that the toilet was leaking for years, but the caulking kept it hidden.

Note:  I do run about a 2” bead of silicone sealant at the front of the bowl to keep it from shifting from right to left.

The wax ring won’t anchor it, and if you tighten the bolts enough to do so, you risk cracking the porcelain.
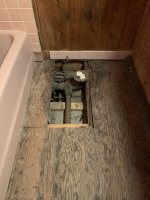
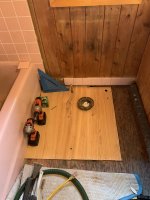
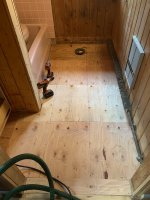
I found this out when I renovated my bathroom at my home Upstate. The original closet flange had been installed significantly higher than the decking so the tile mud bed had been mounded up to meet it. This insured that the toilet never really sat correctly on the tiles, constantly breaking the wax seal and subtly leaking for decades. Previous owners of the property had run a really fat bead of silicone around the bottom of the toilet and decking was utterly gone in all directions around it.

I suspect the previous toilet was actually being held up by nothing more than the waste line itself.

[attachimg=1] [attachimg=2] [attachimg=3]


Attachments

  • IMG_2690.jpeg
    IMG_2690.jpeg
    143.1 KB · Views: 1,733
  • IMG_2694.jpeg
    IMG_2694.jpeg
    140.5 KB · Views: 1,734
  • IMG_2698.jpeg
    IMG_2698.jpeg
    135.2 KB · Views: 1,740
Back
Top