Setting cursors on the TSO parallel guide without guesswork (design weakness ?)

Joined
Aug 13, 2021
Messages
6
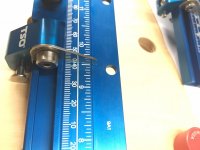
I purchased the TPG Parallel Guide System, and found that the system is well designed, but I have a hard time eyeballing the cursors.

I'm wondering if my eyes are to blame, or if there's a design flaw:

When trying to set cursors to the desired length, one of the following situation occurs:

+ the cursor is in the shade, and it makes it hard to see if it is directely before the desired line on the scale

+ the cursor is not in the shade, but because it is a shiny surface, light is reflected in my eyes, and the white lines on the scale become hard to distinguish from the shiny light blue surface.

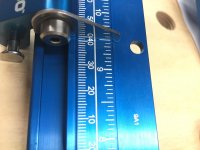
Also, because the cursor is thicker than the lines on the scale, and happens to be above the lines, I suppose that one must calibrate (and use it) by placing the cursor directly before the desired line, while looking directly above.

The problem is that often when I place my eyes above, there is light shining right back in my eyes, and if I move sideways to avoid the reflection, I can then clearly see the difference between the white lines, and the light blue material of the scale, but I am no longer looking directly above, and the cursor will be off.

It seems that there would be easy fixes for this problem:

+ design cursor that is not above the lines of the ruler, but some kind of pointer that points from below the line
+ use a finish that doesn't reflect light so much for the ruler.

I have the 30" rulers, and I noticed that the rulers on the 50" rails are white tape with black lines. Perhaps the black on white, on a non shiny surface would solve the problem. If the tape happens to be less shiny that the anodized blue of the 30" rails.

Would like to know if some have had the same problem, and what solution they found. As it is, I'm thinking of replacing my 30" rails with the 50", because the 30" rails are a pain for the eyes. I'm hoping the seller will allow the exchange.

 
I think you will find the 50-inch guides are now LASER engraved like the 30-inch guides.  I bought my guide rails last July, and was expecting the 50-inch guides to have the tape, but was pleasantly surprised to see they were LASER engraved.
 
None of the above are issues I have when setting the PG's.

A couple of suggestions;

Set the stop prior to installing the unit on the rail. This will allow you to set the stop in the best veiwing postion for you. If you need to adjust the stop once on the rail, unclipping and reinstalling is pretty simple.

Scuff the pointer surface with the 1000 grit sandpaper, this should make the pointer less reflective.

Full disclosure;

I've been testing the PG's for TSO since their inception.

Tom
 
Thanks for the suggestion.

You might have better eyes than me !

The problem with detaching the guides from the rail, is that there is no "good" viewing position:

Either the cursor creates shade on the scale underneath it, or if the light is coming from a "good" direction, it is reflected right back in my eyes by the shiny surface.

The little contrast there is to begin with between light blue and white, is further reduced.

I should note that the problem is less severe for the imperial scale than the metric, since the space between the 1/16 lines is greater.

I should also note that if I'm only interested in a margin of error within a milimeter, there isn't a problem, I can get reasonable confidence that the cursor is more or less near the line. But the whole point of this tool is for those who obcess with hight precision, that's what got me interested in the tool in the first place !

I also find the procedude for setting the cursor "on" the line is also problematic:

first, you have to decide (at calibration time), if you rely on the edge of the cursor being before the line or after, or on the line.

Once you have made the choice during calibration, it becomes "the truth", for production.

The choice of "cursor on/above the line" is suboptimal, since the cursor is fatter than the line, this will get you the worst margin of error of the three choices.

"cursor before the line" or "cursor after the line" are equivalent choices, they are better than "cursor above the line", but the are also error prone:

For example, suppose you chose "cursor before (at the left) line":

While approaching the desired "at the left of the desired line" position, you will push it (gently tapping on it) from left to right, until the cursor is no longer before the line, but a fraction of the cursor thickness is above it.  At this point, you know that the cursor is no longer before (or at the left) of the line, but you don't know what fraction of the cursor moved further above the line. You want this fraction to be zero (as close to zero as possible), but there is no way to know, since the line on the scale is now partialy hidden by the cursor.

After reflection, it seems that having a cursor that hides the ruler reference lines, is a bad idea, I see no advantage in it, and it introduce guess work in the process of trying to obtain precision.

Cursor systems where the cursor is a pointed object, and that is moving/pointing under or above the line are superior IMO, as they let you see where the tip of the point is, relative to the begining or end of the reference line, as well as your eyes will allow.

 
Best I can do is explain how I set the stop.

I start with the cursor at a larger number than what I need. I slide the stop/cursor until the leading edge (board side) is aligned to the leading edge (board side) of the desired size of cut.

In my set up the cursor is over the desired cut tick mark, leading edge aligned to leading edge.

Tom
 
So you place the cursor *over* the desired line.

Do you only use the imperial ruler ?

Because on the metric ruler, the cursor is thicker (wider) than the lines on the ruler, so when the cursor is above the line, there is no way to know if it is centered, one can only guess.

A cursor the same width as the lines would remove the guessing, one would need to make sure no portion of the line were visible from either side, but a cursor with a triangular tip that doesn't hide the scale would be even better, IMO.
 
I have the same issue as you. It prevents me from really trusting the scales for precision cuts - really a shame. Some transparent platic with a thin line would be  preferred …like for a tablesaw fence.

Im going to try and make one for my own use.
 
For me, the line thickness changes on large and small increments so placing it to the left or right will induce an ever so small drift.  Best average for me is to just use the mirror finish to divide the line width.

That said, this is a moot point since tape accuracy is less than the scale and indicator on the TPG.  And I still rely on that one tape for everything else.  So this downgrades the TPG to a stop fence if high precision/repeatability is required. 
 
woodferret said:
Snip.
And I still rely on that one tape for everything else.  So this downgrades the TPG to a stop fence if high precision/repeatability is required.

Agreed with the one-tape through-out a project approach. For precision cuts, I may also use the tape as a story stick to transfer measurements (e.g. to set the table saw fence), and that's why I like the write-able Fastcap tape for those occasions. A pencil mark on the tape for some odd measurement helps a lot.
 
Like Tom, I'm also a Beta tester for TSO. When I first received the product I too had difficulties aligning the cursor with the index marks on a repetitive basis.

I had several conversations with Hans and my solution at the time was to polish the stainless cursor using Semichrome polish. I used the reflected image of the index mark on the cursor to reliably align everything.

Here's a photo of the standard cursor and the polished cursor.

[attachimg=1]

There are several caveats to this approach however.
1.When used outside on a sunny day, you need to do the adjusting of the polished cursor in a shady area.
2. I was only using the imperial scale so the space between the index marks was greater which helped immensely.
3. Parallax error is an issue so it's really mandatory to select a comfortable head position and use that position to read & adjust the cursors.

The 1st photo shows the cursor set to the 9 1/2" mark while the 2nd photo shows it "tweaked" to the same mark by moving it slowly until the reflection disappeared. It is a lot easier to do this in person than to talk about it and squint at the distance between the cursor and the index mark.

[attachimg=2]

[attachimg=3]
 

Attachments

  • 7322.JPG
    7322.JPG
    301.4 KB · Views: 1,221
  • 7325.JPG
    7325.JPG
    230 KB · Views: 1,233
  • 7326.JPG
    7326.JPG
    247.6 KB · Views: 1,227
@MaximeLevesque, [member=4105]tjbnwi[/member], @MikkeIF, [member=44099]Cheese[/member] and others on this thread:

Thank you for participating in this discussion and giving TSO the opportunity to present what we have found to be the simplest way to achieve consistency with setting the cursor and reading the scales.

Maxime Levesque’s email late last week to TSO’s customer service mailbox info@tsoproducts.com caused us to decide to produce a video clip demonstrating the simple, repeatable method  we recommend. Easier to demonstrate in a video than  to explain in writing or verbally over the phone.

We started the video shoot this morning (Wednesday Sept. 15) and then realized we needed some additional camera gear to demonstrate exactly what the eye will see. We’ll try to finish the shoot and editing for posting next week.

As always, we welcome customer feedback and questions. It can lead to an improved experience for all customers and sometimes leads to product improvements or even entire new products.

More next week.
      Keep it coming!
      Hans and Team
 
MaximeLesveque said:
So you place the cursor *over* the desired line.

Do you only use the imperial ruler ?

Because on the metric ruler, the cursor is thicker (wider) than the lines on the ruler, so when the cursor is above the line, there is no way to know if it is centered, one can only guess.

A cursor the same width as the lines would remove the guessing, one would need to make sure no portion of the line were visible from either side, but a cursor with a triangular tip that doesn't hide the scale would be even better, IMO.

Imperial only, I’m only concerned with the leading edge of the cursor. The cursor goes over the measurement mark.

I just tried some metric numbers, aligned the cursor the same way, leading edge to leading edge.

Tom
 
[member=61691]TSO_Products[/member] I'm looking forward to see the video,

I wonder if the intended procedure is to look from above for aligning the cursor and the line on the ruler.

If it's the case, I think it's not great, because of the way optics and the human eye function:

The eye can only focus on either the ruler line, or the cursor, it can't focus on both !

Therefore one of the two objects will inevitably be out of focus, or both if one tries to focus in the middle.

Looking sideways using the cursor plate as a mirror is an alternative as suggested by [member=44099]Cheese[/member] , but then you need to look always from the same angle and position, and repeatability is reduced. Given that you have to set two cursors at the same length for parallel cuts, the ability to have a precise parallel cut is only as good as the repeatability of positioning cursors.

After thinking about it, setting a cursor is a one dimension problem, so a cursor design shouldn't require caring about the vertical dimemsion, (like making sure you are looking at a 90 degree angle above, etc).

I don't see how this can be achieved without having a cursor as flat as possible against the ruler. Pierre Vernier probably realized this in 1631: a vernier caliper can be looked at from many angles, with minimal effect on the reading.

A cursor that would take the form of a ruler sliding against the rail's ruler (like a vernier) would be nice, it would even allow sub milimeter settings, not that they would be often useful, but if you can be confident about sub a milimeter position, then you can have greater confidence that you can at least acheive milimeter precision.

 
[member=4105]tjbnwi[/member] reply #11 states the design intent correctly:
I’m only concerned with the leading edge of the cursor. The cursor goes over the measurement mark.

I just tried some metric numbers, aligned the cursor the same way, leading edge to leading edge.

Tom


@MaximeLevesque: TSO’s intent is to use the only the leading edge of the Cursor to focus on surface of the T-track scale  while referencing the edge between the white engraving mark and the adjacent blue anodized background.

We just completed a video shoot demonstrating this. For expedience I will email a WeTransfer link to Maxime to download and view the raw footage with me on the phone explaining the footage to him.

We will then edit the footage with visual annotation and voice-over explanation, title, etc. Once we have that accomplished next week we will post a link on this FOG thread as well as on our website SUPPORT TAB for all to view anytime.

Shame on us for not doing this up front because we made the bad assumption it would be evident ☹

Thanks to Maxime Levesque to make it clear to us that we need (and CAN DO) much better.

Hans

PS: BTW the technique Tom  [member=4105]tjbnwi[/member] described above and we have used, and explain belatedly, will work with Imperial and Metric scales in one step - no difference. Just pick which scale you want to view.
 
[member=76395]MaximeLesveque[/member] - just noticed my typo error misspelling your name.
I apologize, stand corrected and hope you become aware of this FOG update.

Hans
 
Actualy, you had spelled my name correctly, I had misspelled it myself in my profile, I hadn't noticed until now and I just corrected it !

I'm looking forward to seeing the video !
 
Hi Hans,
I love my TSO products - not just because they are awesome, but also because you really care about what your selling an our experience with your products! Wish more companies were like that  :)
Now I’m looking forward to see the video, so I can trust my scales on the guides also for precision cuts. If that doesn’t work I will try “my idea” above which Im quite sure will solve the problem all together. 
 
[member=61691]TSO_Products[/member]
Any update on when you’ll have the video available?
 
TSO_Products said:
@MaximeLevesque, [member=4105]tjbnwi[/member], @MikkeIF, [member=44099]Cheese[/member] and others on this thread:

Thank you for participating in this discussion and giving TSO the opportunity to present what we have found to be the simplest way to achieve consistency with setting the cursor and reading the scales.

Maxime Levesque’s email late last week to TSO’s customer service mailbox info@tsoproducts.com caused us to decide to produce a video clip demonstrating the simple, repeatable method  we recommend. Easier to demonstrate in a video than  to explain in writing or verbally over the phone.

We started the video shoot this morning (Wednesday Sept. 15) and then realized we needed some additional camera gear to demonstrate exactly what the eye will see. We’ll try to finish the shoot and editing for posting next week.

As always, we welcome customer feedback and questions. It can lead to an improved experience for all customers and sometimes leads to product improvements or even entire new products.

More next week.
      Keep it coming!
      Hans and Team
Now THAT is some Amazing customer service. Bravo, Hans and team!!

Sent from my SM-T290 using Tapatalk

 
Back
Top