Jason Hagen said:
[mention]TSO_Products [/mention] It’s been almost 3 months since you said you were making a video. I haven’t seen it posted anywhere. What happened to this video? I just got my set of tracks and was looking for this video.
[member=69715]MikkelF[/member] - [member=65145]manuc[/member] - [member=680]Jason White[/member] and [member=73418]Jason Hagen[/member]
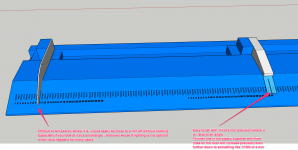
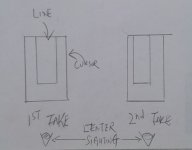
I’m happy to report the short video demonstrating the proper use of the Cursor for aligning the FlipStop to the engraved scale on the TPG T-tracks is now available on TSO website
• Linked on the TPG FlipStop page, at the bottom in its own section titled
"Tips for Using the TPG FlipStop":
https://tsoproducts.com/tso-paralle...-flipstop-v2-0-for-tpg-parallel-guide-system/
o It has also been added to the Product Videos tab of this same page
• Added to the Product Videos tab for the main TPG Parallel Guide System page:
https://tsoproducts.com/tso-parallel-guide-system/tpg-parallel-guide-system/
• Added to the SUPPORT page, under the TPG Parallel Guide System listing:
https://tsoproducts.com/support/
with my apologies for the delay in getting this posted
We hope this helps!
Hans

")