Shop-made Domino Joiner Cradle Jig for the Intersecting-Lines Mortising Techniqu

ChuckM

Member
Joined
Sep 7, 2015
Messages
5,734
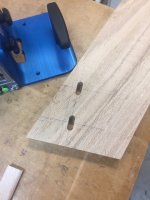
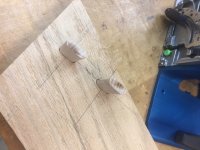
Good enough is not enough when I need dead-on mortising results. No matter how steady you can hold the DJ, it is a huge challenge to use the intersecting-lines method to mill mortises freehand.

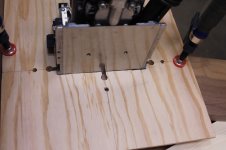
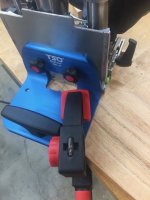
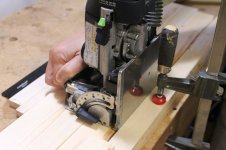
My solution is to encase the joiner in a platform, position the platform in place (using the intersecting lines (milled flats and centre line on the baseplate)), and clamp the platform on the workpiece. 99%+ precision results possible, with no movement due to vibration during mortising. By the way, the DF500 switch is a lousy design, and it should be replaced with a more user-friendly switch found in any brand of routers.

Would any vendor (Seneca, TSO or Woodpeckers?) consider making an improved version of such a jig?
 

Attachments

  • IMG_7983.JPG
    IMG_7983.JPG
    574.3 KB · Views: 1,532
  • IMG_7991.JPG
    IMG_7991.JPG
    300.5 KB · Views: 1,641
  • IMG_7988.JPG
    IMG_7988.JPG
    388 KB · Views: 1,357
  • IMG_8840.JPG
    IMG_8840.JPG
    413.5 KB · Views: 1,280
[member=57948]ChuckM[/member] - we'll take a look at it and respond via PM to you.

Hans
 
That’s interesting Chuck... I was going to do the same thing in a short piece of Festool guide rail that I have. I decided on the guide rail because I wanted to use the clamping slots. And if the Dominos were being placed far from the edge, I could always connect another guide rail and clamp from the edge of the material again.

I could also use the clamp slot edge against a rule or a framing square.
 
Interesting, after reading Cheese's reply I was thinking of mashing the two ideas together and have a guide plate much like that for the router in the LR32 kit that rides along a Festool rail. If it had the indexing capability of the router guide plate that might be useful too for evenly spaced domino mortises.
 
Bob D. said:
Interesting, after reading Cheese's reply I was thinking of mashing the two ideas together and have a guide plate much like that for the router in the LR32 kit that rides along a Festool rail. If it had the indexing capability of the router guide plate that might be useful too for evenly spaced domino mortises.

[scratch chin] [scratch chin]  I like that.  [big grin] [big grin]
 
Even if it didn't index I think using with the guide rail would be awesome. Maybe TSO could take something like the idea of the bigfoot and modify one end so it could ride on the track. I would buy one in a heartbeat. 
 
Perhaps the cradle jig can be made with a built-in slot for use with a track/rail as an option.

The cradle must be a snug/perfect fit with the machine to ensure the lining up with the intersecting lines is precise. To cater for the variance of the baseplate size among machines, the cradle can be made slightly oversize, and some kind of a spring mechanism or set screws are used to secure the base in place. Only the baseplate side matters, as the fence side is not used to position and line up the machine.

I have made two "cradles" and the one shown in an earlier post is a smaller version. These cradles allow for dead-on positioning and clamping of the machine for mortising workpieces of any sizes and at any angle.

Below is an image of an angled mortise milled freehand before I came up with the cradle jigs. I had some 30 of them to do and imagine what a pain the task was.


Attachments

  • IMG_4827.JPG
    IMG_4827.JPG
    343.8 KB · Views: 575
[member=57948]ChuckM[/member]

Cool, nice idea.    I agree that doing it freehand is problematic.

I tried using my TSO Bigfoot to do a similar thing, by clamping it to the workpiece.  I don't think it's quite a repeatable as your template, but works pretty well.  The key is to use the alignment marks on the domino and the alignment point on the Bigfoot.  In my test piece I was able to get good alignment using three points.

[attachimg=1][attachimg=2][attachimg=3]

The Bigfoot would not work on a rail directly, as it is made to align to to the base of the Domino.  It would need another set of holes to create an offset for the rail.  Should be possible if TSO was interested.
 

Attachments

  • IMG_7201.jpeg
    IMG_7201.jpeg
    105 KB · Views: 2,566
  • IMG_7202.jpeg
    IMG_7202.jpeg
    86.9 KB · Views: 2,637
  • IMG_7203.jpeg
    IMG_7203.jpeg
    91.9 KB · Views: 2,566
I saw two lines there, so I suppose you were positioning the baseplate using the line that was 10mm from the mortise centre line. I try to avoid using the 10mm-line approach for precision work because every extra line you draw, you could introduce a slight deviation.
 
ChuckM said:
I saw two lines there, so I suppose you were positioning the baseplate using the line that was 10mm from the mortise centre line. I try to avoid using the 10mm-line approach for precision work because every extra line you draw, you could introduce a slight deviation.

Hi.  Sorry, you are seeing the first lines I drew, but didn't erase completely.  I only used the lines that go through the center of the mortice when positioning the XL.

On the XL the mark on the side of the machine is the center line of the mortice.  I think it's different on the 500.  I agree, this would not work as well if the mark was off by 10mm.
 
Got it.

The DF500 does not have the centre line mark on each side, we use the edge of the milled flats. As the DF500 is lighter, I find it easier to align the DF500 than the DF700 with the intersecting lines. For fine-tuning and adjustments, I use a small plane hammer to tap the cradle for spot-on results. If necessary, I have a 0.3mm pencil to lay out the lines (0.5mm good in most cases).
 
Wondering about making the plate out of plexiglas for even better visibility.  Perhaps 1/4" thick.  I may explore the idea of cutting one out with my Shaper Origin.

Thanks for sharing the idea!
 
Plexiglas...good suggestion, with some kind of coating (or self-adhesive sand paper?) so it is not too smooth for positioning, and thick enough for clamping.
 
Been finding a lot of these recent domino posts from relatively new Festool forums members to be variations on old methods previously posted by somewhat forgotten members that no longer post. For those interested in a very interesting site check out The Dovetail Joint by Jerry Work and what he did before Half an Inch Shy and The New Brit Workshop.
http://www.jerrywork.com/

Go to the how to section and check out what this guy did when the domino was first introduced along with many other things.
 
Took a quick look at the quoted DJ section which contains some interesting builds there. But unless I've missed it in the glancing, I saw nothing about angled joinery using the intersecting lines technique which is what this thread is about.
 
Did you look at the method for mounting the Domino to a Festool rail that Cheese mentioned in this thread?
 
That certainly is one way of doing it, but I do not have any guided rails. I once used a batten to provide a better anchor for the machine, which helped, but it was not as efficient as the cradle method.
 

Attachments

  • Photo 6.JPG
    Photo 6.JPG
    515.2 KB · Views: 1,140
Any word [member=59331]TSO Products[/member] on when the Bigfoot is coming back in stock?
 
Thanks Hans!

TSO Products said:
ear3 said:
Any word [member=59331]TSO Products[/member] on when the Bigfoot is coming back in stock?

[member=37411]ear3[/member] - we just got the next batch back from anodizing. Next comes engraving, assembly, kitting, packaging and receiving into stock ready to ship.

Best to sign up to "NOTIFY ME" on our website product page:
       https://tsoproducts.com/accessories/dbf-45-bigfoot-base-support-bracket-for-festool-domino/

Hans
 
Back
Top