silly little experiment

Crazyraceguy

Member
Joined
Oct 16, 2015
Messages
4,901
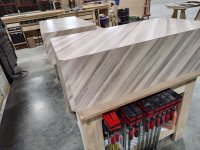
I spent most of the afternoon Friday just working on parts, no assembly yet. I had finished up some more of the pieces for another of those gas stations with the diagonal grain laminate. Now I am down to the last few bits. The rolling platforms/carts are always last because there is no "install" to them. They just sit on the finished floor at the very end of the job.
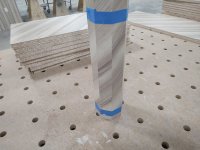
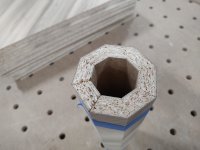
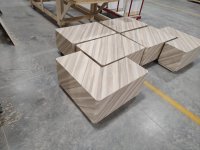
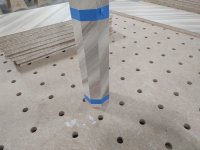
After building the frames and laminating the panels for the outside of them, I started the mitering for the clipped corners and ran out of day. All I got cut were some of the corner caps, still need 8 more, since there are 4 units to build. I lined up the cut pieces and wondered how well they would actually fit together. A couple of strips of blue tape and this was the result. Pretty darn good fit.
They will end up looking similar to the last pic on Monday, except 2' x 4' boxes with wheels.
 

Attachments

  • miterfold.jpg
    miterfold.jpg
    341.4 KB · Views: 269
  • miterfold2.jpg
    miterfold2.jpg
    253.1 KB · Views: 209
  • miterfold3.jpg
    miterfold3.jpg
    157 KB · Views: 244
  • chester display.jpg
    chester display.jpg
    337 KB · Views: 279
So If I read that right you are putting the miter on the panels manually.  I imagine with a tracksaw or tilt base router... Just curious why they dont lay up the sheets first and have the CNC do the majority of the miter folding cuts?
 
Yes, I cut the diagonal pieces with the TS55, from loose sheets of laminate. Lay them up onto the rectangles of particle board, miter the ends with the sliding table saw (Laguna P12/10) and fold them around the central core/base.
Because of the diagonal lay-up, this is a huge waste of material. I have cut hundreds of corners off of dozens of sheets, making these units.
There are several reasons to not cut them out of pre-laminated panels on the CNC. The first of which is that waste, it would include to board too. Second is fit. Again because of the diagonal nature of the parts, they won't "line up" next to each other on a sheet, so you would never get that continuous wrap grain that makes miterfolding attractive in the first place. Third is simply the material itself. You can get away with doing the V-grooving on Solid Surface (Corian, etc) or even veneer, because the material can be sanded and blended back together after it is glued up.  Countertop laminate (HPL) is quite different in that respect. You can't do anything to it, you get what you get, straight from peeling the tape. It is not particularly a fan of being cut from underneath like that, it comes out slightly ragged from a "zero-point" cut like V-grooving. I have done it by-hand, with a router and FS guide rail, even with the tape already applied to the cut-line. You just can't get that chip-free perfect seam like this.
That is not glued, those little end pieces are just held by a light wrap of blue tape.
 
“ because of the diagonal nature of the parts, they won't "line up" next to each other on a sheet, so you would never get that continuous wrap grain that makes miterfolding attractive in the first place.”

It must be a little frustrating to apply your skill to a project that is aesthetically crippled from before the start by the designer’s choices.
 
It is, along with the "waste", it's not my money, but it still bothers me to throw away at least 1/3 of every sheet.

This is a standardized look for all of these stores. The grain direction is a bit crazy. It runs the short direction on all of the long parts of the shelving, vertically on the center cabinet, and diagonally (up/right) on the rest.

I have built a lot of odd (ugly IMO) things over the years, part of the deal with it all being designed by someone else.
Some are just not "practical", others suffer from color choices.
The pics are bad, blurry, but I built 3 of these desks for some kind of real estate office. They are all angled to the side, why I don't know? As an "art piece" they are ok, but in practical terms, horrible. The pointed end is just something to bag into and the end that slopes away is a trip hazard when you walk by. The "leg" is in the path, while the top is still several inches away. The "waterfall" grainmatch looks cool though. The file cabinet, for the same job, sides slope in opposing directions, rather than parallel. Again, sorry about the pics, I wish I had better.
 

Attachments

  • 20180725_065154[839].jpg
    20180725_065154[839].jpg
    154.1 KB · Views: 199
  • 20180723_063651[840].jpg
    20180723_063651[840].jpg
    157.2 KB · Views: 164
  • 20180723_063713[836].jpg
    20180723_063713[836].jpg
    126.4 KB · Views: 180
  • 20180723_063654[838].jpg
    20180723_063654[838].jpg
    149.9 KB · Views: 194
Its really hard to tell if its the design or the photography but the last photo it looks like the wood grain section is wider at the top on what I would call the front and back (drawer front side and drawer back side)  Im kind of digging that look.

I just reread and it sounds like its the design.  Kind of has a mid century vibe.
 
Crazyraceguy said:
I have built a lot of odd (ugly IMO) things over the years, part of the deal with it all being designed by someone else.
Some are just not "practical", others suffer from color choices.
The pics are bad, blurry, but I built 3 of these desks for some kind of real estate office. They are all angled to the side, why I don't know? As an "art piece" they are ok, but in practical terms, horrible. The pointed end is just something to bag into and the end that slopes away is a trip hazard when you walk by. The "leg" is in the path, while the top is still several inches away. The "waterfall" grainmatch looks cool though. The file cabinet, for the same job, sides slope in opposing directions, rather than parallel. Again, sorry about the pics, I wish I had better.
Thanks for the pics.

I think one needs to look as these pieces not as "pieces" but as parts of a whole which we do not get to see. The sloped desk almost calls for a plant to be next to the "withdrawing" side, negating any "foot-in-way" issues. Then the cabinets have both sides recessed, tending to people walking around them.

These stuff you do almost all examples of quality design furniture. Things where there was first an idea of a "result" and only from it one had choosen what pieces will be furniture and what fixed, the materials, shapes, etc., etc.

People in the trades often "design" in the opposite way - aka "what can I make from the materials I like/have" - instead of the design -> assess -> make progression the put the "make-ability" as one of the primary design constraints. This often results in pieces that are almost artisan quality but which fail design-wise either themselves or in not fitting the setting.

When all one does are joints and cuts, it is very, very easy to look at the individual joints beauty while ignoring the dis-joint looks of the pieces, how (out-of-place) they are at a setting. Etc.

Thanks again for the "design items" perspective. How some of those curvy things are achieved and how they are used!
 
I have some more pics of the final product, plus a shot of the trash can full of the corner off-cuts. That is all just from Friday, cutting the sheets on the diagonal, for these four units.
 

Attachments

  • NA.jpg
    NA.jpg
    242 KB · Views: 129
  • NA2.jpg
    NA2.jpg
    306.5 KB · Views: 127
  • NA3.jpg
    NA3.jpg
    313.8 KB · Views: 123
  • NA4.jpg
    NA4.jpg
    299.6 KB · Views: 121
Back
Top