You are using an out of date browser. It may not display this or other websites correctly.
You should upgrade or use an alternative browser.
You should upgrade or use an alternative browser.
simple jig for routing digits (added video)
- Thread starter bror
- Start date
jobsworth said:Nice, could you show some photos as to how it works?
That'd be great.
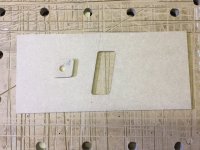
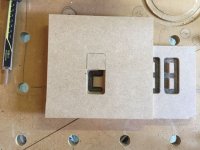
Imagine a 7 segment LCD display like you would find in an inexpensive calculator. The piece on the left is inserted into the template to allow you to create the half width vertical segments or the middle horizontal segment for each digit.
bror
Member
- Joined
- Jul 10, 2011
- Messages
- 85
The jig works with basically every guide bushing that fits the cutout. Off course the amount of play will determine the size of your digits.
As long as the height of the “latch” (moving block) is excactly half the height of the cutout minus the radius of the guide bushing it will be OK.
Or the height of the cut out minus the diameter of the guide bushing divided by two, which off course is the same.
[attachimg=1]
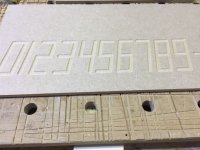
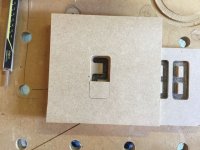
Basically you route two half digits with an horizontal overlap in the middle.
[attachimg=2]
[attachimg=3]
It works for almost any size of digit.
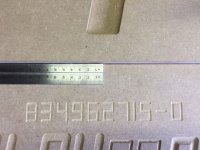
You can make really small digits.
[attachimg=4]
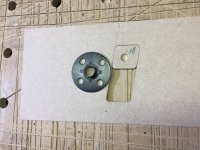
You can use different sizes of guide bushings in one cutout, as long as you have a latch that corresponds with the bushing
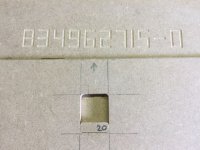
This one is with an other ratio and this latch is suited for a 20mm guide bushing
[attachimg=5]
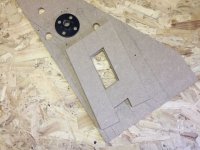
These are the digits from the one above
[attachimg=6]
and this is how it worked out
Thanks for watching, Rogier
As long as the height of the “latch” (moving block) is excactly half the height of the cutout minus the radius of the guide bushing it will be OK.
Or the height of the cut out minus the diameter of the guide bushing divided by two, which off course is the same.
[attachimg=1]
Basically you route two half digits with an horizontal overlap in the middle.
[attachimg=2]
[attachimg=3]
It works for almost any size of digit.
You can make really small digits.
[attachimg=4]
You can use different sizes of guide bushings in one cutout, as long as you have a latch that corresponds with the bushing
This one is with an other ratio and this latch is suited for a 20mm guide bushing
[attachimg=5]
These are the digits from the one above
[attachimg=6]
and this is how it worked out
Thanks for watching, Rogier
Attachments
Vondawg
Member
Thanks for sharing the jig Rogier...that’s slick
waho6o9
Member
Thank you Rogier
GoingMyWay
Member
So simple yet so brilliant! I actually bought the Milescraft Signmaking template kit last year to make a house number sign for the front door, but I think I like this better.
Dumb question - how did you actually cut the hole and spacer block in the jig?
Dumb question - how did you actually cut the hole and spacer block in the jig?
Cheese
Member
Very clever idea. Thanks for sharing. 
grobkuschelig
Member
- Joined
- Dec 27, 2016
- Messages
- 774
Great jig! [emoji41]
[emoji1319]
Thanks a lot for sharing!
[emoji1319]
Thanks a lot for sharing!
bror
Member
- Joined
- Jul 10, 2011
- Messages
- 85
Thanks Guys, and you’re welcome.
GoingMyWay : I usually make cutouts like these with a router and the Festool mfs. When it is not 90 degrees I assemble a jig out of scrap material. I like to use double sided carpeting tape to hold the parts together.
[attachimg=1]
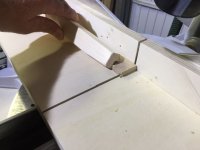
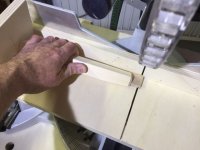
I use the Kapex to saw rather small parts. I think a zero clearance board and a reliable holding stick are a must.
[attachimg=2]
[attachimg=3]
GoingMyWay : I usually make cutouts like these with a router and the Festool mfs. When it is not 90 degrees I assemble a jig out of scrap material. I like to use double sided carpeting tape to hold the parts together.
[attachimg=1]
I use the Kapex to saw rather small parts. I think a zero clearance board and a reliable holding stick are a must.
[attachimg=2]
[attachimg=3]
Attachments
Similar threads
- Replies
- 6
- Views
- 534
- Replies
- 3
- Views
- 512
- Replies
- 49
- Views
- 7K
- Replies
- 0
- Views
- 355