jonny round boy
Member
- Joined
- Jul 21, 2007
- Messages
- 3,227
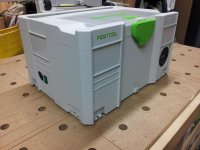
Since posting about my custom systainer a couple of months ago, I was asked by a mate to build him one, too. I decided that I'd make a couple of changes this time round:
3/4 shot:
[attachimg=1]
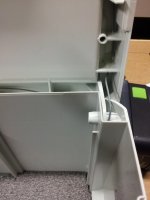
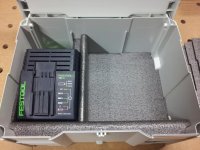
Inside, the charger plugs in to a socket & then locks in above:
[attachimg=2]
It's tight, but all the cable fits inside too:
[attachimg=3]
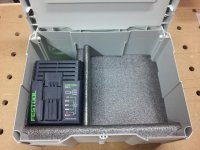
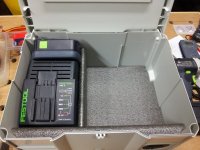
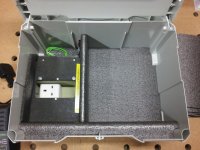
Then the charger slots onto the raised washer-head screws:
[attachimg=4]
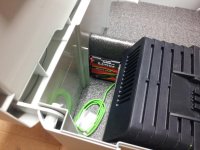
Behind the charger sits the battery box for the radio. Here you can also see the charging lead for his iPhone (in Festool green!):
[attachimg=5]
The cover for the battery box also locks the charger in place, so it doesn't slide off the screws when you remove a battery from it:
[attachimg=6]
Unfortunately, due to the extra length of the charger, there is no longer room for an additional battery to drop right down behind it, however the battery fits perfectly at an angle (even when fitted with the rubber bumper), whilst still allowing you to use the space underneath for something else:
[attachimg=7]
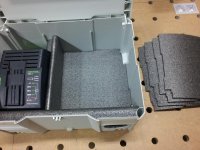
My mate wanted to do his own interior layout for his drill, so I've just cut 4 additional layers of foam that fit in the main drill area:
[attachimg=8]
[attachimg=9]
Here you can see the wire aerial as it runs up into the lid. It goes up & round, returning along the bottom:
[attachimg=10]
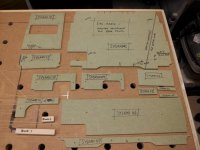
When I made the first one I basically made all the components as I went along, and didn't really record anything (other than photos). This time, every part was designed to be reproduced, and there's a template for all of them so I can replicate them exactly (and quickly too). I also made templates for routing the cut-outs in the systainer itself. Here are just some of them:
[attachimg=11]
Due to this, this one took far longer to build than the first (all in, probably about 3 full days) but now I can make any future ones a lot quicker (in theory, at least!). I'm shortly going to be re-building my first prototype with the additions above, but still with the newer, smaller charger. Again, I'll be making templates so I can make more.
If anyone fancies one for themselves, I'm not going to be mass-producing them but might be open to doing a small run (single figures) if there's any interest. If so, let me know! Due to electrical & shipping, this will be UK only (sorry!). Be warned though, they're not cheap - though being Festool-related they're not going to be!
Jonathan
- He wanted to use the older-style TRC3 charger, which is quite a bit bigger than the newer one;
- I added an illuminated on/off switch next to the plug-it socket, to reduce the likelihood of anyone connecting/disconnecting the plug-it whilst 'hot' (which damages the contacts inside);
- The systainer now has a battery box to power the radio when mains isn't available;
- There is a relay circuit added, which automatically switches the radio from battery to mains power when it is available, extending the battery life;
- The sectional aerial has been replaced with a wire aerial that runs around the edge of the inside of the lid;
- The charger can be now be fitted afterwards, without any modification whatsoever.
3/4 shot:
[attachimg=1]
Inside, the charger plugs in to a socket & then locks in above:
[attachimg=2]
It's tight, but all the cable fits inside too:
[attachimg=3]
Then the charger slots onto the raised washer-head screws:
[attachimg=4]
Behind the charger sits the battery box for the radio. Here you can also see the charging lead for his iPhone (in Festool green!):
[attachimg=5]
The cover for the battery box also locks the charger in place, so it doesn't slide off the screws when you remove a battery from it:
[attachimg=6]
Unfortunately, due to the extra length of the charger, there is no longer room for an additional battery to drop right down behind it, however the battery fits perfectly at an angle (even when fitted with the rubber bumper), whilst still allowing you to use the space underneath for something else:
[attachimg=7]
My mate wanted to do his own interior layout for his drill, so I've just cut 4 additional layers of foam that fit in the main drill area:
[attachimg=8]
[attachimg=9]
Here you can see the wire aerial as it runs up into the lid. It goes up & round, returning along the bottom:
[attachimg=10]
When I made the first one I basically made all the components as I went along, and didn't really record anything (other than photos). This time, every part was designed to be reproduced, and there's a template for all of them so I can replicate them exactly (and quickly too). I also made templates for routing the cut-outs in the systainer itself. Here are just some of them:
[attachimg=11]
Due to this, this one took far longer to build than the first (all in, probably about 3 full days) but now I can make any future ones a lot quicker (in theory, at least!). I'm shortly going to be re-building my first prototype with the additions above, but still with the newer, smaller charger. Again, I'll be making templates so I can make more.
If anyone fancies one for themselves, I'm not going to be mass-producing them but might be open to doing a small run (single figures) if there's any interest. If so, let me know! Due to electrical & shipping, this will be UK only (sorry!). Be warned though, they're not cheap - though being Festool-related they're not going to be!
Jonathan
Attachments
-
 20131205_170938.jpeg96.7 KB · Views: 4,811
 -
 20131203_133637.jpeg112.7 KB · Views: 3,816
 -
 20131204_202213.jpeg134.9 KB · Views: 3,419
 -
 20131205_171055.jpeg138.4 KB · Views: 3,562
 -
 20131205_171135.jpeg163.3 KB · Views: 3,583
 -
 20131204_205243.jpeg150 KB · Views: 3,695
 -
 20131205_171200.jpeg134.2 KB · Views: 3,860
 -
 20131205_171211.jpeg126.5 KB · Views: 8,668
 -
 20131205_171231.jpeg145.4 KB · Views: 4,349
 -
 20131205_171404.jpeg158 KB · Views: 3,775
 -
 20131205_171956.jpeg156 KB · Views: 6,797
")