Slab Thinning vs Slab Flattening

smorgasbord

Member
Joined
Jan 7, 2022
Messages
1,387
I've got a thread or two on a slab desk (42" x 60") I'm making. I'm at the point where I'm making butterflies and, ugh, filling in one void with epoxy. After that, my intention was to take it down to a lumber dealer that has a big manual gantry to reduce the thickness from underneath. In talking with them, they were like "Oh, if it's already flat and you just want it thinner, that will take much less time."

Which got me thinking that maybe I don't need a whole gantry setup - that I could put the surfacing bit in my handheld router with a large base and rout away the ½" depth I want to reduce the thickness by. My thinking is maybe a circular/spiral pattern from the outside in, stopping before I run out of surface to support the router in the dead center, which I'd hand chisel/plane/whatever. Since I'm leaving the top as is and removing from the bottom, getting a perfect surface on the bottom isn't important.

While the slab is dry, and the sanding/planing they did before shipping it to me didn't cause any warpage, I am a bit worried that taking off a ½" off just one side might relieve some stresses. I don't want to use C-Channel, and would rather not do a sliding dovetail underneath to try to keep it flat. The main reason for taking it down in my shop is that I could do it in small increments, let it sit for a week, and see if it moves.

Thoughts?
 
I'd still be using a gantry of some sort for something that large, you'll find it difficult to get a uniformly flat surface free handing it.

Removing that much material I would think most slabs are likely to twist or bow a little, so doing it incrementally if you aren't in a hurry I think is a good idea.
 
I follow the TALLY HO boat building series on YouTube and the owner is a very clever innovator. He showed how to flatten a slab very quickly by using a power planer in the same fashion as everyone else uses a router and since seeing that I have always thought it was the obvious way to do it. I have no hope of finding the particular video as is one of hundreds so I can't help there but this link is to the series and every video is worth watching for the woodworking/boat building skills involved.

TALLY HO
 
I’ve proven to myself that taking equal thickness cuts from each side of a substrate is a habit well worth implementing. Not following that procedure has yielded warped wooden, Teflon and HDPE parts.
Except for hard maple, my experience with that timber is if you breathe on one end the other end twists badly.

I've never seen a timber that reacts to released stresses so violently like most hard maple I've come across.
 
That's the one. It really is a fantastic series for woodworkers to watch and learn from and I admit I learned techniques and methods that had never occurred to me when watching. I thought he was as mad as a box of rocks when he started but the result is stunning due to the manic quality of his, his helper's and the employees work he was fortunate to have on the build.
 
Except for hard maple, my experience with that timber is if you breathe on one end the other end twists badly.

I've never seen a timber that reacts to released stresses so violently like most hard maple I've come across.
Well, they are not exactly common, but most fruit woods are really bad for that. You almost never see Apple, for that very reason. It's nearly impossible to even dry that stuff, without splitting, much less saw it later.
Once in a while, I do see some Pear, but it doesn't get very big. The grain is pretty boring anyway.

I have not really shared your twisting problem. For me, the issue is splintering, especially with a router.
 
That's the one. It really is a fantastic series for woodworkers to watch and learn from and I admit I learned techniques and methods that had never occurred to me when watching. I thought he was as mad as a box of rocks when he started but the result is stunning due to the manic quality of his, his helper's and the employees work he was fortunate to have on the build.
Along that same line, I've been watching videos from Snake Mountain Boat Works. They refurbish beautiful old wooden boats from the 30's to the 60's. Chris Craft, Gar Wood, Shepherd...all the old classics.


One of the more interesting developments is that they DO NOT use a RO sander on the boat until the finishing coats are being applied. All the wood sanding is done with an LS 130 or one of several Hutchins long board air sanders. He's very emphatic about not using a RO sander because he says you'll turn the surface into a "moon scape".

He's also emphatic about using multiple coats of Smith's and only Smith's Penetrating Epoxy Sealer to seal all the wood on the boat. I've used Smith's to seal the bottom of teak furniture legs used year round on an outdoor patio and the stuff really is terrific.
 
Last edited:
I've been using Smith's CPES for decades now and swear by it. It's a great undercoat for everything except a finish that you want to penetrate into the wood, like a stain or tung oil. But for poly, lacquer, paint, etc. it's the best. My exterior wood windows and doors (that I built myself) all have CPES on the exterior surfaces. I'm using it as the sealer coat for the epoxy knot hole fill in my desk (sigh).

Note that on its own CPES provides no UV protection, and indeed relies on a topcoat to provide it protection from UV. Oh, if you've got rotted wood that you're painting, CPES is a great sealer to stabilize the wood before apply an epoxy filler (which Smith's also makes).

Back to the topic, I'm leaning towards making straight, with the grain, passes with a surfacing router bit, but separating them by a ½". I've got 1" and 1.5" diameter surfacing bits. After the first pass, I'd double-stick tape a couple of ¾" wide blocks the thickness of my previous depth of cut to the underside of my router base (heck, I might custom mill such a base on my CNC!) and then take out the remaining protrusions. I'd probably setup to remove only 2-3mm per pass.

And I'm still thinking that I'll go from the current 48mm thickness to, say 40-42mm thick, and then bevel the underside's outside edges. That way I'm still keeping enough thickness for stability, reducing the carry in the room weight, and having a lighter looking top.
 
Yea, the issue with a router sled is the huge number of passes required.

With a big slab I’d seriously consider making a planer sled as above.

It doesn’t have to be that 7” wide planer to cut the number of passes way down.
If you watch the video it’s also clear that the time it takes to make one pass is also radically reduced.
 
Back to the topic, I'm leaning towards making straight, with the grain, passes with a surfacing router bit, but separating them by a ½". I've got 1" and 1.5" diameter surfacing bits. After the first pass, I'd double-stick tape a couple of ¾" wide blocks the thickness of my previous depth of cut to the underside of my router base (heck, I might custom mill such a base on my CNC!) and then take out the remaining protrusions. I'd probably setup to remove only 2-3mm per pass.
In my experience, the spacing could be a problem. You are exposing all of those edges, with nothing to support them.
If they are clamped together solidly, with an extra sacrificial piece on the outer edges, they are far less likely to splinter.
 
Here are a couple diagrams to show what I'm thinking.

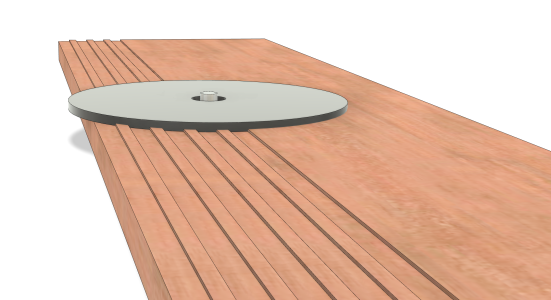
Here's a little ways into pass #1. The big disc is the router base, the small cylinder is the cutting tool and depth of cut is about ⅛":
Screenshot 2025-09-26 at 8.08.36 AM.png

I'll use a track to guide the router. 1" diameter bit, with about ½" spacing.

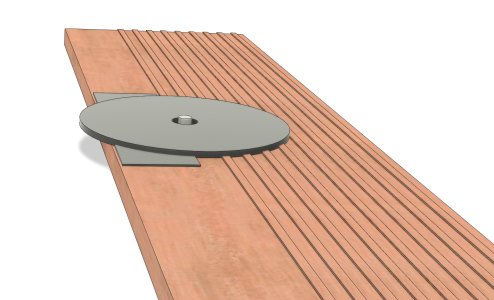
Then for the second pass I'll attach an ⅛" tall filler to the off-side of the router base for support while cutting the middle pieces out:
Screenshot 2025-09-26 at 8.39.33 AM.png

With DOC only ⅛"I don't see a problem with splintering or support.
 
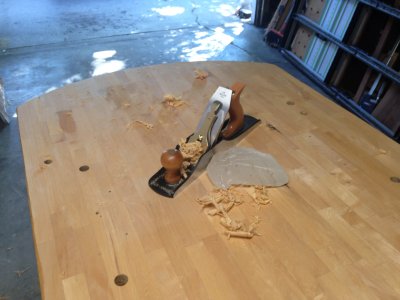
Slab is already flat, thanks. Just needs to be thinner, and I'm not going to take down 8mm or more of thickness with hand planes.
 
Back
Top