Slabs!

rmwarren

Member
Joined
Jul 11, 2010
Messages
3,063
& burls too. A not-too-subtle ad for Clayton at Little Mule (I'll come back to that photo in a moment):

[attachimg=1]

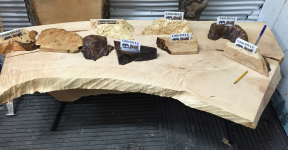
Story is I went to visit a friend I have not seen in far too long at his new place outside State College (PA) in Amish country. He has a 1700's limestone farm house with a new timber framed barn on several acres. We spend 3 days talking wood and tools, smoking meat & cigars, and he introduced me to his new slab source. A couple strays followed me home.

[attachimg=2]

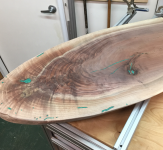
All are 2+" thick, cost between $40-$75 bucks each. The maple slab is the sister to the one in the first photo, cannot wait to bring out that grain!

The others are all walnut, lots of figure in them too:

[attachimg=3]

[attachimg=4]

[attachimg=5]

Couple chunks of burl to round out the haul.

[attachimg=6]

Looking forward to making some coffee/end tables this spring in the newly configured shop.

RMW

Oh, and Clayton himself was the coolest part of the visit, 30-ish and genuinely passionate about his work. He has literally hundreds of larger slabs, lots of them around 40"/120"/3-5", white oak, maple, walnut, sycamore & others. His dad has a CNC and can surface them for very cheap ($65/hour). I won't quote prices but I can say they are much less than anything I have ever seen.

Clayton had never laid eyes on me before, but he remembered Lee from one previous visit (no purchase) in December. When I asked if he took credit cards he said "No, but I can write you an invoice and you can mail me a check". Priceless.


Attachments

  • ScreenClip.png
    ScreenClip.png
    1.2 MB · Views: 5,071
  • ScreenClip [1].png
    ScreenClip [1].png
    1.7 MB · Views: 5,138
  • ScreenClip [2].png
    ScreenClip [2].png
    1.4 MB · Views: 4,905
  • ScreenClip [3].png
    ScreenClip [3].png
    1.2 MB · Views: 4,889
  • ScreenClip [4].png
    ScreenClip [4].png
    1.2 MB · Views: 4,882
  • ScreenClip [5].png
    ScreenClip [5].png
    2 MB · Views: 4,909
Someone asked for Clayton's contact info:

Clayton Braucht
Braucht's Lumber
Millhiem PA
claytonbraucht@verizon.net
814-574-5666

RMW
 
Ok so we're taking a trip to penn state to buy slabs, fat sandwiches and watch a football game?

My wife wants to come she's a nittany lion.
 
Richard, those are some mighty fine looking slabs.  Now I just need to find a hockey tournament or some other reason to head to State College.
 
I am actually planning a trip to State College in July. I may need to take a few hundred bucks...That is really cheap
 
Mort said:
Those are $40-75? I'm living in the wrong area.

Yup. Here's a $40 one I worked on today (gave it a shot of alcohol to see what the figure looked like after flattening:

[attachimg=1]

[attachimg=2]

Truth be told, I'm living in the wrong area too, i.e. South Jurzy.

State College is 4+ hours from me, nearby are lots of Amish farms and businesses. We visited an Amish sawmill that specializes in Hemlock and pine. My friend is planning a 12' by 16' timber-framed pavilion to house the latest version of a pizza oven, I hope to help with the pavilion-raising mid-June. We priced rough-sawn Hemlock for the project, largest beam being 6" by 12" by 16', for enough timber to build the entire thing... $670-something including tax. He was expecting to pay a couple grand.

None of this is available in southern NJ, but if it were that wouldn't be a $40 chunk of Walnut.

RMW   
 

Attachments

  • ScreenClip [7].png
    ScreenClip [7].png
    1.3 MB · Views: 3,971
  • ScreenClip [6].png
    ScreenClip [6].png
    2.7 MB · Views: 4,196
Do You're Using The 80/20 EXTRUSIONS For The Router Sled setup? Mind sharing a closer pick of assembly? I was thinking about something along those lines so I don't have to build a whole frame everyone I plane a slab.
 
Edward A Reno III said:
Do You're Using The 80/20 EXTRUSIONS For The Router Sled setup? Mind sharing a closer pick of assembly? I was thinking about something along those lines so I don't have to build a whole frame everyone I plane a slab.

[member=37411]Edward A Reno III[/member] -

For the guides I just used 2 short chunks of 1530 with a 4' section of 1515, all attached to the SYS/MFT cart using t-nuts/button head cap screws/access holes. 

The sled is made of 2 more pieces of 1515 with a piece of 3/4 ply rabbeted to fit the slots (8mm) and a couple pieces of 1/4" AL flat bar at each end.

[attachimg=1]

[attachimg=2]

[attachimg=3]

If these photos aren't clear enough I can take some more detailed shots, just let me know.

RMW
 

Attachments

  • ScreenClip [10].png
    ScreenClip [10].png
    2.1 MB · Views: 4,326
  • ScreenClip [9].png
    ScreenClip [9].png
    624.3 KB · Views: 3,966
  • ScreenClip [8].png
    ScreenClip [8].png
    947.1 KB · Views: 4,215
Thanks [member=8712]Richard/RMW[/member]  That seems straightforward enough.  What do you do to anchor the actual slab, given that it's only supported by those two extrusions?  And what about the first pass over the slab, particularly one with a slight twist in it?  Do you just shim the slab where it sits on the extrusion?

BTW, made contact with Clayton today, and am planning my trip out there near the end of next week (have already had two people express interest in pooling resources for the trip -- more always welcome: (http://festoolownersgroup.com/member-connections/anyone-in-the-tri-state-area-interested-in-a-slab-run/).  Thanks again for the info on him -- seems like a great guy over the phone. 
 
Edward A Reno III said:
Thanks [member=8712]Richard/RMW[/member]  That seems straightforward enough.  What do you do to anchor the actual slab, given that it's only supported by those two extrusions?  And what about the first pass over the slab, particularly one with a slight twist in it?  Do you just shim the slab where it sits on the extrusion?

BTW, made contact with Clayton today, and am planning my trip out there near the end of next week (have already had two people express interest in pooling resources for the trip -- more always welcome: (http://festoolownersgroup.com/member-connections/anyone-in-the-tri-state-area-interested-in-a-slab-run/).  Thanks again for the info on him -- seems like a great guy over the phone.

Clayton is a great guy, glad to see he picked up some more business.

I used the complex, patented & super-secret "Gravity" clamp to hold the slab.  [big grin]

The extrusions under it were just to raise it up a bit, this particular slab had zero twist to it and did not want to walk around on me so I didn't bother clamping. If the next one needs shims or clamping I will probably use the spacer extrusions again but fasten them to the worktop somehow, then use some blocks of wood fastened to the spacers to trap the slab.

Enjoy the trip out to the country.

RMW
 
Yeah, Gravity is awesome.  That's a pretty wide slot you've got in the router sled -- what diameter bit you using on the 1400?

Richard/RMW said:
Edward A Reno III said:
Thanks [member=8712]Richard/RMW[/member]  That seems straightforward enough.  What do you do to anchor the actual slab, given that it's only supported by those two extrusions?  And what about the first pass over the slab, particularly one with a slight twist in it?  Do you just shim the slab where it sits on the extrusion?

BTW, made contact with Clayton today, and am planning my trip out there near the end of next week (have already had two people express interest in pooling resources for the trip -- more always welcome: (http://festoolownersgroup.com/member-connections/anyone-in-the-tri-state-area-interested-in-a-slab-run/).  Thanks again for the info on him -- seems like a great guy over the phone.

Clayton is a great guy, glad to see he picked up some more business.

I used the complex, patented & super-secret "Gravity" clamp to hold the slab.  [big grin]

The extrusions under it were just to raise it up a bit, this particular slab had zero twist to it and did not want to walk around on me so I didn't bother clamping. If the next one needs shims or clamping I will probably use the spacer extrusions again but fasten them to the worktop somehow, then use some blocks of wood fastened to the spacers to trap the slab.

Enjoy the trip out to the country.

RMW
 
1-1/2" surface planing.

Edward A Reno III said:
Yeah, Gravity is awesome.  That's a pretty wide slot you've got in the router sled -- what diameter bit you using on the 1400?

Richard/RMW said:
Edward A Reno III said:
Thanks [member=8712]Richard/RMW[/member]  That seems straightforward enough.  What do you do to anchor the actual slab, given that it's only supported by those two extrusions?  And what about the first pass over the slab, particularly one with a slight twist in it?  Do you just shim the slab where it sits on the extrusion?

BTW, made contact with Clayton today, and am planning my trip out there near the end of next week (have already had two people express interest in pooling resources for the trip -- more always welcome: (http://festoolownersgroup.com/member-connections/anyone-in-the-tri-state-area-interested-in-a-slab-run/).  Thanks again for the info on him -- seems like a great guy over the phone.

Clayton is a great guy, glad to see he picked up some more business.

I used the complex, patented & super-secret "Gravity" clamp to hold the slab.  [big grin]

The extrusions under it were just to raise it up a bit, this particular slab had zero twist to it and did not want to walk around on me so I didn't bother clamping. If the next one needs shims or clamping I will probably use the spacer extrusions again but fasten them to the worktop somehow, then use some blocks of wood fastened to the spacers to trap the slab.

Enjoy the trip out to the country.

RMW
 
Here's the first one, major learning curve with the malachite inlay.

[attachimg=1]

Filled this void 4 times before I got it right: epoxy only (yuck), poorly mixed epoxy/malachite (didn't cure), epoxy/crushed malachite that went off too fast (globbed up) and finally a mixture of epoxy/malachite power followed by adding crushed stone. Now it's smooth as glass.

[attachimg=2]

Not really in love with the filled bore holes but not sure what else to to fill them with, or perhaps just leave the void? Sanded to 320, just need to manicure the rear end and it's ready for Surfix and hairpin legs.

[member=37411]Edward A Reno III[/member] - did you ever make the trip out to pick up slabs?

RMW
 

Attachments

  • ScreenClip.png
    ScreenClip.png
    1.8 MB · Views: 3,642
  • ScreenClip [1].png
    ScreenClip [1].png
    1.6 MB · Views: 3,577
Richard, in a recent project, I had a large fill like you show with the malakite and epoxy.  I routed out the knot and some around it.  I then cut a slightly smaller piece of contrasting wood and epoxied into the hole.  With the surounding grain to the main body of wood, it sort of fit to look like an arrowhead. It wood have looked even better with malkite as you used  for a border.

I cannot show a pic right now. I recently got an upgrade to my computer.  The "new" one is only 3 or 4 years old.  during the change over, ALL of my stories were lost.  (REAL panic situation  [scared])My Guru managed to retrieve most of those.  I was putting together a grouping of my stories for an old friend who was having his 75th.  I can call him and "old friend" because he used to be 10 years younger than I.  He is now 36 years older than I.  I was looking for some pics to add to the collection and discovered that my complete album had been lost as well.  I have an appointment set up with my computer whiz who says he is sure he can retrieve the pics. 

If we can locate, I can send pic of what I was talking about above.
Tinker
 
Richard on those bore holes around the edges.... a lot of folks are routing them out. creating a rabbet or dado and then filling the void with another piece of wood. plane and sand it flush.

Ron
 
Tinker said:
Richard, in a recent project, I had a large fill like you show with the malakite and epoxy.  I routed out the knot and some around it.  I then cut a slightly smaller piece of contrasting wood and epoxied into the hole.  With the surounding grain to the main body of wood, it sort of fit to look like an arrowhead. It wood have looked even better with malkite as you used  for a border.

I cannot show a pic right now. I recently got an upgrade to my computer.  The "new" one is only 3 or 4 years old.  during the change over, ALL of my stories were lost.  (REAL panic situation  [scared])My Guru managed to retrieve most of those.  I was putting together a grouping of my stories for an old friend who was having his 75th.  I can call him and "old friend" because he used to be 10 years younger than I.  He is now 36 years older than I.  I was looking for some pics to add to the collection and discovered that my complete album had been lost as well.  I have an appointment set up with my computer whiz who says he is sure he can retrieve the pics. 

If we can locate, I can send pic of what I was talking about above.
Tinker

[member=550]Tinker[/member] - my heart skipped a beat at the thought of losing your ramblings... errr stories.  [poke]

Seriously though, we should set up an archive on the FOG to retain your wisdom for posterity. That thread would be a good winter night read.

[member=3192]rvieceli[/member]  - seems like a lot of routing/filling for the small stuff. I think this is the only slab I got with bore holes so probably won't be a problem going forward. There are some splits that need butterfly keys, which is a perfect job for the HandiBot CNC.

Next one should be a 1 day project, having learned from my mistakes along the way.  [blink]

RMW
 
On the patching... in reality not significantly more work that filling and then refilling voids in epoxy. ;-)

works better when they cluster together.

Since you are already cheating by using the handibot...... remember these?
http://www.ripdogs.com/rip-stops-1/

Make the same shape out of aluminum, modify the depth a bit and use those as keys.

Ron
 
The Shaper handheld CNC plunge router would be the ideal overkill too for the job of making custom plugs. Excellent demo here

Thanks to Ned Young for sending info about this device.

Ned is one of the original NA Festoolians from back when FOG was a Yahoo forum.
Ned is the one who coined the term NAINA.
 
Back
Top