Slabs!

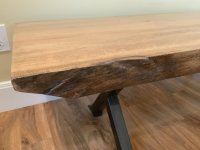
Great look.  We're going out at the end of the week.  Looking forward to it.
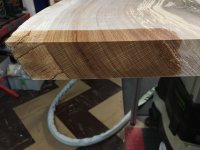
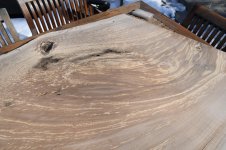
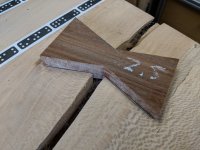
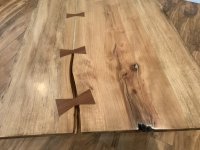
Richard/RMW said:
Here's the first one, major learning curve with the malachite inlay.

[attachimg=1]

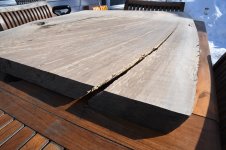
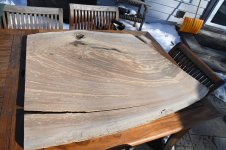
Filled this void 4 times before I got it right: epoxy only (yuck), poorly mixed epoxy/malachite (didn't cure), epoxy/crushed malachite that went off too fast (globbed up) and finally a mixture of epoxy/malachite power followed by adding crushed stone. Now it's smooth as glass.

[attachimg=2]

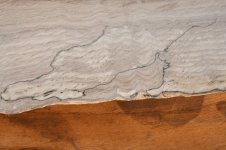
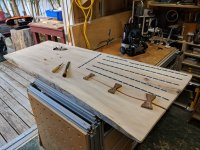
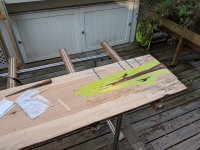
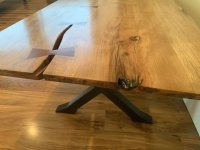
Not really in love with the filled bore holes but not sure what else to to fill them with, or perhaps just leave the void? Sanded to 320, just need to manicure the rear end and it's ready for Surfix and hairpin legs.

[member=37411]Edward A Reno III[/member] - did you ever make the trip out to pick up slabs?

RMW
 
Sanded to 320 with 1 coat of Surfix:

[attachimg=1]

Boss wants "shiny" - if the oil does not satisfy her after I get 3 coats on it, what can I use to give it a bit more gloss?

Thanks,

RMW
 

Attachments

  • ScreenClip [5].png
    ScreenClip [5].png
    1.5 MB · Views: 3,265
[member=8712]Richard/RMW[/member]  I have been using oil finishes on many my projects.  And then Wipe on poly satin.  That leaves a dull finish that I wanted.  Last winter, I built a trestle table and finished the same way.  I wanted to ut another coat on it this spring as I didn't thing I have enough protection.

This past winter, I was introduced to General Finishes Arm-R-Seal Satin and had tried it on a couple of serving trays that I was making.  The finish seemed harder than th Wipe-on Poly.  On such a small surface, I thought it was only a little brighter than the poly.  So, when i made the trip to Massachuesetts, I took along the Arm-R-Seal for the added application. It went on just as easy as the Wipe-on-Poly had, but it came out much brighter.  The table now has a shiny top.  Much brighter than I was hoping for.

The Arm-R-Seal is a blending of Oil and Urethane.  I had talked to the salesman at Woodcraft who had allerted me to the finish.  He told me it goes on over oil or water based finishes. He also told me it withstands much higher heat than the Wipe-on-Poly.  That was the main selling point for me.  Hot coffee, hot potatoes or hot tomales, they are all potential hazards on that table.
Tinker
 
Tinker said:
[member=8712]Richard/RMW[/member]  I have been using oil finishes on many my projects.  And then Wipe on poly satin.  That leaves a dull finish that I wanted.  Last winter, I built a trestle table and finished the same way.  I wanted to ut another coat on it this spring as I didn't thing I have enough protection.

This past winter, I was introduced to General Finishes Arm-R-Seal Satin and had tried it on a couple of serving trays that I was making.  The finish seemed harder than th Wipe-on Poly.  On such a small surface, I thought it was only a little brighter than the poly.  So, when i made the trip to Massachuesetts, I took along the Arm-R-Seal for the added application. It went on just as easy as the Wipe-on-Poly had, but it came out much brighter.  The table now has a shiny top.  Much brighter than I was hoping for.

The Arm-R-Seal is a blending of Oil and Urethane.  I had talked to the salesman at Woodcraft who had allerted me to the finish.  He told me it goes on over oil or water based finishes. He also told me it withstands much higher heat than the Wipe-on-Poly.  That was the main selling point for me.  Hot coffee, hot potatoes or hot tomales, they are all potential hazards on that table.
Tinker

[member=550]Tinker[/member]

Thanks Wayne, that is exactly what I was hoping for. The Boss is also unhappy with the utility area counter-tops w/ Surfix, I was planning to ignore it but if it's that simple I will probably give it coat and bank a few brownie points.

RMW

 
[member=8712]Richard/RMW[/member]  Getting Brownie points is always a great idea [big grin]
Tinker
 
Tinker said:
[member=8712]Richard/RMW[/member]  Getting Brownie points is always a great idea [big grin]
Tinker

Yes, however they have a very limited shelf-life...

RMW
 
[member=8712]Richard/RMW[/member] I just thought about how I had finished off the Arm-R-Seal.  I had read on any directions along the way for using both the Wipe-on and the Arm-R-Seal to use steel wool for the final rub downs.  On all of the projects I had used the WOP I never sanded above 220 grit.  Usually going only to 150 for serving trays.  My Cuz'z wife has been so excited over the table I had built for them, and she is somewhat of a perfectionist, decided at the last minute to give the final finish a rub-down with the steel wool.  Whenever I have gotten steelwool for finishing, or for any other use, I have used maybe one or two pieces for the project.  By the time I think to use it on another project, I find a container full of rust.

When I was discussing the problem @ Woodcraft toy store, the sales man showed me some very coarse pads of a rough cloth material.  He showed me "0O", "000" and "0000".  I brought along one pad of each, but only went to the"000" and decided that was glossy enough.  I think my relative would appreciate going to the higher gloss possible with the "0000".  So, even tho it is glossier than I like, I guess a good compromise. (I looked at the pads down in my shop, but cannot find a company name anywhere.)

So to qualify my previos post, I am not now certain there would be a difference in gloss just because of the different finish material.  But I do believe the Arm-R-Seal is the harder material with better buildup qualities.  [member=13337]Scott Burt[/member] might have better info on this.
Tinker
 
Richard/RMW said:
Sanded to 320 with 1 coat of Surfix:

[attachimg=1]

Boss wants "shiny" - if the oil does not satisfy her after I get 3 coats on it, what can I use to give it a bit more gloss?

Thanks,

RMW

I just took a closer look at theslab you are finishing.  Perhaps The Boss is not so concerned about glos as she is about containing that spook that is obviously trying to get to of there.  [scared]

Tinker
 
SNAKE!!! [poke]

Finally made time to finish a chunk of burl that came with the slab haul. Flattened the back/top with the tablesaw/RAS-115, cleaned it up with 3M sanding disks on the Foredom, routed out the back for some z-bar, couple coats of teak oil & sprayed on semi-gloss lacquer. I would stopped at the oil but the boss wanted it "shiny".
 
[attachimg=1]

[attachimg=2]

[attachimg=3]

[attachimg=4]

[attachimg=5]

Hope to get to the big maple slab soon, it is the gem of the bunch. Has anyone else visited Clayton for slabs?

RMW
 

Attachments

  • ScreenClip [10].png
    ScreenClip [10].png
    2.3 MB · Views: 2,871
  • ScreenClip [6].png
    ScreenClip [6].png
    1.6 MB · Views: 2,705
  • ScreenClip [7].png
    ScreenClip [7].png
    2.3 MB · Views: 2,858
  • ScreenClip [9].png
    ScreenClip [9].png
    1.8 MB · Views: 2,647
  • ScreenClip [8].png
    ScreenClip [8].png
    1.5 MB · Views: 2,637
Well, I picked up this slab yesterday. It's white oak, 35" wide, 45" long and 1 7/8" thick. It was not cut from the trunk but rather it was a branch from the tree.  [eek]

I was told the tree was probably 150-200 years old. I counted up the growth rings and there are 10-15 rings per inch. This roughly validates the age of the tree that I was told.
 

Attachments

  • 5118.JPG
    5118.JPG
    2.4 MB · Views: 500
  • 5116.JPG
    5116.JPG
    2.2 MB · Views: 487
  • 5OO_4102 S.JPG
    5OO_4102 S.JPG
    4.4 MB · Views: 469
  • 5OO_4092 S.JPG
    5OO_4092 S.JPG
    804 KB · Views: 433
  • 5OO_4094 S.JPG
    5OO_4094 S.JPG
    918.5 KB · Views: 456
  • 5OO_4090 S.JPG
    5OO_4090 S.JPG
    827.1 KB · Views: 488
Siberian Elm, formerly shading a neighborhood in Portland, OR.  Please forgive me for killing the edge.

Purchased the slabs from Salvage Works in Portland.  Milled and kiln dried, ready to sand.  Nice helpful folks, good selection and fair prices.
https://www.salvageworkspdx.com/

Top slab (left in picture) is 2" thick and the leg slab (right) is 2-1/2".

Final overall dimensions are 20" w x 48" l x 17" H

The legs were glued up to get the desired width and are joined to the top with three 14mm dominoes on each end.

Sanded up incrementally to P220g and finished with two coats of Osmo satin hard wax oil.  Green Scotch Brite pad (Viles) for first coat burnish and white pad on the second coat.

I used my TS75 saw with 1400 and 1900 rails along with a TSO GRS-16 guide rail square.  ETC EC 150/3 sander for sanding and rubbing in the oil.  Also, a Domino XL and MFT/3.

This was my first slab-style project and I anticipate doing some more.
 

Attachments

  • 20171216_101948.jpg
    20171216_101948.jpg
    2.4 MB · Views: 495
  • 20171216_101929.jpg
    20171216_101929.jpg
    2.5 MB · Views: 511
  • 20171211 Elm slabs.jpg
    20171211 Elm slabs.jpg
    1 MB · Views: 450
Scott,

yer Killing me. Im taking a ride up there next month and Im stopping in Hood river to visit some old friends. Now ya got me going a buying a load of reclaimed wood and a Slab.

Sheesh I gotta quit coming here its always cost me money  [scared]
 
More fun with Slabs! This is a duplicate of a post I made over at the Shaper Origin forum:

I’ve been criminally unproductive ever since receiving my Shaper Origin, this is the first “real” i.e. furniture grade project attempted. Prior to this I fiddled with some shop fixtures only. The most recent firmware update (Dolores) was handy to have especially the ability to zoom in when placing the long wood inlay to the crack.

[attachimg=1]

[attachimg=2]

[attachimg=3]

[attachimg=4]

Slab is 10/4 sycamore, 10’ by 24-30" cross cut @ 66" into a coffee table and wall-mounted worksurface for my niece’s new apartment. Beautiful grain flecks that come to life with shellac/stain/poly finish & some nice spalting. The split goes from end to end and where unopened I need to reinforce on the bottom. Got a steal on it from John @ Full Circle Woodworx because of the checking. Absolutely LOVE sycamore.

Tabletop received Cumru keys and will get some mother of pearl(??) epoxy inlay, the “client’s” idea (my wife & niece). I’m reserving judgment on that until it’s finished. Desk received a cherry inlay and clear epoxy in knot holes.

Kudos to the SO team for ease of use, my potential future nephew did the majority of the cutting after I demo’ed it for him. He had zero woodworking experience prior to this project. He also earned his chops in slab-surfacing with a router jig.

Table will end up with welded steel X legs, hopefully done in the next 2 weeks. Desk will be wall mounted with some 3/16" stainless cable supports.

Shoutout to Eric Schimelpfenig for the development of Fabber, it was used along with SketchUp to design the butterfly keys.

RMW
 

Attachments

  • IMG_20181007_165000 (Medium).jpg
    IMG_20181007_165000 (Medium).jpg
    284 KB · Views: 1,063
  • IMG_20181007_164941 (Medium).jpg
    IMG_20181007_164941 (Medium).jpg
    221.1 KB · Views: 1,066
  • IMG_20181007_164920 (Medium).jpg
    IMG_20181007_164920 (Medium).jpg
    257.2 KB · Views: 1,062
  • IMG_20181007_164930 (Medium).jpg
    IMG_20181007_164930 (Medium).jpg
    255.7 KB · Views: 1,050
Nice job on the table!  Origin makes this kind of work so much easier!

Thanks for sharing!
 
[member=167]neilc[/member] a belated thank you. Finally got this done and out of the shop today. 2 nieces down, 4 nephews to go...

[attachimg=1]

[attachimg=2]

[attachimg=3]

[attachimg=4]

[attachimg=5]

The legs will probably get a little visual distressing workover, used a slate black patina and then sprayed flat lacquer over it. Neice #2 can steel wool off some strategic areas as she sees fit to make them a little more interesting, she's the artistic type.

On to the next half-finished project on the pile.

RMW


Attachments

  • 20190623_182334039_iOS.jpg
    20190623_182334039_iOS.jpg
    117.1 KB · Views: 778
  • 20190623_182346516_iOS.jpg
    20190623_182346516_iOS.jpg
    131.2 KB · Views: 790
  • 20190623_182215093_iOS.jpg
    20190623_182215093_iOS.jpg
    183.7 KB · Views: 852
  • 20190623_182122722_iOS.jpg
    20190623_182122722_iOS.jpg
    125.3 KB · Views: 762
  • 20190623_182134054_iOS.jpg
    20190623_182134054_iOS.jpg
    145.5 KB · Views: 794
Wow - that came out really nice!!! Love the dovetails and finish!! Well done!
 
Great looking table Richard! Can you explain how you did the tapers on the leg feet?  I like the design!
 
Thanks guys.

[member=167]neilc[/member] the legs are 2" .120 wall tubing. I cut them long @ an acute angle, then using the Portaband slit along each side edge, hammered the sides out to the profile we wanted & cut/welded in 1/8" filler. In case this makes no sense...

[attachimg=1]

Welded on some 1/2" by 2" flat bar to close up the bottoms and started grinding. The cordless angle grinder is your friend.

[member=3192]rvieceli[/member] it's Sculpt Nouveau's slate black patina. Flap-disked the surface rust (that grinder again), followed by hand w/ 100G wet/dry, clean with brake cleaner then spray it on & wait 60 seconds. Rinse/repeat to darken. First coat leaves a greenish hue on raw steel which darkened up with 2/3 applications. The stuff smells just like cold blue but has a different (slate) appearance. Only nit is that it tends to rust immediately after rinsing so so you have to dry and surface coat immediately.

I like how the patina doesn't look like a surface film. I was in a hurry so instead of playing around with steel wool to get a more nuanced look I just dried everything and coated with Behlens flat spray lacquer which emphasizes the patina.

When the client takes possession I assume we'll have a little fun adding some highlights and another coat of lacquer.

RMW
 

Attachments

  • 2019-06-24_083610.png
    2019-06-24_083610.png
    21.1 KB · Views: 695
Thanks for the info Richard. On the lacquer front, I have had pretty much zero long term success with lacquer for a finish coat on my steel stuff. Looks good initially but then gets a lot of cracking and checking within the finish after a while. That's with proper cleaning and handling. I have switched to a solvent based enamel and am getting better long term results.

Ron
 
Back
Top