Spalted maple live edge

Toolinator

Member
Joined
Dec 22, 2014
Messages
48
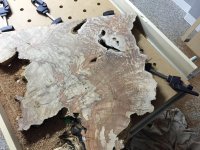
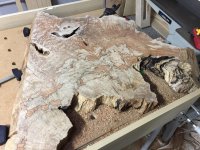
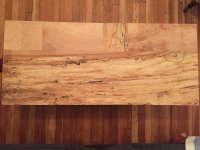
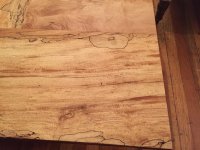
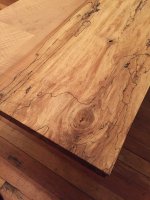
I picked up a small piece of maple that has spalting in it to make into a small coffee table. I planned the top with a router sled and sanded the top way up 800 grit. I have a few questions for you guys...

- Chalk colored wood: in the pics you can see that a decent chunk of the top doesn't look like normal maple, it looks sort of chalk-like particularly the right side of the attached photo (and it's not soft, feels hard if you knock it). Some of the edge was rotten and crumbled and I am assuming this is connected? Is this going to look odd when finished?

- Chip out: I used a brand new 2" straight bit that I thought would be perfect for planning. But there are some small bits here and there of the surface that pulled out. I took two passes at clearing maybe 1/8" at a time. Would a round bowl bit be better?

- the live edge is very contoured and rough (partially from using a soft metal spinning brush to remove the softer rotten wood from the remaining hard maple). What is the best way to smooth the contours a bit? Files/rasps seem like they would take quite awhile, and grinder "flap disks" at a higher grit still seem aggressive.

Any thoughts here? Thanks guys!


Attachments

  • image.jpg
    image.jpg
    1,010.1 KB · Views: 949
It's difficult to eliminate tear out. You could try taking slightly shallower passes. I find taking passes with the grain instead of across the grain helps. But the end grain piece you have won't fit that model.  I use this bit and like it a lot:

http://www.amanatool.com/products/router-bits/solid-surface-router-bits/counter-top-trim-router-bits.html

I also use a wire brush in an angle grinder to knock off some of the flaky stuff. I then follow up with an old Bosch 5 inch sander that is fairly aggressive and I use it at the edges of the pad. Doing this does tend to destroy the finer contours. Other option would be time and hand work.
 
Nice piece of maple!  I'm curious what you will do with the one cut edge.

The chalk-coloured wood is a function of the spalting.  If it is still structurally solid, I would simply finish it the same way as the rest of the piece.

I'm not sure whether your best bet for a smooth surface would be to use a bit with rounded corners, take shallower passes, or simply sand afterwards.  If the wood tears in softer areas, sanding will be your best bet.

Wire brushes can be very useful, but they can also create scratches that are difficult to remove on live-edge material.  Will wire-brushing with the grain hide the scratches?
 
That slab is gorgeous.  Can't wait to see the final product.  Do you plan to fill in the voids with epoxy or leave them?

For the one slab I did, which was not spalted, I first went over it with a sander to get the rough stuff.  RAS was way overkill, but the RO90 with interface pad was better.  I then used small brass and steel bristled brushes by hand (I think they were the cheap ones from Harbor Freight) to clean and pick stuff out of the small voids and it seemed to work well.  The big difference with mine was that the bark was mostly gone and the live edge was fairly consistent and straight so it was easier to work on.  Several coats of shellac and varnish with some sanding in-between smoothed things out on the edges.

Mike A. 
 
Looks like a manta ray smiling after being involved in a car crash.

You know, in a good way.

I had some tear out using a flat bit, didn't really notice it at first but it seems difficult to avoid. Had the same thing with a bowl bit too, so unless I was just unlucky I don't think it's that.
 
I thought it looked sort of like Australia, but the manta ray hitting a bus is better.

Chris, not sure about the one flat edge... I bought it like that. I was thinking of pushing against a wall. Maybe re-cut that edge straight and also put a 45 degree angle on the bottom side? Can't decide about doing that, or 90 degrees or trying to 'fake' a live edge with the flap discs and grinder. Hmmmm. Advice? I used a wire brush wheel and went with the grain on the edge and it looks natural, just has more peaks and valleys on the side than normal.

Tear out: I will try a bowl but and mega shallow passes after the first deep cut to get her level.

I plan to fill the small holes with epoxy, but might leave the bark-intrusion holes that go all the way through the slab alone? This was a picture of the bottom fyi. I decided to flatten and sand first before doing the top side.

Re: apoxy, should I plane and finish sand then epoxy (and re-sand), or apply apoxy first and then flatten and sand?
 

Attachments

  • image.jpg
    image.jpg
    1 MB · Views: 640
Toolinator said:
I thought it looked sort of like Australia, but the manta ray hitting a bus is better.

Chris, not sure about the one flat edge... I bought it like that. I was thinking of pushing against a wall. Maybe re-cut that edge straight and also put a 45 degree angle on the bottom side? Can't decide about doing that, or 90 degrees or trying to 'fake' a live edge with the flap discs and grinder. Hmmmm. Advice? I used a wire brush wheel and went with the grain on the edge and it looks natural, just has more peaks and valleys on the side than normal.

Tear out: I will try a bowl but and mega shallow passes after the first deep cut to get her level.

I plan to fill the small holes with epoxy, but might leave the bark-intrusion holes that go all the way through the slab alone? This was a picture of the bottom fyi. I decided to flatten and sand first before doing the top side.

Re: apoxy, should I plane and finish sand then epoxy (and re-sand), or apply apoxy first and then flatten and sand?

I recently epoxied a slab and then milled it again afterwards before sanding. Mostly because the epoxy on the top I was trying to get rid of with a Rotex wasn't disappearing quickly enough. Ran it through the flattening jig again to get rid of the majority and then started sanding.

If you are going to fill with epoxy, do me a favour? My triple checking that the underside was fully sealed wasn't enough, so you might want to try checking about 10 times or something. I've got a very shiny bench top and floor now, but it was a slab of wood with what appeared to be a cave system inside it.
 
Toolinator,

With regards to the flat edge.  You didn't indicate what base you were planning, but maybe consider some type of waterfall base or straight base joined to the flat edge.  You could find some similar or even contrasting wood.  That might make the flat edge look like it was part of the design.  This probably would work better with a low table.  How high were you planning?

Just my  [2cents]

Mike A.

 
Spalting in maple is caused by a fungal infection- that is why the lighter areas are soft.  You will find that those areas will also soak up a lot more epoxy than the surrounding areas.

I made an olive tray from a spalted maple burl a few years ago.  To prevent the resulting shiny table and floor that Wuffles achieved (and only because I had previously done the same),  I traced the outline on 3mm Baltic birch, cut to the inside of the line and epoxied it to the bottom.  I then gave it (the birch) a coat of black lacquer so it would better match the live edge of the maple after finishing.  After that, I gave the top side its epoxy coat.
 
I have worked with spalted maple quite a bit over the past few years. The end results when done right are stunning, getting there however is a lot of work. Highly figured maple is already temper-mental, the tear-out you are talking about is common. I have had success when all else fails by actually applying water with a little bit of mineral oil to the slab before planing or routing, just a light lubrication you don't want to soak it, nor rust your blades or router bit. Are you router flattening?

As Chris mentioned the chalky coloration is a result of the fungal infection. In my opinion it will finish up just fine. It's good you are using a Rotex and CT because sanding the spalt lines without dust extraction can actually cause the dust from the black fungus to penetrate the surrounding areas creating an undesirable muddied look. One thing I have done on a few of my pieces that have some live edge on them is taking the torch to it, protecting the face of the material with some scrap sheet metal or plywood. The shou sugi ban effect on the live edge with the black spalt lines from the fungus just work beautifully [thumbs up]

Here are a few pictures of a slab coffee table that currently sits in my living room to give you an idea of what it looks like, it was intended for a client but I couldn't bring myself to part with it. I finished it by sanding to 180 and applying 3 coats of OSMO polyx oil.


Attachments

  • IMG_3196.jpg
    IMG_3196.jpg
    1.6 MB · Views: 768
  • IMG_3197.jpg
    IMG_3197.jpg
    1.4 MB · Views: 1,494
  • IMG_3198.jpg
    IMG_3198.jpg
    811.2 KB · Views: 805
  • IMG_3200.jpg
    IMG_3200.jpg
    1.6 MB · Views: 1,176
I like Mike's idea to go with the cut edge and incorporate it into the base design as a sort of semi-border.

Also, I would do all my flattening first before applying epoxy.  Clear epoxy with fill small holes and make them less noticeable.
 
Good feedback. Thank you.

I was leaning towards short'ish hair pin legs, but I like the idea of incorporating the flat edge into a more complex base design
 
Chris, for the holes that go all the way through, if I wanted to fill them with epoxy, would you mix in a little saw dust to make it look more natural (and opaque so that you don't see light looking down under the table).
 
Creating some sort of dam to give the voids a bottom actually seems like a pretty good idea.  How would you do it though?  Pack some sawdust in the hole, then pour in epoxy?
 
Chris Wong said:
Creating some sort of dam to give the voids a bottom actually seems like a pretty good idea.  How would you do it though?  Pack some sawdust in the hole, then pour in epoxy?

In my limited experience you'd have to do more than that to block the hole at the bottom (but I'll assume you knew that) more importantly the sawdust could float to the top, so it depends on the look you are aiming at.
 
Back
Top