Rob-GB
Member
- Joined
- Nov 7, 2009
- Messages
- 1,101
Where to build?
I have made staircases in workshops, people’s houses, garages, Crete, France and now a barn used to store tractors and a Bobcat mini digger.
Anywhere is fair game to me it seems! So choose a place that will be your nominated workshop for the duration and go build.
Planning and design.
Depends on your local regulations and where it is to be installed. In the UK we are governed by the “Building Regulations: approved Document ‘K’.”
This is however not entirely written in stone, as there are some instances that negate them. Such as replacing a stair that existed before regulations did!
In essence, one measures the total rise, finished floor to finished floor, the total going or area it is to sit in and divide these by the number of steps required.
Hopefully within the reg’s. The rise of each step is face of tread to face of tread; the going is face of riser to face of riser.
The nosing is the part of the tread that over hangs the lower riser; this is added to the calculated going.
It is normal practice to make the nosing equal to the tread thickness, 25mm thick tread = 25mm nosing.
Draw up the stair to get clients approval and get your materials ordered and prepared.
Setting out and processing.
Quite often boards have to be glued up to get the width required for strings and treads. I tend to stagger boards to maximise use, clamp up and mark out where the trenching (dado’s) will be and mark positions of domino’s that re-enforce the joint outside of them.


I mark the positions with a straight line and two triangles, Greek capital D, to make it clear that line is the domino one.
I set the Domino to narrow for one board and medium for the other, the point or base of the triangle nearest the edge also denotes this setting.


While most of my clamps are busy I set out the Newel posts, pairing them up where appropriate.
I mark the top for its finished cut line and measure down to mark off positions of hand rail and treads and FFL (finished floor level) and face of riser lines.


Note these newels are laminated, I do this for stability and cost reasons.
Next I set out the positions of mortises and move on to the next newel.


Once the treads are glued up, similar process as the strings, it is time to mark out their shapes and cut them slightly over size.


The outer edges of the glued up boards are nominated as nosing edges and as such are the reference face for all setting out,
very important on a windered stair (winders are also known as kites due to the shape similarity).
The individual treads are then nosed using a round over bit in the CMS router table, the sliding table is locked to add extra support for the wider pieces.
Then all are grooved to take the risers, set back 25mm from the nosing. As all the marking out is still visible on the face of the treads grooving the wrong face is pretty hard to do!


The risers are then rebated to form a tongue to fit the groove, during fitting the tongue may require a bit of easing due to movement in the wood,
a slight chamfer on the tongue leading edges usually suffices.
Trenching the strings, 12mm deep, is next, I use a Trend stair jig that I have been using for close on 23 yrs.
I have modified it by drilling holes to take fixing screws as when a router grabs and jumps (they do that sometimes) the force can knock the jig out of alignment.
Oh! The light colour patch on the jigs tread edge is two pack filler from a repair I made after forgetting to let the router stop before lifting out...22yrs and 9 months ago!!! ;D
The screws only go into the waste or area underneath the steps.

On the windered parts the jig is used without the fence or clamp, instead it is g-clamped and screwed in place, I use a spacer (bottom left) to set up to my lines.

The newels then get the trenching treatment, again using the jig with clamps and careful use of screws. As I prefer to use a dovetailed bit for the trenching one has to stop just shy of coming out the side of the post. As seen in the next pic, the edge of the tread trench is slightly scorched until about 10mm from the exit point which has been eased by hand.

As you work up and around a newel that has winders the trenching can get a little weird looking, if the nosing gets too close to the edge of the newel face I leave it shy and finish the trench by hand.


Using a pattern from the router table set up piece to mark out from.

Next in line are the tenons on the strings that join to the newel’s. I make them 12.7mm (1/2”) thick as most of my deep cutting bits are that size, 65mm deep into a 90mm square post feels right too. Using a 25mm plunge cutter in the OF2200 makes fairly swift work of it. The shoulder lines are marked using a square and steel rule off the tread trench to ensure it is plumb, then squared over to the back face of the string.

Now we have our tenons we need mortises. These I make 3mm deeper than the tenons and set up to mortise gauged lines as in the next pic.

With this set up there is a slight size variation between tenon and mortice. To get the router to slide it has to have a touch of side to side play in the fences, which is to our advantage. The slight variation makes the tenon fit just so, rarely do they need to be eased in their thickness. The mortises also make cutting the tread return trenches easier , example below.

I saw the edges with a Japanese pull saw and a relief cut in-between then chisel out the waste and clean up to depth with a router plane. My reason for this is that I cut the mortises in a newel then cut the relief trenches and repeat the process on the next newel. This system works efficiently for me so I stick with it.


While we have the 12.7mm bit in the router let’s run grooves in the wall strings.

These are 12mm deep and form part of the internal corner joints of the strings that do not share a newel post.
Once run the string is cut to finished size, the pencil line in the pic. Leaving a bit of extra on the length, whether forming a groove or a tenon is a big help in router stability and accuracy.
In a similar way that we formed the tenons we produce the tongue to suit the groove. Both groove and tongue are stopped short of exiting the string material, this way the joint remains unseen.
Fitting the tenons to their newel post is a case of trimming them to depth and chamfering the leading edges to make assembly easier.
I find it quicker to ease/round over the edges to suit the mortise than to square the mortise ends. I even have one of those corner chisels that never ceases to amaze me on how bad it works on anything deeper than a hinge recess.
Drawboring is the method of choice to provide a tight join. Choose where on the tenon and the post will be clear of tread and not too close to the top or bottom edges of the tenon.
Mark out the post, I centre the 12mm hole 20mm in from the face, then drill through the post. Use a scrap piece of timber on the exit hole side to prevent breakout.
Use a brad point drill or auger bit. Insert the tenon into the post and line up the tread trenching top faces so it is correctly sited. Insert the drill bit into the hole and press the point into the tenon. This leaves a centre point mark.

Using the steel rule, draw a square line from the centre point to the shoulder. Measure back from the centre point to the shoulder about 2 or 3mm, this is the new centre point for the 12mm hole.
Drill this, again use a piece of scrap to reduce breakout, and re-assemble the joint.

Lightly tap home some drawbore pins and check that the shoulders pull up tightly.

Stairs are held together with wedges. Yes we glue them, draw bore the tenon joints, put screws in too, but wedges are the main feature. I have pre-assembled numerous staircases and walked up them with nothing but wedges holding it all together. (Don’t try this at home folks, I am a trained lunatic...er!.. woodworker) ;D
With this stair jig the angle of wedge remains constant it is just the thickness and length that alters to suit treads or risers.
So I have a jig for making them that just needs the fence adjusting to suit size. The domino handle is through mortised so I can use it on different handed saws.
The TS55 with a Panther blade in the CMS made easy work of it.
I like to use softwood wedges. Here is why, hardwood wedges will often “bounce” when driven in which leads to them relying on glue to hold them in place. Softwood wedges will tend to crush which aids grip, the glue is then a secondary fixing.

These wedges will be used during the fitting stage of treads and risers to ensure a good fit and to hold them for adjustment marking out, like nosing returns.
The treads are cut to width to your setting out lines and fitted into place, in the next pic you can see in the top right, a tread that has been notched over the post within the trenching and nosing snug in the string. The back edge of this tread is slightly proud of the riser trench face line, this is marked and the same will be done on the other end before trimming.


The next tread does not fit neatly into the nosing part on the newel, due to the angle it enters it. The nosing on the tread has to be squared off to the cut edge and shaped to suit the nosing. This produces a nosing return and is a better method than trying to undercut the nosing trench to get a fit.(particularly that close to the newel face)


On some the nosing trenching needs to be elongated, the riser groove in the tread needs to be in line with the riser trench.


Some of the risers will need to be eased to fit cleanly into the trench edges.

Then it is on to a dry assembly, giving a chance to tweak any joins that need it, before sanding all parts to a finish.

Well that’s about it for the build, next I have to fit handrails and baserails, balustrade and a small matter of installation.
For the eagle eyed you may have noticed a big first step and super long newels at the bottom.
This is due to the old farmhouse having mud floors at the moment at the designed finished floor level is over 300mm higher! One of the other stairs I made for this property sits on breeze blocks at the moment.
I thought it might be interesting to see what hand tools I used .....

I hope you found this of interest and thanks for looking in.
Rob.
I have made staircases in workshops, people’s houses, garages, Crete, France and now a barn used to store tractors and a Bobcat mini digger.
Anywhere is fair game to me it seems! So choose a place that will be your nominated workshop for the duration and go build.
Planning and design.
Depends on your local regulations and where it is to be installed. In the UK we are governed by the “Building Regulations: approved Document ‘K’.”
This is however not entirely written in stone, as there are some instances that negate them. Such as replacing a stair that existed before regulations did!
In essence, one measures the total rise, finished floor to finished floor, the total going or area it is to sit in and divide these by the number of steps required.
Hopefully within the reg’s. The rise of each step is face of tread to face of tread; the going is face of riser to face of riser.
The nosing is the part of the tread that over hangs the lower riser; this is added to the calculated going.
It is normal practice to make the nosing equal to the tread thickness, 25mm thick tread = 25mm nosing.
Draw up the stair to get clients approval and get your materials ordered and prepared.
Setting out and processing.
Quite often boards have to be glued up to get the width required for strings and treads. I tend to stagger boards to maximise use, clamp up and mark out where the trenching (dado’s) will be and mark positions of domino’s that re-enforce the joint outside of them.
I mark the positions with a straight line and two triangles, Greek capital D, to make it clear that line is the domino one.
I set the Domino to narrow for one board and medium for the other, the point or base of the triangle nearest the edge also denotes this setting.
While most of my clamps are busy I set out the Newel posts, pairing them up where appropriate.
I mark the top for its finished cut line and measure down to mark off positions of hand rail and treads and FFL (finished floor level) and face of riser lines.
Note these newels are laminated, I do this for stability and cost reasons.
Next I set out the positions of mortises and move on to the next newel.
Once the treads are glued up, similar process as the strings, it is time to mark out their shapes and cut them slightly over size.
The outer edges of the glued up boards are nominated as nosing edges and as such are the reference face for all setting out,
very important on a windered stair (winders are also known as kites due to the shape similarity).
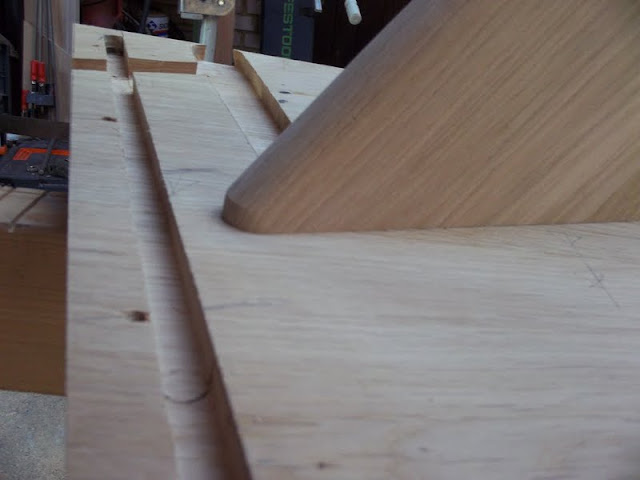
The individual treads are then nosed using a round over bit in the CMS router table, the sliding table is locked to add extra support for the wider pieces.
Then all are grooved to take the risers, set back 25mm from the nosing. As all the marking out is still visible on the face of the treads grooving the wrong face is pretty hard to do!
The risers are then rebated to form a tongue to fit the groove, during fitting the tongue may require a bit of easing due to movement in the wood,
a slight chamfer on the tongue leading edges usually suffices.
Trenching the strings, 12mm deep, is next, I use a Trend stair jig that I have been using for close on 23 yrs.
I have modified it by drilling holes to take fixing screws as when a router grabs and jumps (they do that sometimes) the force can knock the jig out of alignment.
Oh! The light colour patch on the jigs tread edge is two pack filler from a repair I made after forgetting to let the router stop before lifting out...22yrs and 9 months ago!!! ;D
The screws only go into the waste or area underneath the steps.
On the windered parts the jig is used without the fence or clamp, instead it is g-clamped and screwed in place, I use a spacer (bottom left) to set up to my lines.
The newels then get the trenching treatment, again using the jig with clamps and careful use of screws. As I prefer to use a dovetailed bit for the trenching one has to stop just shy of coming out the side of the post. As seen in the next pic, the edge of the tread trench is slightly scorched until about 10mm from the exit point which has been eased by hand.
As you work up and around a newel that has winders the trenching can get a little weird looking, if the nosing gets too close to the edge of the newel face I leave it shy and finish the trench by hand.
Using a pattern from the router table set up piece to mark out from.
Next in line are the tenons on the strings that join to the newel’s. I make them 12.7mm (1/2”) thick as most of my deep cutting bits are that size, 65mm deep into a 90mm square post feels right too. Using a 25mm plunge cutter in the OF2200 makes fairly swift work of it. The shoulder lines are marked using a square and steel rule off the tread trench to ensure it is plumb, then squared over to the back face of the string.
Now we have our tenons we need mortises. These I make 3mm deeper than the tenons and set up to mortise gauged lines as in the next pic.
With this set up there is a slight size variation between tenon and mortice. To get the router to slide it has to have a touch of side to side play in the fences, which is to our advantage. The slight variation makes the tenon fit just so, rarely do they need to be eased in their thickness. The mortises also make cutting the tread return trenches easier , example below.
I saw the edges with a Japanese pull saw and a relief cut in-between then chisel out the waste and clean up to depth with a router plane. My reason for this is that I cut the mortises in a newel then cut the relief trenches and repeat the process on the next newel. This system works efficiently for me so I stick with it.
While we have the 12.7mm bit in the router let’s run grooves in the wall strings.
These are 12mm deep and form part of the internal corner joints of the strings that do not share a newel post.
Once run the string is cut to finished size, the pencil line in the pic. Leaving a bit of extra on the length, whether forming a groove or a tenon is a big help in router stability and accuracy.
In a similar way that we formed the tenons we produce the tongue to suit the groove. Both groove and tongue are stopped short of exiting the string material, this way the joint remains unseen.
Fitting the tenons to their newel post is a case of trimming them to depth and chamfering the leading edges to make assembly easier.
I find it quicker to ease/round over the edges to suit the mortise than to square the mortise ends. I even have one of those corner chisels that never ceases to amaze me on how bad it works on anything deeper than a hinge recess.
Drawboring is the method of choice to provide a tight join. Choose where on the tenon and the post will be clear of tread and not too close to the top or bottom edges of the tenon.
Mark out the post, I centre the 12mm hole 20mm in from the face, then drill through the post. Use a scrap piece of timber on the exit hole side to prevent breakout.
Use a brad point drill or auger bit. Insert the tenon into the post and line up the tread trenching top faces so it is correctly sited. Insert the drill bit into the hole and press the point into the tenon. This leaves a centre point mark.
Using the steel rule, draw a square line from the centre point to the shoulder. Measure back from the centre point to the shoulder about 2 or 3mm, this is the new centre point for the 12mm hole.
Drill this, again use a piece of scrap to reduce breakout, and re-assemble the joint.
Lightly tap home some drawbore pins and check that the shoulders pull up tightly.
Stairs are held together with wedges. Yes we glue them, draw bore the tenon joints, put screws in too, but wedges are the main feature. I have pre-assembled numerous staircases and walked up them with nothing but wedges holding it all together. (Don’t try this at home folks, I am a trained lunatic...er!.. woodworker) ;D
With this stair jig the angle of wedge remains constant it is just the thickness and length that alters to suit treads or risers.
So I have a jig for making them that just needs the fence adjusting to suit size. The domino handle is through mortised so I can use it on different handed saws.
The TS55 with a Panther blade in the CMS made easy work of it.
I like to use softwood wedges. Here is why, hardwood wedges will often “bounce” when driven in which leads to them relying on glue to hold them in place. Softwood wedges will tend to crush which aids grip, the glue is then a secondary fixing.
These wedges will be used during the fitting stage of treads and risers to ensure a good fit and to hold them for adjustment marking out, like nosing returns.
The treads are cut to width to your setting out lines and fitted into place, in the next pic you can see in the top right, a tread that has been notched over the post within the trenching and nosing snug in the string. The back edge of this tread is slightly proud of the riser trench face line, this is marked and the same will be done on the other end before trimming.
The next tread does not fit neatly into the nosing part on the newel, due to the angle it enters it. The nosing on the tread has to be squared off to the cut edge and shaped to suit the nosing. This produces a nosing return and is a better method than trying to undercut the nosing trench to get a fit.(particularly that close to the newel face)
On some the nosing trenching needs to be elongated, the riser groove in the tread needs to be in line with the riser trench.
Some of the risers will need to be eased to fit cleanly into the trench edges.
Then it is on to a dry assembly, giving a chance to tweak any joins that need it, before sanding all parts to a finish.
Well that’s about it for the build, next I have to fit handrails and baserails, balustrade and a small matter of installation.
For the eagle eyed you may have noticed a big first step and super long newels at the bottom.
This is due to the old farmhouse having mud floors at the moment at the designed finished floor level is over 300mm higher! One of the other stairs I made for this property sits on breeze blocks at the moment.
I thought it might be interesting to see what hand tools I used .....
I hope you found this of interest and thanks for looking in.
Rob.