stair help

jeep jake

Member
Joined
Aug 12, 2012
Messages
247
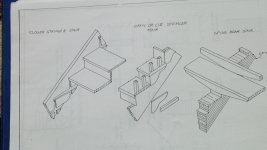
Hey, I was hoping someone could help me. I want to redo my basement stairs. I am going to use douglas fir for the stringers the stairs are going to be up against a wall. The other side will be exposed. I want to skin the exposed stringer, I would like for the riser, and the stringer skin to meet with a miter. Does anyone know of any write ups on how to cut the miters on the skin? or is there a easy way to do it? I wanted to use plywood for the risers, and stringer skin, Thanks guys
 
Don't know if I've misunderstood your post, but this is kind of what I think you mean. On the exposed side cut the stringer at the back if the rise so the riser can fly past and rest on the cut. Mark the short point of the 45 then cut your miter. Then as shown in the picture make a decorative plate and mitre that to the riser. For the going part of the stringer you could cut the bottom part of where the tread sits, then mark your tread to the outside length of the stringer and mark a square line to the round or mould of the tread, then mark a 45 away from the stringer. Then on the table saw rip off the nosing of tread that is not go to be used and mitre it to the nosing of your tread and at the opposite end return the end by either a mitre and a little price mitered so you don't see any end grain, or if the the nosing is just a simple round the dress the end with a block plane to a round. Then screw the tread down the stringer and plug the screw so it can't be seen. Or the other option or doing would be to mark the front line of the rise and cut down the line to the going cut, then using a router with a 45 chamfer cutter ( titman chc45lx) then setting the cutter to the thickness of the riser and take passes till the 45 just touches the outside face of the stringer ( always work with the exposed side down) then for the area where you can't the router in cause of the round of the cut using a nice sharp chisel just finish off the the last little bit. Then cut your riser to fit in with a mitre. Saves having to do a decorative plate. Then do the rest same as before. Or where you made the cut for the tread to sit on come up say 9 mm so the stringer can be housed into the treads and the nosing detail is produced on the end of the treads exposing the end grain. That's along the lines I would do the job hope that helps a little
 

Attachments

  • IMG_00000013.jpg
    IMG_00000013.jpg
    771.5 KB · Views: 303
This video might give you some ideas.  You would need to bevel the riser cut.  Make sure to experiment on scrap and use the stop as mentioned.  If you have the parallel guide attachment for your TS saw, using it as an outrigger will steady the saw.

Peter
 
Pretty cool vid. In the uk we wedge the risers and treads but in Europe they mortise the treads into the stringers as shown in the vid
 
Clamp the trim stringer (what you're calling a skin) to the stringer. Draw the pattern on the inside face of the trim stringer. Cut the horizontial to the vertical line. Clamp your rail on the vertical line, depending on side of trim stringer you may have to plunge cut. You may have to finish the cut by hand.

Tom
 
I think you are making the job harder than it really needs to be mitring the skin. If I was to plate or skirt the stringer I would cover all the risers with the same material as the skirt then simply mark out the skirt so all I had to do is just scribe it to the treads and risers nice an simple. I personally think that by mitring is a lot harder and if you get shrinkage you are going to look into a gap.
 
Mitered risers are common on the older buildings around here. Not that hard once you've done a few.

Tom
 
wrightwoodwork said:
I think you are making the job harder than it really needs to be mitring the skin. If I was to plate or skirt the stringer I would cover all the risers with the same material as the skirt then simply mark out the skirt so all I had to do is just scribe it to the treads and risers nice an simple. I personally think that by mitring is a lot harder and if you get shrinkage you are going to look into a gap.

Where are these gaps going to be? If it's shrinks towards the fixing poing then the miter can only tighten up not get a gap
 
Maybe misunderstanding but are these mitres going to to produce an internal corner or external corner. If internal it shrinks shows a gap if external then obviously it will get tighter. Just had another look I've misunderstood I take its the outside stringer and is open so mitre the corners as dean says will get tighter, was thinking the wall stringer
 
I understand how to lay it out, but how do I cut it in a efficient manor. I was almost thinking that a carvex on a rail might be my best bet. But I would love to hear how a pro does it.
 
Why not using the method peter shows in his vid using qwas dogs to set the angles then mark the long points and cut with your ts55 set at 45
 
I use the TS 55 now. Prior to this I cut them with my Skill worm drive.

Tom
 
Back
Top