curt boyer
Member
- Joined
- Jun 8, 2007
- Messages
- 201
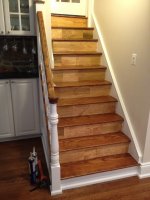
Our floor guy sanded this back stair which had painted risers and yellow pine treads. The risers were finger jointed and never meant to be stained. He put a coat of stain and poly on them anyway to see what they would look like as the homeowner was away at the time. When she got back and saw the risers and asked what we could do to improve the look of the finger jointed risers. The first thing we tried carefully scribed and fit 1/4" birch ply risers. We tried several stains and got pretty close in tone and color to the treads but we couldn't match the cathedral grain of the yellow pine which was a deal breaker for the homeowner. I then suggested milling and applying yellow pine tread stock over top of the existing risers so that the grain would match.
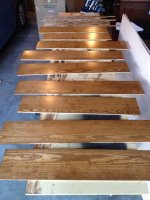
So with perfectly scribed 1/4" birch patterns I started work on option number two. We took stock yellow pine treads cut and ripped them an 1/8" bigger than the numbered patterns. I stood the risers on edge and ran them through the tablesaw twice. As the riser height was on average 7-1/2" tall and my tablesaws capacity is 3-1/8", I had a small island of wood in the middle of the riser to be removed. I used a power plane to get close to a flush surface then I ran them through a thickness planer to dimension them to final thickness. I connected my patterns to the blanks with two way carpet tape. I then used the 1400 with a top bearing pattern bit to cut all the risers. This worked really well and produced very tight fitting risers that needed an occasional touch with a sharp block plane. We stained them and applied one coat of poly in preparation for the installation.
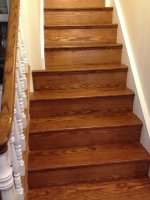
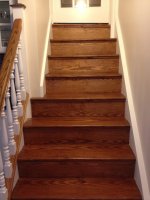
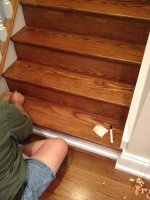
Because the existing risers had poly on them and I wanted to glue as well as nail the new to the old the poly had to go! Enter the RAS the most powerful sander in the world, and if used properly it could sand your head clean off! So bada bing bada boom no more poly gloom. With bare wood risers, I applied constrution adhesive and used a brad gun to fasten each riser in place. Next I applied pine scotia moulding under each tread and we were then ready for the final coats of poly. We used a furniture wax crayon to fill the nail holes. The homeowner was very happy with the end result and we were very happy because it was a time and material job!
Cheers
Curt
So with perfectly scribed 1/4" birch patterns I started work on option number two. We took stock yellow pine treads cut and ripped them an 1/8" bigger than the numbered patterns. I stood the risers on edge and ran them through the tablesaw twice. As the riser height was on average 7-1/2" tall and my tablesaws capacity is 3-1/8", I had a small island of wood in the middle of the riser to be removed. I used a power plane to get close to a flush surface then I ran them through a thickness planer to dimension them to final thickness. I connected my patterns to the blanks with two way carpet tape. I then used the 1400 with a top bearing pattern bit to cut all the risers. This worked really well and produced very tight fitting risers that needed an occasional touch with a sharp block plane. We stained them and applied one coat of poly in preparation for the installation.
Because the existing risers had poly on them and I wanted to glue as well as nail the new to the old the poly had to go! Enter the RAS the most powerful sander in the world, and if used properly it could sand your head clean off! So bada bing bada boom no more poly gloom. With bare wood risers, I applied constrution adhesive and used a brad gun to fasten each riser in place. Next I applied pine scotia moulding under each tread and we were then ready for the final coats of poly. We used a furniture wax crayon to fill the nail holes. The homeowner was very happy with the end result and we were very happy because it was a time and material job!
Cheers
Curt