Starting to brainstorm a Kapex miter stand with sysport legs

sprior

Member
Joined
Feb 15, 2012
Messages
460
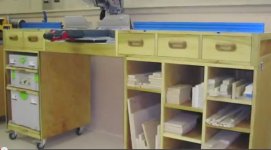
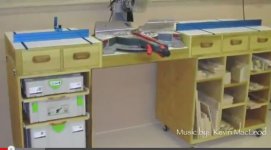
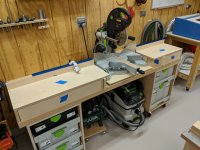
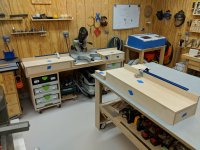
A number of years ago I built this New Yankee Workshop design miter saw stand for my Delta miter saw, now I've replaced the Delta saw with a Kapex and for starters given the different handle and trigger the stand is too tall for the Kapex.
View attachment 1

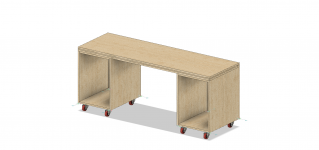
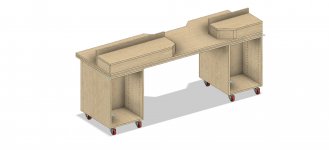
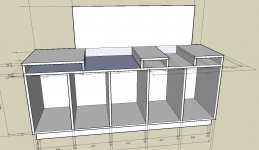
So now I'm starting to brainstorm a new stand which works a bit better for me.  Here is what I'm thinking of so far:
View attachment 2

The idea is that this is a table top at the same height as the MFT/Kapex which I assume is a more comfortable height for this saw.  While I want a stand that can be moved I'm ditching the angled legs from the old stand for something more space efficient.  I need some more Systainer storage so I'm thinking of cabinets on double locking casters on each side which double as Sysports, possibly using the SYS-AZ shelves instead of rolling my own as I've done in the past.  The casters are 100mm tall, the cabinet sides are 640mm tall which conveniently leaves 50mm for the total top thickness which if I'm lazy that's a piece of 1/2" plywood between two 3/4" pieces, if I'm a little less lazy the middle is strips of 1/2" plywood formed into a minimal torsion box structure.

My idea is that maybe the top fastens to the side cabinets maybe with window sash locks or something else that can be released with no tools so the top comes off the sides and the pieces can be relocated if necessary.  I could use Domino connectors, but the idea of tool-less disassembly is appealing despite realistically disassembly would be extremely rare.  For normal shop use the unit can be wheeled around as a whole and solidly locked at the casters.

I haven't worked out the raised top and fence yet or whether 640mm tall sides gives me enough Systainer storage.

So I'm interested in suggestions/ideas while I'm still in the brainstorming stage.  Since I'm doing this design in CAD it'll be easy to share the plans afterwards (which I'd do for free).

Matching the height of the MFT/KAPEX isn't strictly required, I just figured that someone had figured that's an optimal height - I'm 5'-10".  I'm also guessing that the SYS=AZ shelves might use a more optimal amount of space than homebrew shelves.  If anyone has a better idea than the window sash locks to lock it together I'm all ears.  Of course I could go completely nuts and use Domino connectors to fasten the raised sides to the table top so the whole thing comes apart...
 

Attachments

  • 2018-07-13 21.57.10.jpg
    2018-07-13 21.57.10.jpg
    3.6 MB · Views: 1,486
  • kapex miter saw stand v23.png
    kapex miter saw stand v23.png
    887.5 KB · Views: 888
I really look forward to how you progress with this build. I’m a brand new owner of a kapex and have been going back and forth with the best way for me to work with it. The rest of my setup in the shop is modular, so this design suits those needs. I was thinking of using the mft/kapex with with the UG extension wings, but building my own works a lot better on my budget. The start of your design looks great, hopefully you receive lots of constructive feedback.
 
If I ended up using the SYS-AZ shelves and using this project as the excuse to get the Domino Connectors set there's nothing budget friendly about this build  [eek].
 
It's been a while, but some here might remember the discussion for my design of a MFT sysport cabinet (which I'm still very happy with) and my OCD workshop in general.
View attachment 1
View attachment 2
 

Attachments

  • 2018-07-18 20.33.00.jpg
    2018-07-18 20.33.00.jpg
    3.4 MB · Views: 6,434
  • 2018-07-18 20.33.35.jpg
    2018-07-18 20.33.35.jpg
    3.5 MB · Views: 1,273
I had the same thought.  Here are a couple of images that I saved from years ago. I can't remember where I found them.  Hope they help.
 

Attachments

  • rolling-CMS-station1.jpg
    rolling-CMS-station1.jpg
    33.1 KB · Views: 1,185
  • rolling-CMS-station2.jpg
    rolling-CMS-station2.jpg
    32 KB · Views: 1,086
coho10 said:
I had the same thought.  Here are a couple of images that I saved from years ago. I can't remember where I found them.  Hope they help.

Ooh, hadn't thought of drawer space under the top deck, cool idea!

If you look carefully at those photos you even see the latch mechanism I was talking about to hold the top on.
 
sprior said:
It's been a while, but some here might remember the discussion for my design of a MFT sysport cabinet (which I'm still very happy with) and my OCD workshop in general.

[member=14226]sprior[/member] I really like your sysport cabinet. How you like the full hole as a drawer pull? I am at the design stage to make one similar for my CNC.

By the way, do you have a svg file for that systainer bottom?
 
[member=66597]Mario Turcot[/member] I'm very happy with the holes for the drawer pulls - it's easy to open a drawer without looking and one of my design goals for the cabinet was that nothing would extend past the profile of the MFT table so it could be used for vertical clamping which I do a lot for domino and edge banding work.

You also get the prize for being observant - I didn't even know why you'd be mentioning the systainer bottom until I realized that it just happened to be in the photo with the CNC.  I was working on that a couple of nights ago.  I took the plastic tool insert that came with my CXS drill and traced it on paper, then scanned that paper with a ruler in the photo, brought that photo into my favorite CAD program (Fusion 360), calibrated to the ruler and traced the outline.  What you see is one of the test carves of the result, I made some minor adjustments and did a second one.  I then noticed that some systainers have a top/back bar that connects the hinge pins for the lid so my next step is to model to allow for that.  The end idea is that I'd be able to make either a custom bottom insert for something or to make a multi layer tool organizer.  The tool organizer would have to clear that back bar vertically while just a custom bottom could be angled into place around it.  So it's all still something I'm goofing around with.

But to answer your question it is something I intend to share for free, there was a guy once who wanted money for a sketch of the interior of a systainer so I drew mine from scratch.  I was also surprised to not find anything useful on GrabCAD.  It's not an exact totally fill the inner footprint of the systainer model, it's a trace of the insert that came with my CXS.  I have it as a Fusion 360 sketch/model.  Fusion is supposed to be able to export as a DXF which I did and then had trouble importing that into Inkscape to convert to SVG.  But there is a possibility you were only asking for an SVG because it's more common than a Fusion design.  I'll probably upload it to Thingiverse sometime next week and I'll post about it here.
 
[member=14226]sprior[/member] thanks for the response and taking the time for explanation.

sprior said:
[member=66597]Mario Turcot[/member]I have it as a Fusion 360 sketch/model.  Fusion is supposed to be able to export as a DXF which I did and then had trouble importing that into Inkscape to convert to SVG. 

I have a Shapeoko 3 and the carbide motion I use to run the toolpaths can use DXF. Pretty sure your machine can too. If I'm not wrong DXF is pure gcode.

I intend to make some bottom systainers to hold a bunch of tools and accessories like Kapex and TS55, 75 blades by simply stacking a few bottoms together and making a kerf for each blade.

I will try on my side if I can succeed in tracing an accurate bottom.
 
No, DXF really has nothing to do with gcode, it's an old 2 dimensional drawing format which really should be obsolete by now in favor of SVG.  CNC tools offer the ability to import a 2D profile and cut that profile to a specified depth as a quick and easy way to describe something to carve and the program generates the gcode from that design.
 
I based mine heavily off of [member=10829]Timtool[/member] system workshop. Still working on adding the front hold down system.

https://benchworks.be/en/my-projects/system-workshop/

29664838_875543526883_3191997684787771985_o.jpg
 
Thanks [member=167]neilc[/member]!  I actually already had the Shaper plugin installed from when I played with a friend's machine, but I forgot about it.  It makes the SVG export trivial.

So here's the latest outline as a svg (put in a zip because this forum doesn't allow svg attachments), I may tweak it a little more, but it's pretty close.
 

Attachments

sprior said:
Thanks [member=167]neilc[/member]!  I actually already had the Shaper plugin installed from when I played with a friend's machine, but I forgot about it.  It makes the SVG export trivial.

So here's the latest outline as a svg (put in a zip because this forum doesn't allow svg attachments), I may tweak it a little more, but it's pretty close.

Thanks, I will give it a try this week  [big grin]
 
I've been working on the design some more and have made enough progress that I've started to build the sysport columns.  Here's the current design:
View attachment 1

The overall depth of the top is 710mm with a 100mm cutout behind the saw so that the hose can be run underneath to where the dust extractor will sit.  The side cabinets can each store 3 SYS2's.  I'll be using the Kreg precision fence system on top of the fence.

While the stand doesn't have a huge length it should be big enough for most of what I do, but I'm planning to put threaded inserts in each end of the stand where the top platform is and build a removable extension wing that can be temporarily fastened to either end of the bench as needed and stowed when not.

I expect to have actual progress photos within a week or so, currently I've just got the major pieces cut out, time for edgebanding, LR32 holes, then joinery.
 

Attachments

  • miter saw station v8.jpg
    miter saw station v8.jpg
    219.5 KB · Views: 575
coho10 said:
I had the same thought.  Here are a couple of images that I saved from years ago. I can't remember where I found them.  Hope they help.

This is Steve "The Down-to-Earth Woodworker" Johnson's miter saw bench. Great build (http://www.downtoearthwoodworking.com/).

If I had the room, I'd do something like Ana White's version with the mobile carts being systainers. Good infeed/outfeed or parts cart options here (http://www.ana-white.com/2016/02/free_plans/ultimate-roll-away-workbench-system-ryobi-blogger-build)


Attachments

  • workbench rolls away wheels hide compact garage.jpg
    workbench rolls away wheels hide compact garage.jpg
    460.1 KB · Views: 771
It's coming together pretty well so far.  The systainer cabinets are done, the plywood top is done except for edge banding.  The top platform in the photo is temporarily stolen from the old stand, but the new ones will be the full cut width of the saw.  I'm also going to add a 20mm thick platform for the saw to sit on which will be made from 1/2" plywood plus solid wood spacer pieces that I can thickness plane to adjust the height to the top of the platform.  This extra 20mm will also bring the top deck of the saw to just above the height of the router table to the left, so if I cut a long board on the miter saw the router table won't be in the way.  I'm also planning to put a drawer in at least the left (longer) side of the top platform, maybe the right one as well.  On top of the fence will be the Kreg fence system and stops.

View attachment 1

That miter saw station will be sufficient most of the time, but I'm planning to add threaded inserts to both ends of the table and then later build a removable platform extension that can then be attached to either side.  This will allow me to attach the extension to either end of the station as needed.
 

Attachments

  • 2018-08-20 23.41.02-1.jpg
    2018-08-20 23.41.02-1.jpg
    2.6 MB · Views: 4,898
Things are moving along a bit, I cut out all the pieces for the two top platforms and the removable extension out of a single sheet of baltic birch + a small strip from another sheet.  These pictures are of the dry fit while I check everything.  The only thing I'm fine tuning now is the planned location of the threaded inserts on the outside edges of the fixed platforms to make sure it'll be easy to tighten/loosen the fastening knob from underneath without hands banging into walls.  The front surfaces are drawer fronts, I haven't made the drawer boxes yet.  A friend of mine has been joking that there should be a secret compartment somewhere to hide "the fun stuff".  I'm not that fun, but tempted to cut an opening through the left front to back piece so that if the drawer (on full extension sliders) was completely removed you could reach in to that diagonal area on the left.


Attachments

  • 2018-09-02 15.20.27.jpg
    2018-09-02 15.20.27.jpg
    3.6 MB · Views: 4,058
  • 2018-09-02 15.20.49.jpg
    2018-09-02 15.20.49.jpg
    3.5 MB · Views: 1,323
  • 2018-09-02 15.58.34.jpg
    2018-09-02 15.58.34.jpg
    3.4 MB · Views: 820
Very happy with mine. On top I have a french cleat system, below my sysports. On the left I have my Kapex on the right I have a drill. Both use the same Incra Track and INCRA Shop Stop's in front, so long pieces can be machined. Will post some images later on.
 

Attachments

  • screenshot_01.jpg
    screenshot_01.jpg
    434.2 KB · Views: 775
Back
Top