Starting to brainstorm a Kapex miter stand with sysport legs

I don't want to derail, but sprior what cnc setup is that?  What size material can you cut?  Have a buddy that wants to build one, we just don't know where to start.
 
That's an Inventables X-Carve with 1000mm rails, so workable area is just a bit less than 800mm square.  Actually I see you're in Chicago and so are they.  I got the machine a couple of years ago, if I were doing it now I'd also take a hard look at the Shapeoko 3 XXL by Carbide 3D which has about the same work area and much beefier extrusions, and rigidity is a big advantage.  The Carbide 3D software also provides for free some features which Inventables wants to charge a subscription for.
 
Here's a better picture of my X-Carve with the bench I built for it.  The bench is based on a work table from an episode of New Yankee Workshop and has retractable wheels so it's easy to move yet super stable when "landed".  The black square is the X-Controller which I mounted below instead of having it next to the machine, but I moved the red panic button off of the controller to the front of the bench.  I use my CT26 for dust collection for the X-Carve which combined with the optional dust shoe provides very effective dust collection.  I'll probably need to add a cyclone separator because the bags can fill up faster than you realize.  The rolling cart to the left is where I park my laptop when I'm running the X-Carve.

Bringing this back to the topic, within the next couple of days I'll use the X-Carve to carve the drawer boxes for the new miter station including the dados for the bottom, but I'll still use the domino for the joinery.
 

Attachments

  • 2018-09-10 22.35.37.jpg
    2018-09-10 22.35.37.jpg
    3.6 MB · Views: 1,073
Thank you for your knowledge and also for the pictures of your set up.  I think I will end up with one eventually.  So much to learn.
 
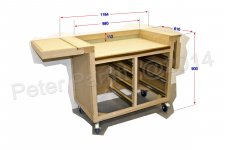
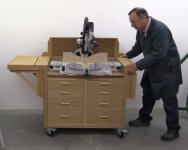
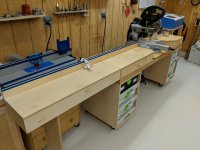
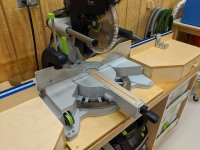
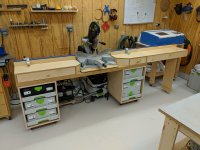
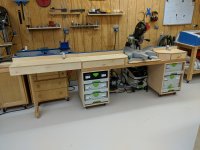
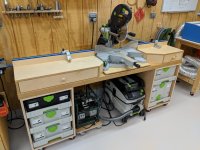
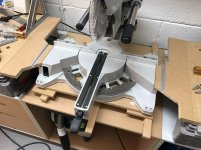
It's done, here's how it turned out.  The extension wing can be attached to either end as needed.  The fence rule is in both imperial and metric.  Originally I was planning to make it the same height as the MFT/Kapex, but I ended up making it just slightly taller so the top of the Kapex platform would be just a bit higher than the top of the router table that sits to the left, so if I was cutting something longer and didn't feel like pulling the Kapex station forward (it's on wheels) and attaching the extension wing, the router table wouldn't interfere with the piece I'm cutting.  The two top drawers are already coming handy for accessories.
 

Attachments

  • 2018-10-05 21.18.24.jpg
    2018-10-05 21.18.24.jpg
    3.2 MB · Views: 731
  • 2018-10-05 21.14.39.jpg
    2018-10-05 21.14.39.jpg
    3.5 MB · Views: 619
  • 2018-10-05 21.21.42.jpg
    2018-10-05 21.21.42.jpg
    3.4 MB · Views: 1,034
  • 2018-10-05 21.14.25.jpg
    2018-10-05 21.14.25.jpg
    3.1 MB · Views: 546
  • 2018-10-05 21.18.35.jpg
    2018-10-05 21.18.35.jpg
    3.2 MB · Views: 685
  • 2018-10-05 21.14.15.jpg
    2018-10-05 21.14.15.jpg
    3.5 MB · Views: 1,389
Nice work. Add a couple of T-Tracks at each side - very handy for clamping pieces and for adding additional tables for cutting crown / small pieces etc.

[attachimg=1]
 

Attachments

  • IMG_3928.jpg
    IMG_3928.jpg
    625.4 KB · Views: 2,172
Oh thanks, I have some track and thought about using it somewhere, but couldn't figure out where it could be used.
 
Back
Top