Starting to think on my next project built in desk

DynaGlide

Member
Joined
May 16, 2017
Messages
1,697
I'll start a new thread when I actually get going but I wanted to get some thoughts out and answered before then. I'm going to order some hinges and slides and do a mockup box in the next month to play around with.

I'll be doing a built in desk spanning about a 10' wall. I'm thinking at this point I'd like to build individual frameless full overlay boxes screwed together for either end. 3/4 prefinished and the Blum Process 32 is appealing to me to be able to just use their built in desk schematics. For the ~4" toe kick I like the idea of using leg levelers with clip on toe kicks.

Do I measure the width of the wall and subtract approximately 2" on each end for filler strips and that's my width to play with for the boxes and leg room area for the desk portion? Build the boxes, level them to each other and screw together and to the studs?

Hardware I'm looking into using the Blum soft close 110 hinges and Tandem undermount slides. If I go off of the Process 32 design and line bore everything I should be able to just drop everything in come assembly time. I know some will say overkill for a small project but I like making things plug n play with system screws.

Goal is to get a box or two built from scraps and mount up a drawer/door to play around with and go from there. I'll have to figure out a top as well once a design starts to come together. Thanks for reading my ramblings.
 
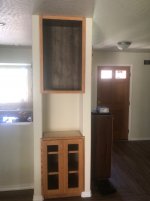
What Id do is measure the distance between the walls, add about a inch to the top. That way when you install the top you cut into the wall to fit the top it gives it a cleamer look, the boxes I meaure the distance between the walls Under where the desk top will set at various heights alway front middle and rear, take the largest dimensions and cut my boxes about a 1/4" shy of the largest measurement. Should come out nice. Here is a example of a small built in i did in oregon (17hrs by truck away from my home in So Cal. Notice no filler piece needed and no caulking needed for the face frame


Attachments

  • IMG_3633.jpg
    IMG_3633.jpg
    741.3 KB · Views: 571
Are you going to use the LR32, or do you have access to a line boring machine?

The undermounts are great - I used them in my kitchen and they were easy to install.

You have some flexibility with the filler strip.  Depending on how straight your walls are, you could go even smaller if you like that look.

Personally, I prefer to bring the filler flush with the face of the cabinet drawer/door.  I think it looks a little more 'bespoke' that way, but it seems to take longer.  I also saw something where the filler had a step down, so there was what functioned like a 1/4" reveal at the wall.  That seemed like an interesting look.
 
jobsworth said:
What Id do is measure the distance between the walls, add about a inch to the top. That way when you install the top you cut into the wall to fit the top it gives it a cleamer look, the boxes I meaure the distance between the walls Under where the desk top will set at various heights alway front middle and rear, take the largest dimensions and cut my boxes about a 1/4" shy of the largest measurement. Should come out nice. Here is a example of a small built in i did in oregon (17hrs by truck away from my home in So Cal. Notice no filler piece needed and no caulking needed for the face frame

I think I follow. Not sure on how you cut the top into the walls though. For the box you end up making it 1/4" shy so when you scribe it in that gap closes up I'm assuming.

mrFinpgh said:
Are you going to use the LR32, or do you have access to a line boring machine?

The undermounts are great - I used them in my kitchen and they were easy to install.

You have some flexibility with the filler strip.  Depending on how straight your walls are, you could go even smaller if you like that look.

Personally, I prefer to bring the filler flush with the face of the cabinet drawer/door.  I think it looks a little more 'bespoke' that way, but it seems to take longer.  I also saw something where the filler had a step down, so there was what functioned like a 1/4" reveal at the wall.  That seemed like an interesting look.

[member=59039]mrFinpgh[/member]

I was just up in Pittsburgh visiting friends in September. I went to school at Pitt.

Yes I'll use the LR32 system. Should I go smaller like 1" filler strip? I could construct them as an L shape to bring them in line with the drawers/doors. I just read something about scribing to maintain a 1/8" reveal between the filler and the door/drawer for uniformity by attaching a strip to the side of the box that the scribe is attached to.
 
Matt,
    You might want to think about making a mock-up out of cardboard to get the look right.  Also consider using rigid cardboard to template the top shape such that you don't need to either cut in or undercut the top.  Ping me sometime and we can discuss the technique. 
 
More questions as I think about installation. I try to work everything out before I even start on something to avoid any gotchas.

For frameless euro boxes scribed to the wall I like the idea of bringing the filler strip flush to the doors/drawers. The doors/drawers create the reveal by virtue of their mounting. If you set each door to have 2mm then two adjacent doors end up at 4mm. Easy. But when you get to the filler strip and scribe it flush with the box then the gap would only be 2mm. In practice is this okay looking? If you attempted to get an even 4mm reveal between the filler strip and the adjacent door/drawer then that would expose the backer board which the filler strip is attached to, correct?

Anyone have any experience with the U-scribe jig https://www.u-scribejig.co.uk/ ? My favorite YouTuber is Peter Millard. He talked about the U-Scribe in some videos and further looking into them they seem quite handy provided the cabinet sides conform to one of the set sizes (16mm, 18mm, 19mm, 22mm). I'll be building the boxes out of either 18mm or 19mm prefinished maple most likely depending on what I get in.

Thank you for your time,
Matt
 
DynaGlide said:
jobsworth said:
What Id do is measure the distance between the walls, add about a inch to the top. That way when you install the top you cut into the wall to fit the top it gives it a cleamer look, the boxes I meaure the distance between the walls Under where the desk top will set at various heights alway front middle and rear, take the largest dimensions and cut my boxes about a 1/4" shy of the largest measurement. Should come out nice. Here is a example of a small built in i did in oregon (17hrs by truck away from my home in So Cal. Notice no filler piece needed and no caulking needed for the face frame

I think I follow. Not sure on how you cut the top into the walls though. For the box you end up making it 1/4" shy so when you scribe it in that gap closes up I'm assuming.

[member=65062]DynaGlide[/member]

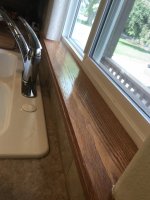
Sorry I just found this. After I install the base cabinets, Id make the top a tad longer then cut into the wall the thickness of the top to fit the top in the wall. Then install the top.
It makes for a cleaner  installation.
Here is a photo of a window sill I installed where I cut into the wall. A very clean install, the F/F should cover the gaps from the cabinet to the wall, just need to add a few shims if necessary

[attachimg=1]
 

Attachments

  • 0D03CE00-FE3B-459B-8253-E1D5DF93BBF2.jpeg
    0D03CE00-FE3B-459B-8253-E1D5DF93BBF2.jpeg
    824 KB · Views: 531
Sparktrician said:
Matt,
    You might want to think about making a mock-up out of cardboard to get the look right.  Also consider using rigid cardboard to template the top shape such that you don't need to either cut in or undercut the top.  Ping me sometime and we can discuss the technique.

[member=7493]Sparktrician[/member]

Willy - I came across this article while researching and I quite like his method:https://www.popularwoodworking.com/projects/aw-extra-51514-precision-3-wall-scribes/
 
DynaGlide said:
Sparktrician said:
Matt,
    You might want to think about making a mock-up out of cardboard to get the look right.  Also consider using rigid cardboard to template the top shape such that you don't need to either cut in or undercut the top.  Ping me sometime and we can discuss the technique.

[member=7493]Sparktrician[/member]

Willy - I came across this article while researching and I quite like his method:https://www.popularwoodworking.com/projects/aw-extra-51514-precision-3-wall-scribes/

[member=65062]DynaGlide[/member], I like that method.  It's very sound.  I think I'd choose to use the RAS to do the scribing since it's less bulky and more controllable than a belt sander, although a belt sander will do a great job.  I'd also choose to do the lamination last.  I'd get the top substrate to fit the space properly first, then laminate the necessary parts, just to prevent chip-out during fitment.  The MFK 700 is a wonderful trim and laminate router.  I would use that to do the laminate trimming, first with a straight flush bit, then with the Amana No-File bit to get a nice round-over.  If you've not done laminate work before, we should chat about the process sometime.  [smile]
 
Sparktrician said:
DynaGlide said:
Sparktrician said:
Matt,
    You might want to think about making a mock-up out of cardboard to get the look right.  Also consider using rigid cardboard to template the top shape such that you don't need to either cut in or undercut the top.  Ping me sometime and we can discuss the technique.

[member=7493]Sparktrician[/member]

Willy - I came across this article while researching and I quite like his method:https://www.popularwoodworking.com/projects/aw-extra-51514-precision-3-wall-scribes/

[member=65062]DynaGlide[/member], I like that method.  It's very sound.  I think I'd choose to use the RAS to do the scribing since it's less bulky and more controllable than a belt sander, although a belt sander will do a great job.  I'd also choose to do the lamination last.  I'd get the top substrate to fit the space properly first, then laminate the necessary parts, just to prevent chip-out during fitment.  The MFK 700 is a wonderful trim and laminate router.  I would use that to do the laminate trimming, first with a straight flush bit, then with the Amana No-File bit to get a nice round-over.  If you've not done laminate work before, we should chat about the process sometime.  [smile]

Thanks Willy. No belt sander here so I wouldn't use it anyhow. Of course I haven't done laminate work before I just jump into these things and figure it out as I go  [big grin] I think there may be several consults once I get into working on this after the holidays. I want the top to have a pleasing look and feel, not something that cuts into my wrists when I'm using it.
 
DynaGlide said:
More questions as I think about installation. I try to work everything out before I even start on something to avoid any gotchas.

For frameless euro boxes scribed to the wall I like the idea of bringing the filler strip flush to the doors/drawers. The doors/drawers create the reveal by virtue of their mounting. If you set each door to have 2mm then two adjacent doors end up at 4mm. Easy. But when you get to the filler strip and scribe it flush with the box then the gap would only be 2mm. In practice is this okay looking? If you attempted to get an even 4mm reveal between the filler strip and the adjacent door/drawer then that would expose the backer board which the filler strip is attached to, correct?

Anyone have any experience with the U-scribe jig https://www.u-scribejig.co.uk/ ? My favorite YouTuber is Peter Millard. He talked about the U-Scribe in some videos and further looking into them they seem quite handy provided the cabinet sides conform to one of the set sizes (16mm, 18mm, 19mm, 22mm). I'll be building the boxes out of either 18mm or 19mm prefinished maple most likely depending on what I get in.

Thank you for your time,
Matt

hi buddy, late to the party but always here to help or answer any questions you may have on here, instagram etc

thanks Dan @uscribejig
 
Back
Top