You are using an out of date browser. It may not display this or other websites correctly.
You should upgrade or use an alternative browser.
You should upgrade or use an alternative browser.
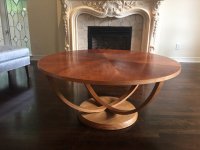
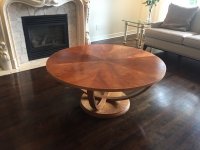
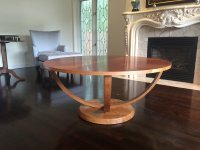
Sunburst table
- Thread starter mouppe
- Start date
Tayler_mann
Member
- Joined
- Nov 23, 2014
- Messages
- 410
That is an amazing piece of work. Please, if you could, give us some details of the process for the legs. Also a few close ups of the veneer seams and the adhesives used. I've only done a handful of veneer projects and would like to hear. Also I really like close ups of the sheen on he finish. That table is amazing and something you must be proud of.
mouppe
Member
- Joined
- Feb 7, 2010
- Messages
- 3,026
Tayler_mann said:That is an amazing piece of work. Please, if you could, give us some details of the process for the legs. Also a few close ups of the veneer seams and the adhesives used. I've only done a handful of veneer projects and would like to hear. Also I really like close ups of the sheen on he finish. That table is amazing and something you must be proud of.
Thanks. For the legs I used my TS55 to cut 1/8"" strips of cherry and then laminated them together against a form. I made a video on YouTube of the process. After it was glued up I used hand planes to refine the edges and clean up the faces.
The legs are intersected with a half lap joint, and then screwed into the base from underneath.
I'll take some close ups of the top and show you how I did the veneer.
Thanks for the compliments I am happy and relieved to have finished the table- definitely the most complex thing I have made.
mike_aa
Member
[member=7882]RL[/member],
Spectacular! That is some very fine craftsmanship!
How large is the top?
Thanks for sharing!
Mike A.
Spectacular! That is some very fine craftsmanship!
How large is the top?
Thanks for sharing!
Mike A.
nclemmons
Member
Really nice work - great to hear you cut the leg strips with the TS55. Did you use the parallel guides or something similar ?
I've been thinking about some bent lamination ideas and this might be a good path forward based on your success.
Can you provide a link to your video?
Also, did you do a similar process on the exterior apron using laminated strips?
Thanks!
I've been thinking about some bent lamination ideas and this might be a good path forward based on your success.
Can you provide a link to your video?
Also, did you do a similar process on the exterior apron using laminated strips?
Thanks!
mouppe
Member
- Joined
- Feb 7, 2010
- Messages
- 3,026
Thanks, the diameter of the top is 4 feet and is 20" off the floor. The diameter of the base is 2 feet.
I didn't use parallel guides to cut the strips. I just set a marking gauge to 1/8" plus the thickness of the blade and carefully butted the guide rail up to it. There wasn't anything special about choosing 1/8"- it was merely the thickest sized strip that would bend to the form without cracking. (Trial and error.) I used a panther blade to rip the strips. There are 8 strips per lamination.
There is a 4" flat spot in the middle of each lamination to make the half lap joinery simpler. It's not really visible to the eye.
For the edge banding I just glued the strips one by one with hide glue (easiest cleanup). One strip didn't look thick enough so I added a second one. Everything was flush trimmed with hand planes and spokeshaves.
Here are the videos on the bent lamination and half lap joint. They are not the best quality but I tried to explain what I did in them.
Once again you produce one of the best projects showcased here and also great videos to document. Well Done!!!!
Peter
Peter
mouppe
Member
- Joined
- Feb 7, 2010
- Messages
- 3,026
Tayler_mann said:That is an amazing piece of work. Please, if you could, give us some details of the process for the legs. Also a few close ups of the veneer seams and the adhesives used. I've only done a handful of veneer projects and would like to hear. Also I really like close ups of the sheen on he finish. That table is amazing and something you must be proud of.
Thanks Peter, Kev et al for all the compliments.
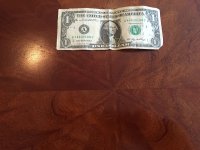
Here are the close ups of the veneer seams and a brief explanation. I didn't have a ruler so I used a dollar bill for size comparison.
The substrate is 2 pieces of 1/2" plywood glued together with white glue in a vacuum press. To lay out the mahogany veneers as accurately as possible, I made a template with a 60 degree corner representing one of the wedges on the table top. I cut 5 of the veneers using the template, taped them together and then cut the 6th wedge to fit the gap. It was almost exactly the same size as the template but to be exact it needs to be cut to fit the final space. I use a Gramercy Tools veneer saw to cut all my veneers- I haven't found a better tool or knife to cut veneers cleanly and quickly.
Then it's a simple matter of taping all the pieces together and putting everything in the vacuum press. Again, I used white glue.
For the finish, I sanded the top to 220 grit with my ETS 125 and Brilliant 2 paper, then brushed on a coat of shellac. Then I hand sanded it with 500 grit granat, leaving the shellac dust on the surface. Then I come back with shellac on a pad and add another few coats of shellac. The dust is redissolved and helps fill the pores leaving a smooth surface. Then I rubbed it out with 1000 grit Platin 2 and added a wax- both applied with the rotex 125 and its hard pad.
Here's a little video of the shellac going on.
Attachments

Similar threads
- Replies
- 19
- Views
- 1K