Mario Turcot
Member
- Joined
- Nov 26, 2017
- Messages
- 1,247
[member=57948]ChuckM[/member] Fun fact, went to CT today and found the 50' for 42.99 instead of 79.99 [eek]
David Fox said:Mario,
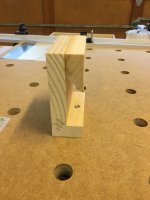
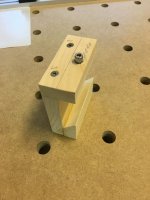
I like your boom arm upgrades. I'm thinking of a tall bracket that extends below the bottom edge of the French cleat a couple of inches. Then a sliding,slotted block that rides in a dado, which will minimize any torque twisting the block. Once the bracket is set onto the French cleat, slide the block tight against the underside of the cleat and tighten a knob to hold it in place. Now the cleat is locked securely onto the cleat.
David Fox said:Mario,
I like your boom arm upgrades. I'm thinking of a tall bracket that extends below the bottom edge of the French cleat a couple of inches. Then a sliding,slotted block that rides in a dado, which will minimize any torque twisting the block. Once the bracket is set onto the French cleat, slide the block tight against the underside of the cleat and tighten a knob to hold it in place. Now the cleat is locked securely onto the cleat.
Mario Turcot said:[member=7493]Sparktrician[/member] Willy, can you get me a picture? I am a visual guy [embarassed] and would like to see how you did it.
Thanks a bunch [smile]
Sparktrician said:From my notes on the computer:
If using the Imperial system, space cleats at 12", 30", 48", 66" and 84" AFF, measured to the bottom of the beveled surface on the stationary cleat. The delta is 18". Use a minimum of two cleats per cabinet so any cabinet is supported by no less than two cleats. Base cabinets are supported by two+ cleats plus two Ikea Capita (http://www.ikea.com/us/en/catalog/products/60263574/) legs at the front for strength and to make under-cabinet cleaning easier. Leg height is set to 115mm AFF (level floor). Leg adjustment range is from 110mm (4-3/8") to 120mm (4-3/4") .
Four standard cabinet heights (Imperial):
31-1/2", 2 cleats
49-1/2", 3 cleats
67-1/2", 4 cleats
85-1/2", 5 cleats
Point of bottom cleat bevel spaced 7-1/2" above cabinet bottom, then every 18".

Mario Turcot said:Willy, I am on my way to Ikea to get those legs and will modify my Kapex stand using those. Thanks again for the tip.