clark_fork
Member
- Joined
- Apr 7, 2015
- Messages
- 255
From time to time, I get those “duh” moments. Recently, I came to the realization that the 96mm spacing on the MFT/3 table is rooted in the 32mm system… ( 32 x 3=96) “Duh!!”.
Link to article:
http://www.finewoodworking.com/2016/09/29/tablesaw-sled-miters
A recent Fine Woodworking article (December 2016-No. 257-44-49, Craig Thibodeau introduced “Tablesaw Sled for Miters.” Here is what he said about his sled: “ The key to my success is two-fold. First I use a dedicated miter sled for the tablesaw. Second, I cut the parts to final length at 90° , then I use the fresh-cut ends as the reference for the actual miter cuts done on the sled. This method helps me cut miters precisely the first time, without a lot of test-fitting and recutting.”
Yes, test-fitting and recutting has been my habit so this method provided my latest “duh” moment.
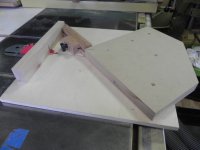
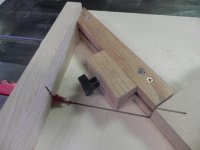
You may be tempted to build this jig or it might offer some insight in using a MFT/3 variation with stop block clamped in place. The principle is simple: Cut the four sides to final length and then cut the miters.
Thibodeau’s tablesaw jig disappoints. Due to the difference in stock widths, the stop block moves each time and must be secured anew. This issue is easily solved with a T-Slot add-on. I cut the T-slot on the router table but a track may be an easier solution. I certainly know the miter can be cut on the MFT/3 but this jig sets up quickly and gets the job done.
[attachimg=1]
[attachimg=2]
[attachimg=3]
Link to article:
http://www.finewoodworking.com/2016/09/29/tablesaw-sled-miters
A recent Fine Woodworking article (December 2016-No. 257-44-49, Craig Thibodeau introduced “Tablesaw Sled for Miters.” Here is what he said about his sled: “ The key to my success is two-fold. First I use a dedicated miter sled for the tablesaw. Second, I cut the parts to final length at 90° , then I use the fresh-cut ends as the reference for the actual miter cuts done on the sled. This method helps me cut miters precisely the first time, without a lot of test-fitting and recutting.”
Yes, test-fitting and recutting has been my habit so this method provided my latest “duh” moment.
You may be tempted to build this jig or it might offer some insight in using a MFT/3 variation with stop block clamped in place. The principle is simple: Cut the four sides to final length and then cut the miters.
Thibodeau’s tablesaw jig disappoints. Due to the difference in stock widths, the stop block moves each time and must be secured anew. This issue is easily solved with a T-Slot add-on. I cut the T-slot on the router table but a track may be an easier solution. I certainly know the miter can be cut on the MFT/3 but this jig sets up quickly and gets the job done.
[attachimg=1]
[attachimg=2]
[attachimg=3]
![011257044_miter-jig-e1475162610639[1].jpg](/data/attachments/32/32325-ed2714405813b18c519a0d7d50df9fb1.jpg?hash=ElBIcG9uQ2)