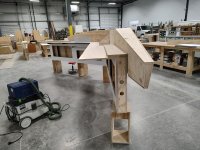
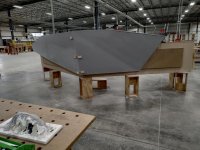
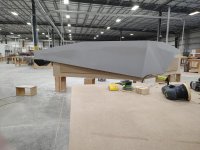
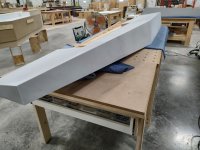
The wild looking desk begins

Crazyraceguy

Member
Joined
Oct 16, 2015
Messages
4,901
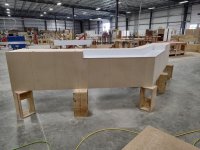
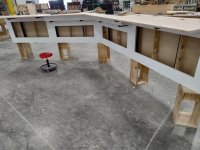
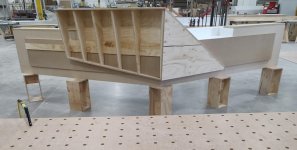
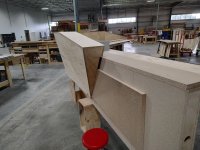
After a day and a half of wrestling with a handful of issues that came from the engineering department, the base is complete. It was supposed to be the easy part.
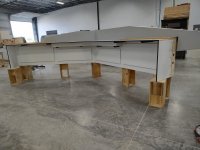
The lower section in the front is a monitor well, there will be a higher "transaction top" area to cover this. You would never know it is there from the front, when it is done. Tomorrow starts the multi-plain, angular facet, front bump-out. The white areas are final finishes and the rest of what is exposed on the front and top will be covered in some kind of stone/quartz.
That gets done by someone else after it is installed. The rest of what I have to do is all Corian, all one color, but many oddly shaped panels.
 

Attachments

  • Vert1.jpg
    Vert1.jpg
    334.8 KB · Views: 337
  • Vert2.jpg
    Vert2.jpg
    363.6 KB · Views: 319
  • Vert3.jpg
    Vert3.jpg
    375 KB · Views: 353
I'd love to see what the plans and/or cut list for such a project look like. Just a page or two if you're able to share.

I'm curious about the level of detail that's included, whether it's a napkin sketch with dimensions, or more like plans you'd see an architect produce.

[cool]
 
4nthony said:
I'd love to see what the plans and/or cut list for such a project look like. Just a page or two if you're able to share.

I'm curious about the level of detail that's included, whether it's a napkin sketch with dimensions, or more like plans you'd see an architect produce.

[cool]

The plans for this are very detailed. There are multiple pieces to the elaborate front facia, each with several facets. The current struggle is working with a fairly new "engineer" who sees these things from the outside, but doesn't quite get that it can't be built that way. The details of things that have to be there first or measurements from something that is not there yet, rather frustrating. I spent at least 3 hours more on this than it should have taken to this point, compensating for some backward thinking. Some I modified and others I just had to deal with/work around. I just hope the more complex part isn't worse.

I have built quite a few things from the "cocktail napkin" type sketches, but those are usually "special" or "personal" projects for the bosses or their friends.
The other projects all come from architects, converting them into shop drawings is basically the job of the engineering guys. Surprisingly enough, some of these items are more "conceptual" than you would think. They are going for a specific look and the details of how to get there a bit light sometimes. They work this out with the project manager and draw it into something that can actually be built.
Because of the complexity of the angles, this one has a lot of CNC cut parts, far more than usual.
Generally, all that is precut on these desk units are the top and bottom plates of the stud cavity and the studs themselves.
 
Are the black supports steel/aluminum?  I see some black on the studs in the lower cutouts Im assuming thats the bottom leg of the overhang supports.  Im curious does your cnc dept. tab and mortise everything so all the framing locks together or do you have to layout the top and bottom plates yourself?  Does the cnc dept take the plans and breakout and draw all the parts.  Just curious how it compares to my old shop. First engineering would supply architectural drawings, then cnc would explode, dissect, model and cut all the parts, All the parts came 99% done.  some glue and an sks was pretty much all you needed.   
 
The black supports are steel. We have them made by a local metal shop that used to be just down the street, before we moved. We stock them by the hundreds as 23" x 23" and 28" x 28", them down for the few times we need them smaller.
They cut out the top and bottom plates with no indexing of any kind. The studs are also just square cut. I do all of the layout/spacing based on the requirements of the job, offsets, countertop supports, etc.
As far as breaking out the parts, it just depends. For simple rectangular walls they don't bother. I can cut that stuff on the beam saw and not take up CNC time. On shaped parts they do, at least some of them.
On this particular job the parts were made that way, but they are all oversized because of the bevels. Most of the parts will need beveled edges, ends, or both on the studs and the face panels. I then follow up with the TS55 to hand fit the parts.

Today's progress was not where I wanted it to be, again because of the way it was modeled, but I have it figured out now. The first two segments are at least mounted. There are two more to go. Then to clad it all with Corian. The 1 1/8" blocks are merely spacers to compensate for the quartz  covering that will go in its place.

This one has an odd detail with the access panels. Instead of the usual flush mounting, these will be overlayed on Z-clips.
 

Attachments

  • Vert7.jpg
    Vert7.jpg
    223.1 KB · Views: 219
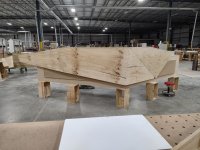
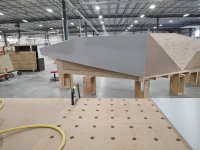
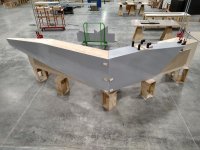
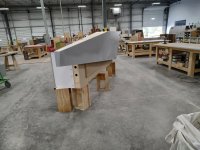
I got the rest of it skinned with ply today. Most everyone that has walked by today has commented that it looks like a spaceship. I imagine that once it is covered in gray Corian, it will look much different.
 

Attachments

  • Vert12.jpg
    Vert12.jpg
    318.3 KB · Views: 222
  • Vert10.jpg
    Vert10.jpg
    314.5 KB · Views: 211
  • Vert11.jpg
    Vert11.jpg
    298.7 KB · Views: 228
luvmytoolz said:
That's a lot of angles there!

There certainly are. The only place of that upper section that is actually square is from the back to the top. Every other interface is at least 8 degrees from the adjacent face. The front is 10 degrees from the top.
I got a few more panels on it. There was an "open house" at the shop yesterday and I worked on this unit (on/off) throughout it. It gave people the opportunity to see how this kind of thing is done.
Most of them were amazed at the Festool collection I have and that I was cutting those panels right there at the bench with a track saw. Glued, flush routed and preliminary sanded, almost dust free during a demo of how the shop's main equipment works.
Working with 150 people walking around is a little odd, but it was pretty casual. I could stop and answer questions, so it wasn't like a real day, but some of the ones who stayed all afternoon got to see it happening. Now I'm waiting on 2 more sheets of Corian to finish it.
 

Attachments

  • Vert16.jpg
    Vert16.jpg
    299.4 KB · Views: 180
  • Vert18.jpg
    Vert18.jpg
    258.9 KB · Views: 201
You sure get some neat/interesting projects to build…..thanks for taking us along always enjoy it !
 
I finally got back to this job today. One more panel is on and the next will go on early tomorrow.
Cap the top and break it back apart. Not happening in one day though, so it's going to have to sit. I'm on vacation next week.
 

Attachments

  • Vert20.jpg
    Vert20.jpg
    551.4 KB · Views: 142
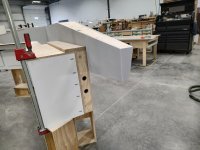
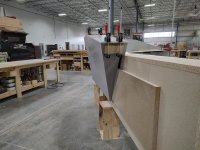
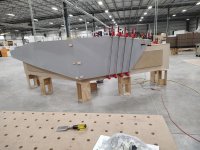
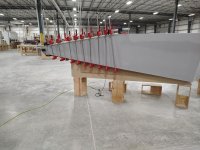
[member=58857]Crazyraceguy[/member]  the clamps are pulling wood blocks attached to the Corian panels. How are the blocks secured to the panel? Hot glue?
 
Crazyraceguy said:
1. The current struggle is working with a fairly new "engineer" who sees these things from the outside, but doesn't quite get that it can't be built that way. The details of things that have to be there first or measurements from something that is not there yet, rather frustrating. I spent at least 3 hours more on this than it should have taken to this point, compensating for some backward thinking. Some I modified and others I just had to deal with/work around. I just hope the more complex part isn't worse.

2. The other projects all come from architects, converting them into shop drawings is basically the job of the engineering guys. Surprisingly enough, some of these items are more "conceptual" than you would think. They are going for a specific look and the details of how to get there a bit light sometimes. They work this out with the project manager and draw it into something that can actually be built.

1. I worked as an engineer in the semiconductor field for over 30 years. For "special requests", which certainly dovetails with your projects, the internal sales person was the chief intermediary with the customer. That worked for the most part but as machines/designs became more sophisticated and more complex, that "lack of practical implementation" on the sales person's behalf became more apparent and more disruptive for manufacturing and scheduling concerns.

After some time it was then decided that a marketing "product manager" would accompany the sales person when it was time to sign off on the specifications, delivery date and final sales price. The "product manager" typically had a reasonably broad background in what it takes to bring newly designed equipment to fruition.

That was much better but there were still stumbles along the way which caused customer delays and internal manufacturing angst.

The final change to the process, which took years to implement because of the additional expenses incurred, was to allow an engineer to tag along with the "product manager" if this was considered to be a final machine specification. The engineer in-turn
could request a manufacturing person accompany him/her if manufacturability/scheduling issues were an issue. This approach worked well and there was less internal manufacturing/sales stress and more machines delivered on time.

2. I'm personal friends with 3-4 architects and my consensus is that as a group, they are more conceptual than analytical and focus more on the "vision" and less on the practical implementation, like everything else, there are exceptions. Like so many others in our society, everyone's focused on the idea/invention and forget about the implementation. However the implementation is what it's all about, without the implementation you have NOTHING.

I was fortunate to work in my final years for a company that placed inventiveness and manufacturability on an equal balance.
They understood that new ideas are great but the full implementation of those ideas is more significant for monetary and marketing positioning reasons. Thus on the patents that were rendered, both the inventor and the implementor were noted with equal significance.
 
[member=297]Michael Kellough[/member], yes simple hot glue. A smack with a dead-blow mallet will knock it right off, but they will take a surprising amount of pressure, as long as there is no impact.

"Engineer" is a stretch of wording. That's the name of the department, but they are essentially draftsmen (or the modern digital equivalent) Basically they convert the architectural drawings into usable shop drawings. They swap the feet and inches measurements into inches only, eliminate unneeded cluttery details, create section views, etc.

[member=44099]Cheese[/member]
It's funny that you would say that about your friends. I realize that it's just my personal view, but I see "designers" as what you are describing, where an "architect" should be more interested in the actual ability to build the thing. I don't mean so far as a structural engineer, but at least leaning in that direction.

The part of this whole thing that I struggle with the most is pricing. How can someone who has no idea what it is actually going to take to build something like this put any kind of cost to it?
There will be "engineering" time in figuring out what needs to be modified, then it gets reviewed by the supervisor (sometimes me too). There may be significant changes, depending on how crazy the original design was, then re-draw. After all of that, it may still be modified by me as it is built. All of this adds up and some of the simplest little details can make big swings in the real build time. Dumb things like how much more time is required to build a countertop that is over 144", laminate or solid surface, both take significantly more work.
I have been doing this (at a pretty high level) for 20 years and I can't just look at a job like this and tell you how long it will take. Plus,  "stuff happens" and there can be un-planned hold-ups/delays, etc. These don't add to the time directly, but they kind of do, in the end? Starts and stops always add to the total time in a job.

I got the face and left end added today, plus one section of the top. The second one is fitted and I started working out the clamping strategy.
 

Attachments

  • Vert26.jpg
    Vert26.jpg
    274 KB · Views: 126
  • Vert25.jpg
    Vert25.jpg
    304 KB · Views: 112
  • Vert24.jpg
    Vert24.jpg
    241.5 KB · Views: 104
  • Vert23.jpg
    Vert23.jpg
    325.9 KB · Views: 116
  • Vert22.jpg
    Vert22.jpg
    315.4 KB · Views: 116
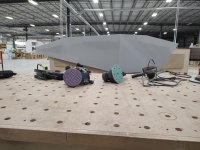
After having last week off, I finished it today, at least enough to start taking it back apart. It still needs some final sanding but otherwise ready to go. The thing is stupid heavy, which I was expecting, but it's a good thing we are ready for that kind of thing. The solid surface guys have a couple of those big, pump-up style, suction cup handles. I have 2 Geckos, so holding such an object is not so bad, but it's still crazy heavy.
I can't wait to see this one totally finished, but I might be a while. The base has to be assembled, then the stone guys do their part, then our guys go back to put the upper/front section over that.
As I understand it, the stone part is nearly black. Should look very different with a shiny black base.
 

Attachments

  • Vert27.jpg
    Vert27.jpg
    339.4 KB · Views: 115
  • Vert28.jpg
    Vert28.jpg
    299.6 KB · Views: 105
  • Vert29.jpg
    Vert29.jpg
    286.7 KB · Views: 107
  • Vert30.jpg
    Vert30.jpg
    312.5 KB · Views: 112
  • Vert31.jpg
    Vert31.jpg
    213.7 KB · Views: 112
Back
Top