This is gonna take a while. Miter station/shop build gone overboard!

Iceclimber

Member
Joined
Oct 25, 2014
Messages
504
Well i was not going to share any pics of this project till it was 100% done. I took a new job so this is going o take much longer than i planned when i started building.

My thought process with regard to not sharing pictures till the project was completed was that my vision may not be realized at various stages of progress and may just look like a hot mess. Maybe it is a hot mess but i like it so far and thats what matters.

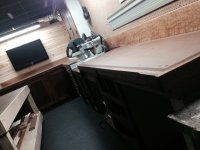
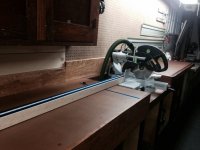
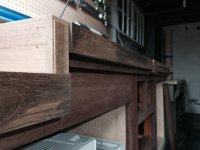
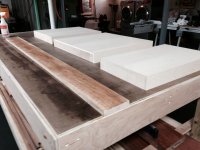
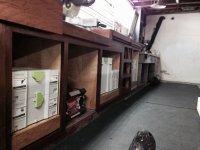
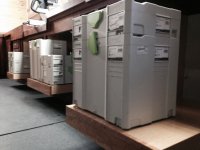
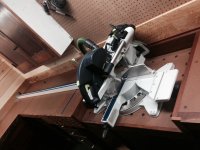
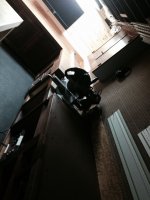
The project started out with the purchase of a Kapex. I had a existing old built in work bench that came with my house and series of cabinets i could not bring myself to just tear out and throw in a landfill.

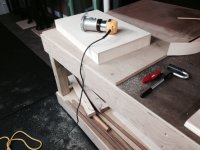
I have always wanted a dedicated built in miter station for repeatable cuts. For the most part i liked the layout of the existing bench and it had what at the time seemed like good bones. I also intended to use most only various scrap wood i had lying around "so much for that plan" from various projects to save money hence the hodge podge of wood species. In retrospect had i known i would get so carried away i would had made the top out of solid wood as apposed to MDF. Oh well what are you gonna do?

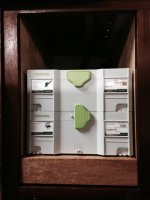
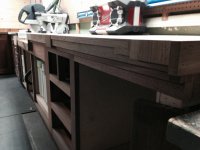
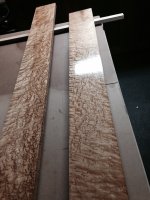
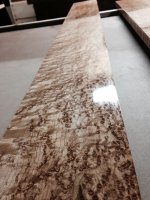
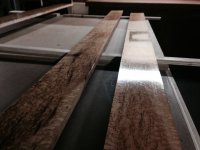
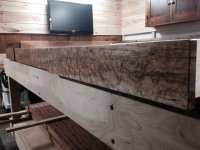
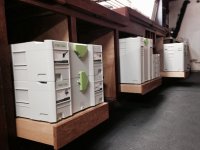
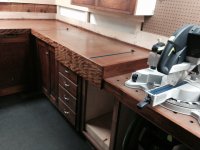
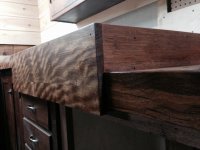
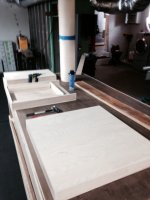
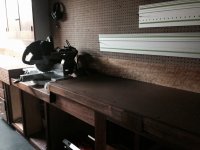
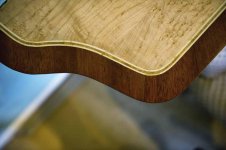
In the end and at this point i could have purchased the UG cart and extensions about 3-4 times. By the time I'm done probably 5-6 times if not more. The plan is to build some additional wall cabinets to mount above the bench/saw comprised of mahogany boxes styles and rails with floating birdseye panels. Also any place you see a opening for a drawer there will be one. The drawers will have 3/4 birdseye faces and mahogany boxes surrounded by the mahogany face frames. As of now the bench is a mix of various mahogany species, teak and birdseye.

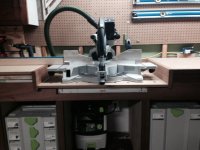
The fence will be rebuilt with solid ebony and the T Track in the bench top replaced with gold as apposed to the ugly blue. I think ill go gold T Track also in the fence and make a nifty stop out of wood.

And fyi i have many many more work surfaces in my shop to actually work on. This is solely for mitered cuts and drawing up plans tool storage and generally just being something i enjoy looking at while i build other projects.

Ill add more pics of the build as i sort through them. I also add more as the project progresses.


Attachments

  • image.jpg
    image.jpg
    631 KB · Views: 1,151
  • image.jpg
    image.jpg
    639.8 KB · Views: 1,172
  • image.jpg
    image.jpg
    682.5 KB · Views: 1,042
  • image.jpg
    image.jpg
    639.1 KB · Views: 754
A portion of the counter/bench edge detail prior to finish.

These details just evolved as i built. Often i wonder should i have just done that, do i like it or don't I?


Attachments

  • image.jpg
    image.jpg
    688.1 KB · Views: 879
Looking back the other direction...

Pree finish. This part of the bench got oil stain followed by multiple coats of teak oil. All with weeks between coats.
 

Attachments

  • image.jpg
    image.jpg
    722.4 KB · Views: 676
Applying one of like 20 coats of Waterlox to the birdseye backsplash.
 

Attachments

  • image.jpg
    image.jpg
    820.1 KB · Views: 465
  • image.jpg
    image.jpg
    874 KB · Views: 631
  • image.jpg
    image.jpg
    600.7 KB · Views: 625
Making my version of sytstainer drawer slides. Many many more to come!

They are made of D grade birch plywood. Then veneered with maple. The face is solid birdseye. They are mounted atop Blum Drawer glides.


Attachments

  • image.jpg
    image.jpg
    706.6 KB · Views: 637
  • image.jpg
    image.jpg
    707.3 KB · Views: 552
  • image.jpg
    image.jpg
    808.5 KB · Views: 551
  • image.jpg
    image.jpg
    672.4 KB · Views: 508
Under the Kapex is a midi and four outlets. It will also have a down draft function that sucks the dust the CT does not get left on the bench top. I did this by using a MFT top for the portion of the bench just under the Kapex. If it does not suck as much up as i hope flip of a switch and a quick brush with a duster and its all cleaned up at days end as apposed to having to pull out the vacuum.

I have not decided yet but i kay build louvered doors for the opening that houses the CT under the Kapex? We will see how things look after i build the drawers to the far right of bench.
 

Attachments

  • image.jpg
    image.jpg
    825.6 KB · Views: 409
  • image.jpg
    image.jpg
    682.5 KB · Views: 364
  • image.jpg
    image.jpg
    825.6 KB · Views: 369
  • image.jpg
    image.jpg
    655.2 KB · Views: 397
Figured teak just after a coat of finish and prior to installation of backsplash.

All the pine cabinets boxes under the counter will be refaced with mahogany. The doors will be mahogany stiles and rails with floating birdseye panels. Same goes for the one cabinet above the bench. It will go and and a series of cabinets will be made that span the bench left to right with a shorter double cabinet above the saw.


Attachments

  • image.jpg
    image.jpg
    705 KB · Views: 716
  • image.jpg
    image.jpg
    699.2 KB · Views: 437
[attachimg=3]Working out the down draft function under the saw.


Attachments

  • image.jpg
    image.jpg
    673.7 KB · Views: 739
  • image.jpg
    image.jpg
    678.9 KB · Views: 685
Lots of storage. 

Love the figured wood - gives you plenty of inspiration. 

If your shop looks THIS good, imagine the motivation on the furniture and other work you do!

Thanks for sharing!

neil
 
More of the drawer slides being built. Pretty easy and even with the birdseye they cost about the same as the plastic Festool one would had.

Tbh when they announced the Festool ones i was stoked and ready to hit purchase. Then i thought be patient and build your own they will be waaaaaay nicer and maybe cost slightly more?

Pictures of the drawer slides pulled out does nothing for how amazing the figure of the birdseye is. My shop light stinks for pictures. Lighting is on the list after the next 10-15K I'm about to spend on a couple machines.

I actually drove three hours to source the birdseye on two occasions and 5-6 hours at a shot sorting through boards for just the right ones.


Attachments

  • image.jpg
    image.jpg
    788.8 KB · Views: 448
  • image.jpg
    image.jpg
    621.9 KB · Views: 534
More..

And until next time i hope someone enjoys my work?


Attachments

  • image.jpg
    image.jpg
    653.8 KB · Views: 537
  • image.jpg
    image.jpg
    540.4 KB · Views: 496
  • image.jpg
    image.jpg
    768.9 KB · Views: 537
  • image.jpg
    image.jpg
    691.5 KB · Views: 454
Hey man.

Build is looking great!  One word of advice... not sure if you plan on keeping your rails hanging like that, but I would advise against it.  or make sure you have some support above or below so you don't get a sag in the rail.  If it is just temporary, i will keep my trap shut! 

Cheers.  Bryan.

 
Really,

SAG!

Thats no good. Are you kidding me i have to find a flat spot for them!

My shop is 1000 sq foot and i think thats pretty big. Im starting to run out of space. So far i see a spot for every machine. The one problem i am going to have is ample room for lumber storage.

So what do you do with yours.

My big concern with storing them that way was more when one drops and puts giant ding in that soft MDF top I'm gonna be ticked. Shoulda made the top out of solid hardwood.

Eventually above the bench from left to right spanning the whole wall the Kapex is on will be wall hanging cabinets. The peg board is only temporary or rather a design flaw i am working through as i build.

At this rate those cabinets are at least a year away so maybe i should move the rails...
 
They look like long guys so I was just concerned there. What you could do if you need to store them horizontally like that would be to flip them over so the "ribs" are along the bottom. Screw in a cleat under it to support the middle and you should be fine.

I would kill for 1,000 sq feet!  Enjoy it mate.

Cheers. Bryan.
 
Awesome shop pics.  I will follow as I plan on building a larger shop and like what you have done.  Bill
 
Looking really good so far! Love the maple back splash.

I've got my rails hanging vertically, and my ceiling is just high enough for the 2700mm one. Supporting them in the middle while hanging horizontally should work just fine as well.
 
Nice job.  I like how you turned the corner.  I am in the process of redesigning mine and was considering the same idea.

As for rails, I hang my shorter rails vertically.  For the long rail, I repurposed the original shipping crate and screwed it to the ceiling.  Had to brace it a bit to keep the front from sagging, but it stays up out of the way.

 
Ice !
What a magnificent build!  I am a huge fan of birdseye maple and mahogany.  I used it in one of my first veneer projects.  (Yes the filletti has issues.)  It's a great combo.

I am going to look into "waterlox" for my backsplash.  Can I spray it with an HVLP?

That rig for the Kapex is outstanding.

[attachimg=1]


Attachments

  • ven-1.jpg
    ven-1.jpg
    52.9 KB · Views: 2,067
Back
Top