Tile backsplash - how to handle window trim

Administrator_JSVN

Administrator
Staff member
Joined
Jan 22, 2007
Messages
8,426
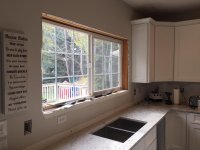
Need a little advice this morning fellas. I'm getting ready to install a tile backsplash in the kitchen between the counter and cabinets. I have a window that I'll need to go around.

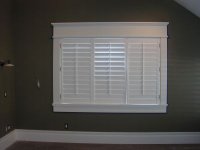
What is normally done around the window trim? Do you cut the tiles to fit around the trim and caulk or grout the gap? Do you remove the windows apron and leave the sill so you don't have to mess with it at all?

I bought a tile saw many years ago so that would make cutting to the shape of the trim pretty easy probably. I've only ever installed tile on floors, so this whole wall installation thing is new territory for me.

Thanks for any advice.

Shane
 
Shane    I would remove the apron , tile and re-install after trimming.
Thats how I have done it in the past. I am guessing you are talking about a crown moulding style apron at the sill

Sal
 
- Caulk to trim, no grout. If you grout to the trim the grout seam will naturally crack and look lousy in short time. Color matched caulks are available for many grout colors at tile stores, don't know about big box stores since I don't buy tile there.
- As far as the apron I've done it both ways. Depends on the type of trim and thickness of the apron.
Modern thin trim, I would remove the apron, tile and then silicone it back on. That is if the apron doesn't end up too close to the edge of the sill. A tiny back set from the sill edge to the apron face always looks bad.
Vintage thick trim, I would go up against the apron. Vintage trim tends to be thick enough to still allow a little reveal along the seam and look good.
Hope that helps, Markus
 
I'm for tiling around - can't say I've ever removed any trim to tile.
 
If the trim can be removed fairly easily I have removed and cut a rabet so that when reinstalled would extend over the tile.  Also have cut the tile to the trim .

Peter
 
Nice call Peter rabbit. I've done that as well on high end jobs but rarely. I really have to like the client to go that extra step or actually get paid for that kind of work. Considering the amount of routers and MFT's Shane has access to that would be a pretty sweet detail.
 
Holzhacker said:
- Caulk to trim, no grout. If you grout to the trim the grout seam will naturally crack and look lousy in short time. Color matched caulks are available for many grout colors at tile stores, don't know about big box stores since I don't buy tile there.
Yes do not grout to trim or counter top.Use a good quality caulk.Caulk is flexible,grout is not and will crack.
 
Thanks for the feedback.

I knew about caulking versus grouting and the potential of cracking. Not sure why I even said that to begin with.
 
If you have not started, look into using Bondera to set the tile. So far counter plashes is the only place I'm comfortable using it. There are two grades, splash and counter.

As for the trim I have done it every way mentioned, and removed the trim and bullnose tile in its place.

Local Home Depot should have a product called Add A Depth on the shelf for the receptacles and switches. If you install the devices without them, you will be in violation of the Indiana electrical code. If you can't find them locally, PM me a count and I'll mail you what you need to the office.

http://www.bonderatilematset.com/

Extensions from Home Depot;

http://www.homedepot.com/buy/electrical/electrical-boxes-conduit-fittings/raco/accessory-switch-box-addadepth-ring-steel-14-in-to-1-in-adjustment-70458.html

Plastic extensions;

http://www.amazon.com/dp/B00303FYHS/ref=asc_df_B00303FYHS1860647?smid=ATVPDKIKX0DER&tag=hyprod-20&linkCode=asn&creative=395093&creativeASIN=B00303FYHS

Tom
 
I like to pull the trim and plow out the back like was said earlier.

Real nice clean finished look.

Sometimes looks funny with thing mouldings, but then I just sell them a better trim package.

close cuts and color matched caulk works well too.
 
I wanted to revive this old thread and see if you can help me with a similar question.

For a kitchen remodel, I want to upgrade my drywall jambs, and redo my window trim entirely.  I ripped out all the drywall in the kitchen window and am back to the rough framed opening.

My plan is to build a craftsman style window complete with poplar jambs, maple stool, and 1x4's with an eased edge for casing.  As the window will have wide casings, a  larger apron and deep stool as I have a 5" deep window area, my question is similar:

When do I tile the backsplash?  Since I have already torn out all the old apron and jamb/etc. I got to thinking that I could backsplash now, (or after the stool is installed, but before the apron and casings).  The challenge I see, is my tile-line will only run midway up the window, so only part of the casing will be in the "tile zone".  If I ran tile under the stool and a part of the casing, I'm concerned about the uneven wall surface/gap.

In the beginning, I had just assumed I trim out the window first, and tile around the new trim (grouting under the tile, and running caulk between the trim and the tile).  The trim will all be painted white.

See the picture of my rough framing, and another image of the type of trim I plan to duplicate.

Thoughts from the FOG?

Rough opening:
[attachimg=1]

Craftsman trim:
[attachimg=2]
 

Attachments

  • IMG_8868.JPG
    IMG_8868.JPG
    196.9 KB · Views: 141,734
  • window.jpg
    window.jpg
    24.3 KB · Views: 79,942
I am getting towards doing mine.  I have tile in place now and will be replacing it.  I plan on removing my trim when I remove the existing tile and then creating rabbets on the new trim to allow me to run the new partially behind it.  Faster and cleaner I believe.

Peter
 
While I too would trim the window before tiling, it's important to consider the vision for the final product before either.  If the cabinet and trim touch or the outlet means you have to notch the apron, you may want to reconsider your dimensions to maintain symmetry.  This is always a tricky area with no right or wrong answers and the whole room to consider.  I've left off the apron in favor of tile, esp. if I'm using a horizontal tile like subway, etc. when an outlet crowds the scene.  Ideally, all the trim matches throughout a house, but sometimes you need to be a little inventive when you're remodeling. 
 
Grasshopper said:
The challenge I see, is my tile-line will only run midway up the window, so only part of the casing will be in the "tile zone".  If I ran tile under the stool and a part of the casing, I'm concerned about the uneven wall surface/gap.

I'd consider this approach because you're only running half-way up the window and would still want to have a finished surface on the top edge of the tile. I'd also run it down the window casing until you get to the corner of the casing at which time, as others have said, you can rabbet the bottom casing and hide the tile edge under it. That's simpler and cheaper than continuing the stainless trim strip around the window trim.

[attachthumb=1]

This shows the stainless trim strip that runs along an angled cabinet and provides a nice stopping point for the tile.

[attachthumb=2]

Similar to your situation, this is the finished edge surface for the stainless tile. It's right out there where everyone can see it. It also ties in well with the stainless riser on the gas range.

[attachthumb=3]

This is one profile available. Schluter is the manufacturer and it is available in multiple profiles, materials and colors. This one is stainless and available from HD on special order.

[attachthumb=4]

Just another view of the profile. It is normally applied with thinset, but I prefer to use hotmelt. I'm just older and slower than most. [big grin]
 

Attachments

  • 2248.JPG
    2248.JPG
    681.4 KB · Views: 18,864
  • 2249.JPG
    2249.JPG
    678.5 KB · Views: 9,449
  • 2251.JPG
    2251.JPG
    485.9 KB · Views: 6,935
  • 2252.JPG
    2252.JPG
    555.9 KB · Views: 15,351
Thanks all for the replies. They were helpful!!!

I'm going to trim first, then tile.

Good tips all around!

Now off to figure out a temporary spray booth for the garage to get my trim painted!

I'm excited/nervous to break in my Fuji 4-stage HVLP.
 
My preferred way to do what your asking is tile the backsplash so the lip of the tile sits 1/2 to an inch under the trim. Then use a straight edge to measure your window packers and bring them out flush with the tile. Then install your trim as usual and you've got nailing for your trim and the trim sits over top of your tile making a really tight look. You could also run the tile further behind the trim and only shoot the trim in the grout joints. Grout up to the trim, wipe it down around the trim and once grout sets up put a bead of white silicone down it.
 
I have a bathroom window over a tub that is in similar need of a a tile backsplash.  The window was replaced and I asked the window guys to add 3/8" to the jamb.  My plan was to tile to the jamb, and then trim over the tile.  The tile will wrap partway up the window and the trim would sit on top of it, leaving some of the tile exposed.  For the part up the wall where there isn't tile, the trim would have some sort of backing added to increase the depth where it meets the wall.  Does this sound wonky?
 
Back
Top