Tiling in a tub, tub doesn't meet the wall?

JeremyH.

Member
Joined
Apr 12, 2015
Messages
331
Hi guys,

I've got a problem where a tube, when level, won't meet the wall at it's non-drain end (the wall isn't plum). I thought about moving away from the wall to make a tile bridge from the wall to it, but doing that would shrink the other side too much where that's being done so the faucet will hang out over the tub, from a tile base. It's sort of a problem because the tile cement board is 1/4, so the tile actually overlaps the lip of the tub that screws to the wall ontop of the greenboard.

It's an awkward bathroom, it has a 60" tub, but it was also protruding into the wall. Not it's a 54". I tried to talk up doing a clawfoot 54" because it would have only costed as much tile to do the area behind and under the tub, as it eliminates a lot of work, it's deep enough for an adult, and people love them. (There's a really affordable refinishing place here for clawfoots). Oh well...
 
Sister in studs so they contact the tub flange and plumb up to the ceiling. Doing this will save you a lot of grief trying to fit the long wall tile to the put of plumb short wall tile. You'll have to do some repairs and paint, sometimes what appears to be the hard way ends up being the easy way.

1/4" cement board is not an approved backer for wall tile, 1/2"minimum.

Tom
 
Great, that means tearing apart the entire wall... which was just fixed up.

Also the tub appears to be made for 1/4 backer, because 1/2 would make the tile need a pile of morter under it where it overlaps the tub?

I believe you on the 1/2" but it complicates things an awful lot.
 
JeremyH. said:
Great, that means tearing apart the entire wall... which was just fixed up.

The backer was placed/installed prior to the tub being set?

Tom
 
tjbnwi said:
JeremyH. said:
Great, that means tearing apart the entire wall... which was just fixed up.

The backer was placed/installed prior to the tub being set?

Tom

No, the backer hasn't been placed. But if the tub is set ontop of backer, then I'm not sure how to get the tile over the tubs's mounting flange, because it's 1/4"
 
I assume this is a alcove install (3 sides contact walls.).

Place the tub in the alcove, level the tub in both directions with the tub flange against the long and faucet walls.

Cut studs about 6" longer than the distance from tub flange to the ceiling. Place the stud against the tile flange and set them plumb. You should now have 3 walls of plumb framing.

Install 1/2 backer board from the tub flange to the ceiling. This will leave you a1/4" gap that you can fill with Sika Pro construction sealant Make sure you tape the tub deck very well, this sealant does not want to come off any surface.

Any intersecting room walls to the new plumb alcove wall will need to be addressed.

Make sure you waterproof the walls prior to setting tile. Most tiles, grouts and mortars are not waterproof. Does not use adhesive in this wet area, it must be mortar.

What do you mean by "the tub is set onto of backer"? If 1/4" backer board is set on the floor sheathing then the tub is set on that you're good. 1/4" backer is approver for floors.

When questions come up, pictures really do help us understand the entire situation. Makes it easier for us to help.

Tom
 
Just reread your post about the backer, tub is set then the backer is installed.

Also insulate around the tub prior to installing the backer.

I'm doing a master bath now where Ditra board will be installed before the tub, whole different situation.

Tom

 
Sorry, set is the wrong word, I meant pushed up against.

Thanks for the help, I don't deal with bathrooms ever so I've got a bit to learn on them.
 
The bathroom is one room where a mistake turns quickly into a tragedy. When dealing with water management/containment there is no room for error.

Tom
 
Yes. I like kitchens!

The wall has 2x sheetrock, and where it's cut out for the greenboard and backer, I can sister out 2x4's, instead of doing to the ceiling. It won't change anything except the shape of the tile pieces connect from the wall. That or just grout, which in this case will only be around 1/4" or slightly more on that one side. I've seen it be the full 1/2" plus half the tile before.
 
I really hope I am understanding this wrong because if I'm not this is a bad deal.
tub is supposed to go up against framing, durock or other approved wall board comes down to raised flange of tub and sticks out over raised vertical flange, tile goes down to tub apron
- this is a detail detail so when the caulk joint along the tub seam fails water isn't automatically weeping into drywall
- if this isn't your house and you don't care about the client then I guess you can go 3/8' green board covered with 1/4" durock; not something I would do, as long as the grout doesn't fail it will be fine
pictures would be good, this sounds like starting over might not be a bad idea
 
Tub is against the greenboard. 1/2" backer will meet it. I'll use that filler mentioned earlier in the thread to fill in the gap between backer and tub, so tile can be placed over it.

The wall will get corrected by using 2x4's onto the current ones.

The new greeboard is 1/2", combined with backer 1/2" . The old wall which is cut out around where the tile goes is 2x 3/8 drywall.

The tile is going to run down the wall next to tub for the width of a selected piece so there's no overhang, at the non-drain end. The drain and spout end will have a small construction from the wall out to meet the tub, and it'll go to the ground so there isn't any weird tile ending anywhere.
 
Is Kerdi utilizing Kerdi Fix an option? It can go straight over sheetrock and is one of the best waterproofing membranes out there. Plus it is pretty easy to work with. Maybe I just like the color orange  [tongue]

Shimming and furring is the norm.
 
Peter_C said:
Is Kerdi utilizing Kerdi Fix an option? It can go straight over sheetrock and is one of the best waterproofing membranes out there. Plus it is pretty easy to work with. Maybe I just like the color orange  [tongue]

Shimming and furring is the norm.

I use Kerdi, Kerdi board and Kerdi Fix. I try very hard not to push a product/brand here. That is why I only warned to makes sure the walls were waterproofed.

I do agree the Schluter line of waterproofing products is very very good.

The Sika Pro Urethane Construction Sealant is the same as Kerdi Fix.

Tom
 
You kidding? Lay it on, so this is done right. It's a cheap remodel to begin with because it's a very small space. I've even considered cutting drywall out of between studs to make pockets to hang towels.

Where do you like the membrane? under the backing board? or do you mean you can skip a backing board by using it? I wouldn't want to because flex can destroy tile work quickly. Also screws would cause a problem too? Does this add much depth? And would I not have a good enough water seal without it?

It looks like on Schluters site (big fan of their name, only used some of their shower stuff before) it goes on top of backing board with thinset about as thin as you can go, then mortar on top of it, then tile?

 
Nothing to add other than I really like using the Ditra stuff for floor tiles. Haven't used the stuff that allows for heated flooring, but great stuff and no cracks and flex whatsoever.

Good luck. Bryan.

 
JeremyH. said:
You kidding? Lay it on, so this is done right. It's a cheap remodel to begin with because it's a very small space. I've even considered cutting drywall out of between studs to make pockets to hang towels.

Where do you like the membrane? under the backing board? or do you mean you can skip a backing board by using it? I wouldn't want to because flex can destroy tile work quickly. Also screws would cause a problem too? Does this add much depth? And would I not have a good enough water seal without it?

It looks like on Schluters site (big fan of their name, only used some of their shower stuff before) it goes on top of backing board with thinset about as thin as you can go, then mortar on top of it, then tile?

Membrane goes on top of which ever backer you choose.

You can use Kerdi Board and skip the backer. The board has the waterproof membrane on both faces. You do need to seal all seams and washer/screw penetrations with Kerdi band.

You can install 1/2" backer (drywall is approved by Schluter) then cover with Kerdi and seal the seams and corners with Kerdi band.

I land the backer on the flange and fill as I laid out above.

Go to Schluters website and look in the install manual for the way the product are used.

You can also check the Schluter website for training in your area.

Tom

 
bkharman said:
Nothing to add other than I really like using the Ditra stuff for floor tiles. Haven't used the stuff that allows for heated flooring, but great stuff and no cracks and flex whatsoever.

Good luck. Bryan.

Dirt heat is an amazing system. What makes it better is using Nu Heat cable with a Nu Heat WiFi thermostat.

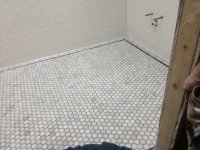
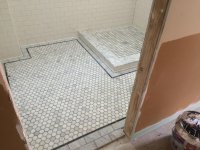
These floors have Ditra Heat under them, including the shower area.

Tom
 

Attachments

  • IMG_3835.JPG
    IMG_3835.JPG
    1.8 MB · Views: 710
  • IMG_3838.JPG
    IMG_3838.JPG
    697.1 KB · Views: 758
That is sexy Tom!  I have looked at the octagon carerra marble before and didn't pull the trigger.

Thanks for sharing. Looks great as usual!

Cheers. Bryan.
 
Back
Top