I just got a Domino 500 and I can understand why everybody likes it, it seems like a clever, very high-quality tool.
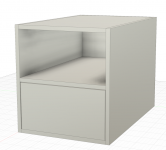
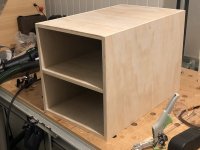
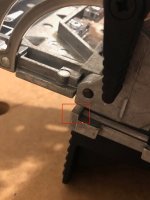
My first project uses 1/2 plywood (and a 4mm cutter with 4mm dominos). It's a simple small box holding two drawers, with a middle shelf on which one of the drawers rests (see picture). Festool's supplemental user manual for the Domino has a section describing exactly what I need ("Making Carcase Butt Joints").
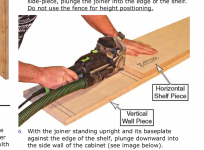
Those instructions have me referencing the cut from the bottom of the tool, which is 10mm from the cutter center. That seems too high and way off center for 1/2" plywood. I can see how only that bottom surface can be conveniently used to reference both when cutting into a board's edge as well as when standing vertically to cut into the side board's face, and I can see how that works great when the board is a bit thicker, but what do people do in this situation with thinner boards?
The cuts into the face at the top and bottom of the side board are no problem, I can use the height-adjustable fence for those, but that doesn't work for the ones in the middle of the face.
[attachimg=1]
[attachimg=2]
My first project uses 1/2 plywood (and a 4mm cutter with 4mm dominos). It's a simple small box holding two drawers, with a middle shelf on which one of the drawers rests (see picture). Festool's supplemental user manual for the Domino has a section describing exactly what I need ("Making Carcase Butt Joints").
Those instructions have me referencing the cut from the bottom of the tool, which is 10mm from the cutter center. That seems too high and way off center for 1/2" plywood. I can see how only that bottom surface can be conveniently used to reference both when cutting into a board's edge as well as when standing vertically to cut into the side board's face, and I can see how that works great when the board is a bit thicker, but what do people do in this situation with thinner boards?
The cuts into the face at the top and bottom of the side board are no problem, I can use the height-adjustable fence for those, but that doesn't work for the ones in the middle of the face.
[attachimg=1]
[attachimg=2]