You are using an out of date browser. It may not display this or other websites correctly.
You should upgrade or use an alternative browser.
You should upgrade or use an alternative browser.
Tips for working with aluminum
- Thread starter Richard/RMW
- Start date
Cheese
Member
Mortiser said:[member=44099]Cheese[/member] , that's a nice looking job! May I ask whose railing you used?
----
Rich
Hey Rich, for most of the individual pieces I used Wagner out of Wisconsin. Great people to work with, 2 day service and all around a very helpful group...high recommend.
https://wagnercompanies.com
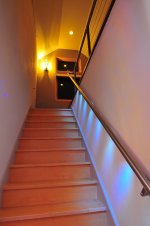
For the vertical posts and horizontal rail, I purchased that stainless locally from Discount Steel (now Coremark Metals) and brought it to a local guy to have the exterior surface center-less ground because it came with a mill finish. He charged me $2.50 per foot to bring it to a #4 finish...pretty cheap. The prices quoted for the same materials from Wagner were staggering considering they were only 150 miles away. And the kicker was that Wagner admitted that some slight scuffing of the stainless rail in transit was likely and it would probably need to be "touched up". Kudos to Wagner for saying out loud what everyone that has shipped product knows. [big grin]
The individual pieces are held together with 3M Scotch-Weld™, a structural epoxy.
I also installed small LED's in the bottom of the handrail to light the stairs. They look pretty purple in this photo but they actually aren't because they're 4200 K.
[attachimg=1]
Attachments
[member=44099]Cheese[/member] Could you specify which one? I see a bunch 3M Scotch-Weld Epoxies labeled PD100 through DP8010.Cheese said:The individual pieces are held together with 3M Scotch-Weld™, a structural epoxy.
Did you just butt jointed tubes with epoxy or used some internal dowel reinforcement?
Thanks.
Cheese
Member
Svar said:Could you specify which one? I see a bunch 3M Scotch-Weld Epoxies labeled PD100 through DP8010.
Did you just butt jointed tubes with epoxy or used some internal dowel reinforcement?
Thanks.
Hey Svar, we haven't tangled in a while...I rather miss that... [big grin] ..the 3M Scotch-Weld™ is DP 190 it was designed for bonding airplane skins to airplane structures. It's a dual tube unit that dispenses equal amounts of both epoxy and hardener.
The individual stainless pieces were designed to be butt faced for welding but could also be used with an internal structural member inside to provide added strength, that's the method I used. I located the original purchase receipts but it seems Wagner has changed the part numbers... [mad] ...so the part numbers I input don't come up. I know I used 1-1/4" stainless pipe which is almost 1-3/4" in diameter.
The railing has been up for 14 years and has survived many functions. But more than that, it's more important that the substructure is secure. It's secured to 1-1/2 " of ply secured to 2x8's, it's absolutely rock solid.
As an aside, I originally wanted this railing to be a fully welded assembly but as I further sought out pictures of welded stainless railings, I realized that fully welded stainless railings were only perfect 5% of the time. All of the other examples were cobbled together pieces of stainless that had bulges and obvious welding discrepancies...not very pretty.
So while not aesthetically perfect, it's still better than fully welded assemblies unless you have the $100K of equipment available to perfect the process.
Richard/RMW
Member
- Joined
- Jul 11, 2010
- Messages
- 2,947
[member=44099]Cheese[/member] you have a lot of really great details scattered around, I enjoy your design aesthetic. Are you waiting out the weather to get back to the garage project?
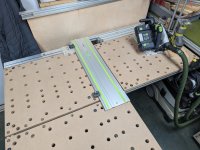
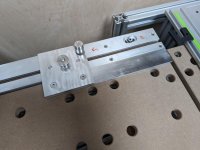
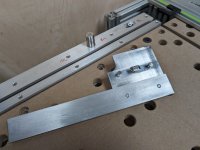
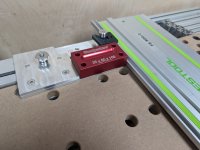
Been doing a little AL work this past week, & think I've finally settled on a TS fence system for the DIY MFT. Not having room for a permanently set up guide rail I needed to stick to dogs for aligning cuts. I wanted something I could leave set up that wouldn't interfere with using the worksurface, this attaches just off the edge of the MFT top with two machine screws and takes a couple minutes to install and align to the dog holes.
Shaper'ed the parts for the fence last week, then the stop plate today. Lots of manual work with the portaband, drill press and files. I also figured out how to true up the edges of the fence with a long shooting-board sanding block.
[attachimg=1]
[attachimg=2]
[attachimg=3]
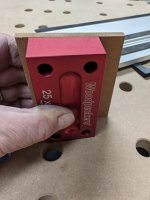
Measurements can be set with a gage block or story stick.
[attachimg=4]
[attachimg=5]
[attachimg=6]
This fence is ~30" long, now that the kinks are worked out I'll make a 4' version to use when working outside with a larger MFT setup.
Rain and 40's, spring is right around the corner...
RMW
Been doing a little AL work this past week, & think I've finally settled on a TS fence system for the DIY MFT. Not having room for a permanently set up guide rail I needed to stick to dogs for aligning cuts. I wanted something I could leave set up that wouldn't interfere with using the worksurface, this attaches just off the edge of the MFT top with two machine screws and takes a couple minutes to install and align to the dog holes.
Shaper'ed the parts for the fence last week, then the stop plate today. Lots of manual work with the portaband, drill press and files. I also figured out how to true up the edges of the fence with a long shooting-board sanding block.
[attachimg=1]
[attachimg=2]
[attachimg=3]
Measurements can be set with a gage block or story stick.
[attachimg=4]
[attachimg=5]
[attachimg=6]
This fence is ~30" long, now that the kinks are worked out I'll make a 4' version to use when working outside with a larger MFT setup.
Rain and 40's, spring is right around the corner...
RMW
Attachments

Cheese
Member
Thanks Richard... [big grin] ...the only issue with my design aesthetic is that my design preferences are expensive to implement if I were to pay someone to do it, thus I have to take on and complete the project myself. That approach saves me the $$ but costs me the time.
I work on the garage every day but the amount of work that needs to be completed is staggering. Interior electrical and insulation are my priorities now because come this spring the yard has to be repaired. We've scattered straw across all of the dirt to prevent the dogs from tracking in the mud. Come spring, the in-ground electrical runs need to be finished so that the fill can be hauled in & spread, sod laid, some cement steps formed & poured, the fence reinstalled and the foam around the footings stuccoed. After that it's painting time as everything is just primed at the moment.
Here's an example of 2 steps forward and 1 backwards. [smile] I'm in the process of installing the insulation under the loft floor, but as I'm walking on the loft floor, I notice a sponginess in several locations. I chase the issue down to the truss cavities for the skylights. The 2 skylights are 30" wide so the truss spacing is 30-1/2" wide in 2 areas. The 3/4" DuraStrand subfloor is meant to only span 24". So before I can finish the insulation install, I have to switch plans and come up with adding some support structure to the 30" truss spaces. It's one of those "now or never" moments because after the insulation is up, the vapor barrier installed and the drywall placed and mudded...well it just wouldn't happen.
I really like your MFT set-up Richard. Are all of those aluminum parts done with the Shaper? Nice job! I've got to get mine up and running this summer. [sad]
So as the stock you're cutting changes thickness, a small scrap would have to be placed under the rail where the bottom dog is located...correct?
Looks to me like the cut length can be set with a gauge block, story stick, another piece of wood or even a tape measure. I like cutting to hard stops, it's much more accurate and repeatable.
I like that the dogs never move so that dog hole wear will never be an issue. I don't own an MFT so I have ZERO experience with using one, but there do seem to be some issues with accuracy and set-up with the standard Festool version.
I've been thinking about purchasing one for the garage to save space, seeing as I've relinquished the prime real estate (directly in front of a pair of 40" x 40" casement windows) where I was going to install an 80/20 bench, to my wife for her planting bench instead. [tongue]
Richard/RMW
Member
- Joined
- Jul 11, 2010
- Messages
- 2,947
[member=44099]Cheese[/member] totally understand the “cost to get what I want done the way I want it done” premium. I struggle to explain what I envision to a contractor (& it’s not them, it’s me) let alone get them to actually do it. At any cost...
Regarding the spacers/stock thickness, the fence itself sits 1/4” above the MFT, so I use the 1/4” thick MDF donuts at the bottom end of the rail for support. If I’m cutting 1/2” I just add another spacer to the stack, ditto for 3/4” material.
The drawback to using a fence on the MFT for cutting is it’s easy to chase a small misalignment around all day long. Assuming the MFT top hole pattern is accurate, then the fence has to be aligned to the row of dogs on the X axis and the dog embedded in the fence has to align exactly with the row of holes in the Y axis. The solution was to use spacers to align the fence to the hole pattern and the guide rail to align the dogs. After a little practice I can do it without the need for a 3rd hand.
Most of the AL work was manual. Origin was used the cut the hole thru the AL fence for the embedded dog + the counterbored slots, and the hole pattern in the stop plate. With an O-Flute bit and the right feeds/speeds it works really nicely.
Looking forward to your spring progress report on the garage.
RMW
Vondawg
Member
Feel my kibitzing here with you two ….Richard you blow my mind with your inventive process and having to make everything fit…love how you make it happen and Cheese we think alike and these days it means more and more to me…not being able get things done right after 60 years of doing just that..and now, having to think twice about wether I should get up there on a 25 ft. Ladder to do what what I would have done ,and always have done, but not what’s being done today…well….I think y’all knowwhat I’m getting at…..thanks !
rvieceli
Member
[member=44099]Cheese[/member] interesting dilemma on the spongy subfloor. With conventional framing you would probably just throw another floor joist in there. But the trusses kind of negates that.
Can you add some framing elements perpendicular to the two trusses without messing with integrity of the truss?
I hear you be on doing stuff yourself. It is seemingly harder now to get any one that wants to do a job right. Plus they are usually only concerned with a larger project.
On the insulation front I’ve had a couple of friends use some insulation installers who did a good job and brought the project in for less than they could have bout the insulation for.
Ron
squall_line
Member
Richard/RMW said:Cheese totally understand the “cost to get what I want done the way I want it done” premium. I struggle to explain what I envision to a contractor (& it’s not them, it’s me) let alone get them to actually do it. At any cost...
I've been fortunate to have finally found a contractor to whom I can explain my vision, who can explain it back to me in a way that indicates he understands it (and writes the scope of work accordingly), and who is pretty focused on details and cleanliness. And I feel your struggle, because sometimes I can't even repeat my own ideas back to myself!
Cheese
Member
3M released more information on their new Cubitron™ 3 upgrade from Cubitron™ II. The new Cubitron geometry is interesting. I can see why they claim it "Delivers up to 53% faster initial cut rate and up to 43% faster sustained cut rate compared to the 3M Cubitron™ II Fibre Disc 987C, 36+".
3M announced that there will not be a price increase for the new Cubitron. [smile]
[attachimg=1]
Here's the latest brochure.
https://multimedia.3m.com/mws/media...-1182c-1187c-brochure-version2-digital_R3.pdf
3M announced that there will not be a price increase for the new Cubitron. [smile]
[attachimg=1]
Here's the latest brochure.
https://multimedia.3m.com/mws/media...-1182c-1187c-brochure-version2-digital_R3.pdf
Attachments

Cheese
Member
Ran across this brochure today while looking for belts for my Milwaukee band file. I'm going to put a #3 or #4 finish on some stainless pipe & fittings. This brochure gives suggestions for various tools used on Aluminum, Steel & Stainless.
https://multimedia.3m.com/mws/media...hlet-pdf-file.pdf?&fn=61-5002-8395-9_2015.pdf
https://multimedia.3m.com/mws/media...hlet-pdf-file.pdf?&fn=61-5002-8395-9_2015.pdf
Michael Kellough
Member
Thanks Chees!
Cheese
Member
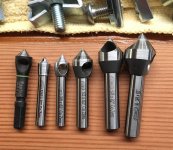
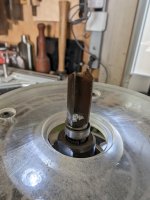
This is a great deburring tool for any metal (haven't tried it on titanium) and plastics also. I have the Noga NG3003 and have used it the last 8-9 years. The handle is hollow so that about 6 different blades can be stored in the handle. Noga offers blades for use on materials from stainless to plastic.
I also have the Rotodrive NG1107...it's ok for quickly removing a burr. If you need a real clean chamfer though, I still prefer to use a Keo Zero Flute cobalt countersink.
https://cdn2.hubspot.net/hubfs/5257...2ac3eef3|e39ac9fe-2190-46cf-a855-b639aeca2b2b
[attachimg=1]
I also have the Rotodrive NG1107...it's ok for quickly removing a burr. If you need a real clean chamfer though, I still prefer to use a Keo Zero Flute cobalt countersink.
https://cdn2.hubspot.net/hubfs/5257...2ac3eef3|e39ac9fe-2190-46cf-a855-b639aeca2b2b
[attachimg=1]
Attachments
Richard/RMW
Member
- Joined
- Jul 11, 2010
- Messages
- 2,947
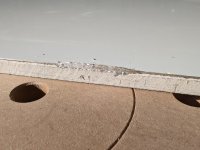
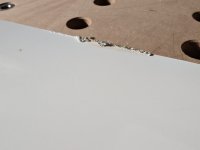
[member=44099]Cheese[/member] and others have suggested using IPA for lube when cutting AL, that stuff is magic!
Trimming overhanging ~0.30-0.40" AL sheet laminated to a panel, W/O IPA:
[attachimg=1]
[attachimg=2]
[attachimg=3]
W/ IPA trimming 8"-10" sections then 10-20 seconds to cool down, rinse lather repeat:
[attachimg=4]
[attachimg=5]
Night and day difference.
RMW
Trimming overhanging ~0.30-0.40" AL sheet laminated to a panel, W/O IPA:
[attachimg=1]
[attachimg=2]
[attachimg=3]
W/ IPA trimming 8"-10" sections then 10-20 seconds to cool down, rinse lather repeat:
[attachimg=4]
[attachimg=5]
Night and day difference.
RMW
Attachments


Cheese
Member
Richard/RMW said:[member=44099]Cheese[/member] and others have suggested using IPA for lube when cutting AL, that stuff is magic!
Night and day difference.
RMW
Glad that worked for you Richard... [big grin] I used to use Tapmatic for aluminum, it's petroleum based. It's also a mess because it has to cleaned up with another solvent, I used aerosol brake cleaner or IPA because neither left a film behind.
The nice thing about IPA is that it evaporates within 15-20 seconds of application so there's little to no clean up mess involved. [cool] Also, because it's evaporating all of the time, the cutting tool is being cooled constantly and that prevents the aluminum chips from welding themselves to the cutter.
Just a warning to everyone, it is flammable and it burns with a blue flame that's difficult to see. So be careful and make sure that what you're cutting does not produce sparks or a lot of heat.
Cheese said:Just a warning to everyone, it is flammable and it burns with a blue flame that's difficult to see. So be careful and make sure that what you're cutting does not produce sparks or a lot of heat.
I was told that Indy cars using methanol have the same problem. The secret code for "I'm on fire" is apparently to get out of the car and do jumping jacks
Cheese
Member
tsmi243 said:I was told that Indy cars using methanol have the same problem. The secret code for "I'm on fire" is apparently to get out of the car and do jumping jacks
An interesting tid bit...Back when I was in my 20's, I was way into drag racing. That was the deal, street racing was where it was at. [big grin] I enjoyed running a stock street gasser for most of the street racing era and 1/4 mile contests. It was fun...it was also dangerous but what did i know, I was only 20 years old. [tongue]
However a friend of mine asked me to crew for him while he ran a fuel drag car. It seemed pretty benign at that point as I thought what the hey...gas vs alcohol...gasoline is just gasoline.
Well after a couple of weeks and a couple of close calls I decided to call it quits. And this is when i was in my 20's when you're not afraid of anything. [eek]
Alcohol burns with a soft blue flame that you will not notice unless you are looking for it.
Any tips for thru-cutting aluminum sheet?
Thickness is 1/8", 6061. I'm planning to use my MFS to make knockout cuts for panel instruments. I have a whole bunch of random router bits, including a 0-flute that I haven't tried out yet.
1. Pre-drill 1st, or just plunge in with the router?
2. Skinny bit for reduced chipload, or thicker bit for rigidity? Where's the sweet spot?
3. Will I be forced to rough cut with a jigsaw? Was hoping to avoid this, to keep the panel looking pristine.
4. Cutting fluid needed? The MFS will be totally enclosed by the router base, I'm wondering if having 100% of the alcohol end up in the vac is a fire hazard. Maybe just water this time?