torsion mft build, kinda

raylaray

Member
Joined
Dec 8, 2023
Messages
22
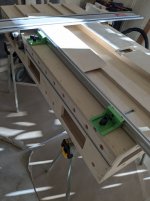
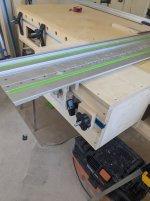
I had a request in another thread for some pictures of a bench I put together. In case it's helpful, I'll drop some photos here. It's a Paulk style torsion box, with some mft style mods including a homebrew guide rail hinge setup, adjustable back fence, and t tracks on the long sides and dog holes along all the sides. I've made Paulk workbenches in the past with 1/2 ply, but I wanted to route in for t-tracks and have something sturdier for attaching other bits, so went with 3/4 BB this time around. No dogholes on the top yet, but that'll be the next task.

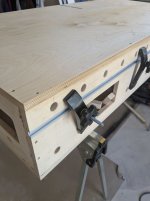
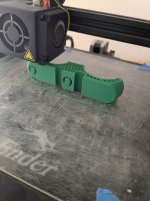
The green fence brackets also have a couple of clamps next to them, to make sure the fence doesn't get bumped out of square. The 3d printed fence brackets are a bit too slippery by themselves. I probably should try attaching some sandpaper or cork or the like to the bottom of each fence bracket to give a bit more friction, but in any case the additional clamps are doing their job.
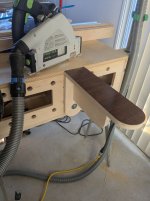
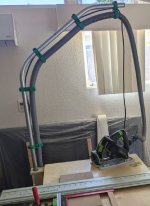
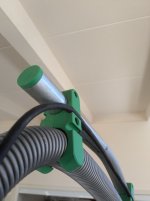
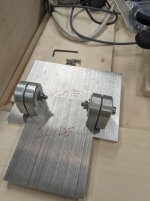
 

Attachments

  • bench042.jpg
    bench042.jpg
    135.2 KB · Views: 1,856
  • bench007.jpg
    bench007.jpg
    128.8 KB · Views: 1,632
  • bench014.jpg
    bench014.jpg
    106.9 KB · Views: 1,692
the dog holes are spaced 96mm apart horizontally because mft, and I'll remember the measurements. Vertically, it's a bit of odd spacing just due to the height I cut the side pieces. Having the holes along the sides lets me position and reposition extra add-ons as needed. Add-ons are connected with some basic 3d printed dog hole bushings(?) with a 5/16 machine screw and fender washers. I used 5/16 just in case I wanted to add t-track knobs later. For example, here's a simple outrigger to give an extra hand for longer stock can be attached and placed at an end or side as needed.
 

Attachments

  • bench050.jpg
    bench050.jpg
    144.6 KB · Views: 1,612
  • bench046.jpg
    bench046.jpg
    85.5 KB · Views: 1,549
  • bench044.jpg
    bench044.jpg
    100 KB · Views: 1,558
other add-ons use the same dog hole attachment method. I have a homebrew dust boom arm bent from 1" EMT and some 3d printed hose/cable hangers. This is attached to the table with a little mounting bracket made from 3/4 ply, with a couple of 3d printed bushings where the EMT pivots. The bushings are mostly because I had a slightly larger forstner bit than the EMT outer diameter - this keeps the boom arm nicely vertical in the oversized holes.


Attachments

  • bench036b.jpg
    bench036b.jpg
    176.4 KB · Views: 1,552
  • bench024.jpg
    bench024.jpg
    139.8 KB · Views: 1,565
  • bench041.jpg
    bench041.jpg
    125.2 KB · Views: 1,533
  • bench028.jpg
    bench028.jpg
    77.6 KB · Views: 1,537
the rail hinge is home-made, machined out of aluminum stock. I went overboard and machined everything, including the shoulder bolts that the hinges pivot on, and delrin bushings where the shoulder bolts insert into the aluminum hinge blocks. The flat parts are all 1/4 aluminum plate.

The hinge components attach to the table via some t-track bolts, and can be positioned as needed to square up the rail to the fence. I also added a couple of wood blocks that clamp on the t track on either side of the front rail support and ensure nothing moves if it gets bumped.

You can also see an outrigger table section here that the front rail support is attached to. This gives me a deeper table depth for wider stock. Same dog hole attachment system as the other add-on parts in previous posts.
 

Attachments

  • bench009.jpg
    bench009.jpg
    111 KB · Views: 1,560
  • bench010.jpg
    bench010.jpg
    95.1 KB · Views: 1,517
  • bench039.jpg
    bench039.jpg
    137.6 KB · Views: 1,536
  • bench001.jpg
    bench001.jpg
    155.8 KB · Views: 1,525
  • bench038.jpg
    bench038.jpg
    117.5 KB · Views: 1,524
I am in a constant battle with myself trying to control my compulsion to make my projects way stronger than they need to be. 

But I see I’m doing this all wrong.  I should be embracing that compulsion, not fighting it.  [big grin]

Nicely done—from one compulsive to another.

 
Packard said:
I am in a constant battle with myself trying to control my compulsion to make my projects way stronger than they need to be. 

But I see I’m doing this all wrong.  I should be embracing that compulsion, not fighting it.  [big grin]

Nicely done—from one compulsive to another.

lol, thanks I think! Nobody ever complained when their stuff didn't break.

the rail hinge is built like a tank, but some of that is down to using what stock I had on hand, and I generally like machining stuff with a bit thicker material just because it's less fiddly and gives some extra meat for points where the bits will attach to each other. There's no flex in it, and adding delrin for hinge bushings makes it buttery smooth. As for the 3/4 plywood, well... I likely could have made do with 1/2 material and just doubled up where the t-track was added. Torsion boxes even with 1/2 material are very nice rigid structures for working on.

I set the t-track in epoxy, and for the sake of that staying put in the long term, I didn't want to have every single heavy or tightly clamped contraption hanging off of it. The dog holes are great for general purpose expandability of the bench, and the parts to attach (bolts and 3d printed gubbins) are cheap and easy to source.
 
Man, that hinge is a work of art.  Kaiser stamp and all, I wouldn't change anything on it  [cool] 

There's a few of us on here that have metal lathes/mills.  They don't get shown much, but we do exist!  Check out the "Working with Aluminum" thread if you haven't seen it already.  And RMW's vise thread. 

 
tsmi243 said:
Man, that hinge is a work of art.  Kaiser stamp and all, I wouldn't change anything on it  [cool] 

There's a few of us on here that have metal lathes/mills.  They don't get shown much, but we do exist!  Check out the "Working with Aluminum" thread if you haven't seen it already.  And RMW's vise thread.

cool beans - always interesting to see what tools or jigs people are putting together
 
That boom arm is excellent! [thumbs up] [thumbs up] [thumbs up] Very well over engineered! [big grin] [big grin]  The bushings really put it over the top!
 
gunnyr said:
That boom arm is excellent! [thumbs up] [thumbs up] [thumbs up] Very well over engineered! [big grin] [big grin]  The bushings really put it over the top!

thanks :) had no choice on the bushings holding the boom arm - I didn't have anything that would drill the exact diameter I needed for the EMT. Worked out nicely this way though.
 
raylaray said:
gunnyr said:
That boom arm is excellent! [thumbs up] [thumbs up] [thumbs up] Very well over engineered! [big grin] [big grin]  The bushings really put it over the top!

thanks :) had no choice on the bushings holding the boom arm - I didn't have anything that would drill the exact diameter I needed for the EMT. Worked out nicely this way though.

I have not yet succeeded in convincing SWMBO that I “need” a laser printer.  I was thinking I could use my Shaper to make the holes…….. [big grin] [big grin]
 
gunnyr said:
I have not yet succeeded in convincing SWMBO that I “need” a laser printer.  I was thinking I could use my Shaper to make the holes…….. [big grin] [big grin]

my printer cost me about $100 - how'd you convince that the $3000 robot router was needed? I need to learn that skill! :P
 
[member=81019]raylaray[/member], THANK YOU for all of this.

I'm completely remaking my setup and have been torn between a Paulk top on a mobile base (no need for pack and go to the jobsite but do need it all to be easily movable), vs. an open-bottom MFT with T track aprons of the same size. A huge plus for the Paulk design is the ability to cantilever/hang accessories wherever you need them. In that regard, your addition of the dog holes around the sides is brilliant. I definitely think I want my router table to be re-locatable and to make use of the adjacent surface - whether as an extension with legs or hung off the side. The latter, with no legs to mess with, is attractive.

Did you glue down your top? I see the relatively beefy screws and wonder whether you didn't. To me, being able to replace it would be a big advantage.

I've spent the last 2 days down the aluminum extrusion frame MFT rabbit hole. It was looking pretty attractive but hadn't yet won for sure over the open bottom with generous apron a la Peter Millard.  You now have me thinking again...
 
ajs123 said:
[member=81019]raylaray[/member]
Did you glue down your top? I see the relatively beefy screws and wonder whether you didn't. To me, being able to replace it would be a big advantage.

I glued and used dominoes to join the ribs and the bottom, but the top is just put in place with some spax #6 mdf screws. I wanted that removable in case at some point it gets too beat up. I don't honestly know if it'll get bad enough that I'd replace it but who knows. If anything, I'll likely just route out a strip and stick in some 1/4 mdf where the saw cut line is. The screws are more than strong enough to hold it where it needs to be. The thing I like about the torsion box is that the top remains so nice and flat no matter what I do to it. I have another old paulk workbench I made ages ago out of 1/2 BB plywood, mostly same, screwed top, but with pocket screws and glue for the ribs to sides/bottom. It's held up very well despite a lot of abuse.  I haven't replaced the top on that one yet; at most I've sanded the top to get rid of various messes here and there.

This one at the moment is sitting on sawhorses; the old paulk bench is on a rolling mobile base. The only thing I don't like about the rolling base is that it can move when I apply some lateral pressure, say for a domino joint, or trying to slide a panel on the top of the bench. After a while the wheels get dusty from sawdust, and even though they are locking it's too easy to push the bench around; the wheels will still slip and slide a bit along the floor due to the sawdust.
 
Another question re your Paulk benches: Compared with an open-bottom MFT, the design makes use of the space below the top as a place to stow tools that are in use. It also catches any debris and dropped items - a positive to some and a negative to others. One the other hand, with an open-bottom MFT it's easier to provide a tray to catch debris but the vertical space behind the apron is basically lost. Have you been happy with yours? Do you use the "cubby space" with the smaller openings?
 
ajs123 said:
Another question re your Paulk benches: Compared with an open-bottom MFT, the design makes use of the space below the top as a place to stow tools that are in use. It also catches any debris and dropped items - a positive to some and a negative to others. One the other hand, with an open-bottom MFT it's easier to provide a tray to catch debris but the vertical space behind the apron is basically lost. Have you been happy with yours? Do you use the "cubby space" with the smaller openings?

the bottom space always has various tools sat in there, generally useful for sure. I do need to get around to drilling some dog holes in the top, but I don't think I want the full grid of mft holes; probably I'll just make a few strategically placed rows for clamping, and maybe a set behind the back fence. So maybe that limits the amount of sawdust that'll fall through. Right now, the back fence is held by little brackets running in t tracks at the moment. I did that to keep things adjustable, but I find that if I need to square up the guide rail, I'm always just adjusting the front bracket a little left or right, so likely having a fixed back fence held by a couple of dogs that are pretty close to 90 degrees to the rail would work just as well and give me another couple/few inches of cross cut capacity. I'll try to keep them reasonably accurately placed, but don't think I'm confident in getting the holes square enough for dogs to hold a really accurate 90 degree for both fence and rail by any method I have access to, and I can get it much more dialed in moving either the back fence or one end of the guide rail brackets, and I'll rely on my current methods to ensure a square cross cut setup, so generally I'm not overly concerned about getting the dog holes exactly placed.
 
[member=81019]raylaray[/member] how tall did you make your "windows" on the sides?

I think I am headed in this direction, so thank you again for sharing. The Kreg base I bought for this is 64x28". Though the top can easily overhang on the sides, I might actually go with this size given the ease of extending the surface. My count of the holes along a long edge suggests that yours is 5-ish feet wide.

Re crosscuts: For my use case, I'm unlikely to go with a rail hinge, though the idea of a dedicated crosscut line is attractive. I have a Parf guide so should be able to make a good perpendicular grid, and figure on doing my final trim of the top with the grid as a reference. Still, I'm imagining that any fence mounted to a rear rail is going to have to be calibrated.
 
Back
Top