Track Guide Crosscut Guide

ragstian

Member
Joined
Aug 29, 2014
Messages
18
Hi

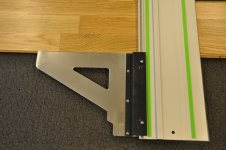
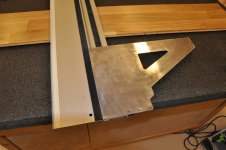
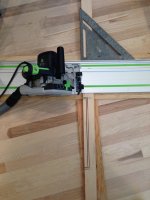
Have been installing and cutting laminate flooring recently I found that aligning the guide by a square for every cut was sort of tedious.
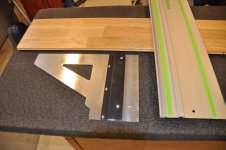
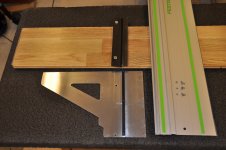
I came up with the following guide - made from "repurposed" aluminium "scrap" from some old 19" electronics rack enclosures. (One man's junk is another man's treasure!)

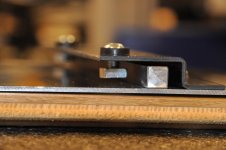
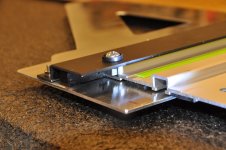
The guide can be installed and taken off in seconds without any adjustments needed - thanks to the fixed square bar on the bottom plate.

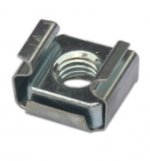
The nuts used in the track are "standard" square nuts used in 19" electronics rack fastening clips.

[attachimg=1]

[attachimg=2]

[attachimg=3]

[attachimg=4]

[attachimg=5]

[attachimg=6]

Best Regards
Ragnar


Attachments

  • DSC_3405_Small.jpg
    DSC_3405_Small.jpg
    367.5 KB · Views: 9,219
  • DSC_3407_Small.jpg
    DSC_3407_Small.jpg
    408.9 KB · Views: 8,339
  • DSC_3413_Small.jpg
    DSC_3413_Small.jpg
    449.6 KB · Views: 8,458
  • DSC_3417_Small.jpg
    DSC_3417_Small.jpg
    323.7 KB · Views: 8,262
  • DSC_3418_Small.jpg
    DSC_3418_Small.jpg
    447.2 KB · Views: 8,177
  • DSC_3420_Small.jpg
    DSC_3420_Small.jpg
    384.2 KB · Views: 9,214
Hi

Do you know of any sources/website for the clips?

These nuts are used in most rack installations in IT-centers etc.

They are called "rack cage nuts" - perform a google search to find a source in your area.

To get the nut - pry off the cage with a plier!

They normally sell for around 25 US$ for 50pcs including plastic washers and screws or around 20US$ for the nuts alone.

Amazon

[attachimg=1]

[attachimg=2]

RGDS
Ragnar
 

Attachments

  • 20-cage-nuts-for-07mm-16mm.jpg
    20-cage-nuts-for-07mm-16mm.jpg
    25.3 KB · Views: 8,054
  • cagenuts.png
    cagenuts.png
    78.2 KB · Views: 7,974
Hi.

The Qwas does the same as "my" guide but there was  a few things I did not like.
First, screws are protruding from the bottom of the guide,
second,  the foam strip had to be removed from the Festool guide
and last, the guide has to be adjusted for "squareness" every time it's installed.

Functionality are the same. Would like to have my guide anodized for durability. Might give that a try later. See here; DIY Anodizing

RGDS
Ragnar
 
Hi I tend to use my DeWalt Premium Rafter Square 7" (£8) - place the lip part flat against the outside of the rail and line up the face to the wood, job done in two seconds, saves messing around as it's already square.

But thinking about the above does anyone know the drop in pin part number for the kitchen worktop jig and its diameter ?

As a simpler thing might be - as the rail already has the small hole at it's base, if I drilled a hole in the Square to match and dropped in a peg from the rails hole and through the hole in the square then that would lock it in place.  The hole I mean is the one that I use for lining it up on the hinge of my MFT, if tht makes sense.
 
Well thanks for pulling this thread back to the top!

I like how Ragnar built one, and am going to do the same at some point. Something with a quick disconnect using thumb screws.

The track saw seems to have many uses. These are the cut outs for my heat registers. First cut with the track saw which gives a clean edge. Then cut the middle part out with the jigsaw, followed by the router to quickly clean up the between the cuts. Worked for me anyhow, and was reasonably fast, and came out clean with sharp corners.


Attachments

  • IMG_8931.JPG
    IMG_8931.JPG
    596.8 KB · Views: 1,280
Why not incorporate a wooden stop/fence (that gets cut to length on first use) for the front edge of your workpiece that will aid in aligning the rail to your intended cutline? Just like the 'adjustable arm' in this Kreg product:

Kreg Square-Cut
 
Back
Top