Trouble with small edge profiles with OF1400

slatifi

Member
Joined
Dec 4, 2022
Messages
5
I am relatively new to woodworking (I am a hobbyist) and use my OF1400 as my main router for groves, dados, flush trimming and edge profiles. When routing smaller edge profiles (such as 1/8” roundover) with my OF1400, I feel that it tends to tip (not balance) which messes up the edge profile.

Of course because the router is quite large this is to be expected when the material is not very wide/thick.

I think that its probably unfair to ask the 1/2” router to work for small pieces so I was thinking of buying the MFK 700 (or another trim router) for these more delicate tasks?

Any ideas?
 
In situations like that, I place a second piece of stock of the same thickness parallel to the piece I am working on.  That second piece is a “support piece” and is placed far enough away so that the router bit does not engage, but close enough that the router base can use it for support.

My preference, however, is to use the router table when feasible.  I’m sure there are some cost-effective ones out there.  Rockier makes one that seems nice and won’t break the bank.
 
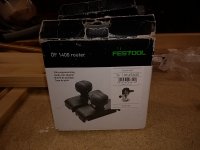
Buying an MFK would fix that problem but there are other ways. The first one that comes to mind is what Packard suggested. The second one is a Festool accessory base for the OF 1400 called a table widener. It is just a larger base that extends the base of the router. Like all Festool accessories it is not cheap but it is quite handy and it definitely less expensive than an MFK. I use mine more often than I use the stock base.
 
If you find you'd be using the same edge bit quite a lot, I'd just buy a cheap Makita trimmer and permanently leave a round over bit in it.

I find this the far easier and cheaper method myself.
 
Get the MFK. I just added it to the other three Festool routers and leave a 1/8" round over chucked up almost permanently. It's perfect for the small things.
 
I have an OF1400 and an MFK700 to cover off most handheld tasks.
 
Hello [member=79093]slatifi[/member], welcome to the FOG (that's the first time I've typed that).
I'm a hobby wood worker, I was doing that exact task yesterday.
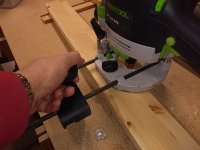
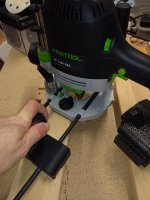
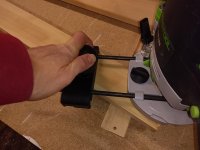
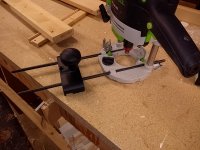
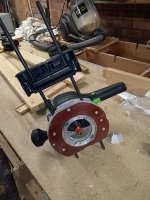
Unfortunately you're going to have to buy a part, 492601 "Guide Rail Adapter".  This can be split apart and used as an additional handle to balance the router.
Have a look at the photos I've attached.  Pay particular note to the side of the router i have the handle on, it's on the left side of the router, nearest the screw for the edge guide rods.
I start the cut with the extra handle resting on the work piece and move the router around as I make the cut so the extra handle is still on the work piece at the end of the cut.  There is a spot in the middle where the extra handle isn't on the work piece, but keep practicing and you'll get the hang of it.
Regards
bob

Edit, thinking about this a little more...you can make yourself a base extender and attach it using the two m6 threads in the router base.  Don't over tighten the bolts, you'll strip the threads!
 

Attachments

  • IMG_20221205_100906.jpg
    IMG_20221205_100906.jpg
    468.5 KB · Views: 122
  • IMG_20221205_100840.jpg
    IMG_20221205_100840.jpg
    496.8 KB · Views: 131
  • IMG_20221205_100824.jpg
    IMG_20221205_100824.jpg
    531.8 KB · Views: 123
  • IMG_20221205_100739.jpg
    IMG_20221205_100739.jpg
    486.9 KB · Views: 122
  • IMG_20221205_100716.jpg
    IMG_20221205_100716.jpg
    607.1 KB · Views: 122
  • IMG_20221205_100702.jpg
    IMG_20221205_100702.jpg
    617.5 KB · Views: 129
Alanbach said:
Buying an MFK would fix that problem but there are other ways. The first one that comes to mind is what Packard suggested. The second one is a Festool accessory base for the OF 1400 called a table widener. It is just a larger base that extends the base of the router. Like all Festool accessories it is not cheap but it is quite handy and it definitely less expensive than an MFK. I use mine more often than I use the stock base.

The table widener for the 1010 isn't made anymore afaik. Maybe the 1400 one is still around... dunno. But it still doesnt solve the weight issue on small stock
 
[member=79093]slatifi[/member] Packard has given you the best advice. this is the perfect application for using a router table for slim parts. It doesn't have to be a very expensive unit with all the bells and whistles. A piece of MDF with a hole in it and a trim router mounted underneath can be clamped to a surface and will do what you want.

Here's an example of that from the web. Scroll down a bit for the table.
https://www.wwgoa.com/article/shop-...5R2VGM1FEVGw4d005T1pTM3RqdyZ0PUFBQUFBR09OMThv

Ron
 
My first “router table” was simply a sheet of 3/4” plywood resting on two saw horses.  It was about 3 feet x 3 feet.  I reduced the thickness of the center to about 3/8” to allow easier mounting of the router.

To do that, I traced the shape of the router base on the plywood and freehand, using a dado bit, I routed the outline of the base.  It does not have to look too tidy, as long as it is slightly larger than the base, it is fine.  After the outline is done, you need to clean up the interior area.

To do this I used two pieces of same thickness lumber and rested them on the plywood and used them to support opposite sides of the router base.  It involved frequently moving those pieces of lumber, but it is a small section and it goes quickly.

I then mounted the router on the reduced thickness area first drilling a hole in the center to accommodate the bits.  When I flipped the board over, I had a flat surface to rest the work on.  Changing bits was easy.  Just flip the board over and it is your regular upright router.

It offers 360 degrees of access for adjusting the depth of cut.  Removing router leaves you with your saw horses and one sheet of flat plywood.  Easily stored.

My fence was two 36” x 4” plywood (3/4”), joined to make a long  “L” shaped piece.  I used wood screws to join these and I cut a relief for the router bit in the middle.  Two C-clamps anchor the fence.  And you are in business.

Tip:  I used drywall screws on my original fence.  Better is to use pocket screws.  Alternate the screws on opposite sides of the stock.  By tightening on one side and loosening on the other side, you can get a fence that is 100% square.  There may come a time when a taller fence that is perfectly square will be required.  So you might want to make your fence 6” tall to deal with that eventuality.  You will want that upright to be perfectly square.

If you are just routing flat sheets, then your “fence” can be a simple flat strip of plywood (or MDF or particle board) with relief in the center to allow for the router bit. 

There is a reasonable chance you have all the materials you need for this in you lumber stock.  Otherwise, less than $50.00 total. 

(I liked that setup.  I wonder why I abandoned it.)
 
Typically, I'd use a trim router for edge profiles and flush trimming on thin stock, but sometimes I like using my 1400 and will clamp material to the front of my workbench. It takes an extra step to get the piece flush with the worktop. The workbench supports most of the router so no tipping. It doesn't work in all situations, but it's been handy on many of my projects.

Monosnap_2022-12-04_17-30-53.png
 
4nthony said:
Typically, I'd use a trim router for edge profiles and flush trimming on thin stock, but sometimes I like using my 1400 and will clamp material to the front of my workbench. It takes an extra step to get the piece flush with the worktop. The workbench supports most of the router so no tipping. It doesn't work in all situations, but it's been handy on many of my projects.

Monosnap_2022-12-04_17-30-53.png

I like that setup.  I may try it in the future.    I do have one router mounted on the table saw table.  It is not as convenient as I imagined it would be.  I thought I would be using the table saw fence for the router.  But that never seems to work out. 

 
This is literally one of those situations where there are a hundred ways to do it. Some involve a bit of cash outlay, some are just more about experience.
As a huge MFK700 fan, I can tell you that they are great and you would not be disappointed with it, but it is also the very most expensive way to solve this issue.
My first recommendation, especially for a newbie, is to modify your technique. This costs nothing.
The main handle of the OF1400 is very unique in the world of routers and can be used to your advantage in this situation. The handle is likely somewhat causing your problem now, because I would assume that you are right-handed. Most right-handed users push into the cut, holding the router with their right hand on the trigger. This, as you noticed, puts more than half of the router outward of the edge, contributing to the instability.
If you simply walk around the router and pull it through the cut, your right hand and the handle will be over the material, rather than hanging off of it. Much more stable. The only issue with this technique is cord/hose management. It can be done, you just have to be aware of the need.

Personally, I would never use such a small bit in an OF1400, but I'm also the idiot who has more router than sense. The off-set of the base and the extra knob out there in the off-set make the MFK700 the perfect router for this, but it is still way over-kill for a hobby woodworker.
 
Thank you all  :).

You have given me plenty to think about and try. Personally, as I don't have too much room, I tend to lean towards bringing machines to the workpiece (with the exception of the table saw) so that is why I haven't built a router table to date - but, your point of a simple piece of MDF may come in handy.

Will update the thread with any more info in the future!
 
Back
Top