Hi all,
Need some help troubleshooting out of square cuts...I've been having trouble getting square cuts from my MFT and TS 55 tracksaw.
The table was setup according to the Festool manual, and I used Greg Paolini's great videos found on youtube:
The only change I made to the youtube video methods shown are that I used an Anderson Plywood square (triangle) instead of a Woodpeckers square.
The Anderson Plywood square was checked for orthogonality by tracing a line, and rotating it 90 degrees to reproduce the line. It matches up perfectly. For a sanity check, I did use a Woodpeckers 6 inch square to verify the MFT fence and guide rail are 90 degrees square.
Using 3/4 MDF, I cut down a few inches off each side of a 48 in x 48 in work piece (4 cut method).
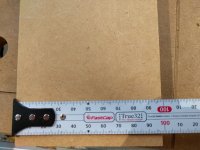
The first cut is out of square by ~2mm, and of course the problem is amplified by the time I cut the last side.
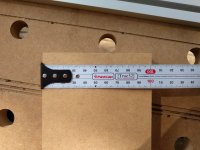
The cut tapers wide to narrow from the start of the cut to the end of the cut.
Here is the start:
View attachment 1
And here is the end:
View attachment 2
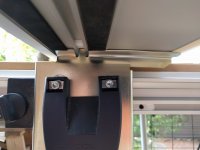
The MFT arrived with some pretty serious shipping damage, enough that one of the aluminum extrusions on the front profile was replaced.
What I didn't notice/expect was that the front hinge plate (with the tab that sticks into the recess on the guide rail) is not square and definitely bent. Doesn't look like I can attach photos (yet?), so imagine this. You are looking at the front of the MFT, and the metal portion of the front hinge plate slopes from the left to the right, so that when the guide rail rests on the tab, it is not fully supported on the right side by 1/4 inch or so, where the splinterguard is.
View attachment 3
Other than cutting out of square, the saw makes clean cuts, does not burn wood, and seems to perform just fine.
Before I started adjusting toe-in and other items, do you think the bent front hinge plate is the issue?
One last thing I should mention, I took the Festool cabinet class in N. Carolina (highly recommended). All of the cuts came out square and my boxes came out 90 degrees, so I doubt it's technique.
Hopefully the brain trust has some suggestions to help me fix.
Thanks!
Chris
Need some help troubleshooting out of square cuts...I've been having trouble getting square cuts from my MFT and TS 55 tracksaw.
The table was setup according to the Festool manual, and I used Greg Paolini's great videos found on youtube:
The only change I made to the youtube video methods shown are that I used an Anderson Plywood square (triangle) instead of a Woodpeckers square.
The Anderson Plywood square was checked for orthogonality by tracing a line, and rotating it 90 degrees to reproduce the line. It matches up perfectly. For a sanity check, I did use a Woodpeckers 6 inch square to verify the MFT fence and guide rail are 90 degrees square.
Using 3/4 MDF, I cut down a few inches off each side of a 48 in x 48 in work piece (4 cut method).
The first cut is out of square by ~2mm, and of course the problem is amplified by the time I cut the last side.
The cut tapers wide to narrow from the start of the cut to the end of the cut.
Here is the start:
View attachment 1
And here is the end:
View attachment 2
The MFT arrived with some pretty serious shipping damage, enough that one of the aluminum extrusions on the front profile was replaced.
What I didn't notice/expect was that the front hinge plate (with the tab that sticks into the recess on the guide rail) is not square and definitely bent.
View attachment 3
Other than cutting out of square, the saw makes clean cuts, does not burn wood, and seems to perform just fine.
Before I started adjusting toe-in and other items, do you think the bent front hinge plate is the issue?
One last thing I should mention, I took the Festool cabinet class in N. Carolina (highly recommended). All of the cuts came out square and my boxes came out 90 degrees, so I doubt it's technique.
Hopefully the brain trust has some suggestions to help me fix.
Thanks!
Chris