TS55 and Cembrit cement board.

Lbob131

Member
Joined
Jul 18, 2012
Messages
616
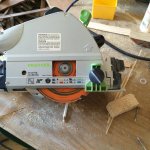
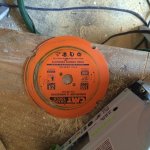
Fitted a  4"  angle grinder  masonry  blade  to my  ts55 today.
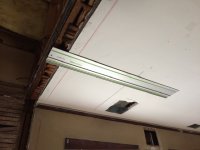
Set  the  depth  to achieve a  scoring  cut  and  hey  presto  worked  like  a  dream.
We use  hundreds  of  sheets  of  cembrit  and it never dawned  on me  to  try  this  method.
And  dust  free.  :)
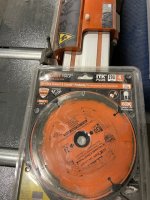
The  blade bore  is  a  couple of  mil  bigger  but  it  worked.  [blink]
 
Festool makes a blade specifically for cutting cement board, which would be a far better solution. Having a blade with an over-sized bore could be very damaging to the saw. Slightly off-center could vibrate quite badly.
 
And for someone not wanting to shell out for the Festool version, Oshlun makes one as well at a lower price point.

That being said, glad it worked out for you without any major problems.  Personally I’m too chicken to try stuff like that but when you’re in a pinch, you’re in a pinch.
 
Would highly recommend using the diamond blade festool makes. Works really well with the ts55

Sent from my iPhone using Tapatalk
 
I use the CMT PCD blade on the TS-55. At the time I bought it Festool did not offer a PCD blade in the U.S. Works great on drywall also.

[attachimg=2]

[attachimg=1]

Plater ceilings cut easily, be careful if it is metal lath.

[attachimg=4]

And just to start some …., I use the CMT PCD blade in one of my Kapexs to cut cement board planks…

[attachimg=3]

Tom
 

Attachments

  • IMG_3132.jpeg
    IMG_3132.jpeg
    136.5 KB · Views: 304
  • IMG_4761.jpeg
    IMG_4761.jpeg
    130.5 KB · Views: 308
  • IMG_3133.jpeg
    IMG_3133.jpeg
    144.3 KB · Views: 302
  • IMG_3129.jpeg
    IMG_3129.jpeg
    60 KB · Views: 301
My personal weapon of choice for cement board is a Hilti AG115 4.5" angle grinder fitted with their excellent dust control kit, hooked up to a CTL26. Surprisingly affordable for a 'red' machine, although the dust collection shroud and associated fittings cost more than the grinder itself. Money well-spent for sure though. Also does a stellar job on tiles, slate, granite and quartz.

Does anyone here have the Festool part number for the self-levitating, anti-gravity rails as pictured above?

Or are they regular rails which are held up there by the power of the user's mind? Or specialised aluminium magnets? Or voodoo? Or was the photo taken whilst in Netflix-Stranger-Things-Upside-Down-World? Or something else?

[attachimg=1]
 

Attachments

  • Screenshot 2023-12-09 193350.png
    Screenshot 2023-12-09 193350.png
    669.4 KB · Views: 288
They make those fancy new rails for just this sort of thing, but this is not that  [eek]

Double sided tape? or it's a trick and that's the floor?
I have heard of guys drilling and countersinking them for screws too, but I couldn't do it.
I have thought about using my Shaper Origin to cut those slots into at least one of my rails.
The FS1900 could use a couple of those holes.
If I got my hands on a genuine one with calipers in hand, I would do it.
 
Drilling and countersinking holes in the guide rail is no big deal.
You might want to use an old bit to grind through the anodized surface to get started.

I expected the holes for the green sticky things to be something like 20x100. Actual size is very close but weirdly different.

21mm x 103.5mm.

Upper part of hole is chamfered 45 degrees leaving about 1/2mm flat on the lower edge of the hole.
 
I don’t have a blade for cement board so looked for that CMT blade. It’s $99 most places but not available on Amazon. I did find a 7-1/4” blade with 5/8” arbor for only $35. Puzzled by the huge Dion price for nearly the same thing.

Four diamond tooth blades, 160mm x 20mm

Oshlan $65
CMT    $99
Festool $145
 
Crazyraceguy said:
They make those fancy new rails for just this sort of thing, but this is not that  [eek]

Double sided tape? or it's a trick and that's the floor?
I have heard of guys drilling and countersinking them for screws too, but I couldn't do it.
I have thought about using my Shaper Origin to cut those slots into at least one of my rails.
The FS1900 could use a couple of those holes.
If I got my hands on a genuine one with calipers in hand, I would do it.

There is a screw in the hole that is at the end of the rail, the free end has a clamp in the slot that reaches into the cavity.

In this video I’m using the rapid clamp in the “spreader” configuration.
=ri5plz_SCnNh42z0

Tom
 
tjbnwi said:
There is a screw in the hole that is at the end of the rail, the free end has a clamp in the slot that reaches into the cavity.

In this video I’m using the rapid clamp in the “spreader” configuration.
=ri5plz_SCnNh42z0

Tom


I have never done it that way. They are great, every track saw user should have one, but I have only ever used it in clamping mode.
Once again....necessity is the mother of invention.
I hang a few of mine by the hole, but I have never screwed one down. Between the Geckos, Rapid clamp, and regular F-clamps, I have never needed too. I'm not cutting on the ceiling either  [eek] though I have done vertical a few times  [blink]
Thanks for the explanation Tom
 
Here's an HKC with the orange CMT blade I use for cementous backer board. The blade works well considering it only cost $50 a few years ago. I believe I got it from Tool Nut.

[attachimg=1]

Like Tom mentioned, there's already a hole in each end of the rail so you only need to add an additional hole or two to mount the rail vertically.

I've also added screw holes to all of the MFS rails. MFS 200/400/700/1000, they've all had holes added. If you're careful they look like they came from the factory that way.  [smile]

[attachimg=2]

In this photo you can see the hole in the upper MFS 700 rail while the lower MFS 700 rail is attached to some ply with #8 FH Torx screws.

[attachimg=3]
 

Attachments

  • 8929.jpg
    8929.jpg
    396.6 KB · Views: 233
  • 4638.jpg
    4638.jpg
    645.1 KB · Views: 234
  • 6694.jpg
    6694.jpg
    262.7 KB · Views: 235
Back
Top