TS55 REBQ - major issues when bevel cutting

Simo_Petar

Member
Joined
Sep 17, 2017
Messages
13
Hello
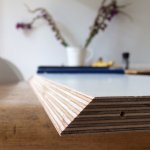
I've been using the TS55 regularly for a year now processing 18mm birch ply and it's performed brilliantly for the cuts I've needed, all at 90 degrees.  However at 45 degrees on the same stock I've had some major issues:

1. Saw struggled really hard to go through sheet stock. At one point it shut off before the end of a 1200mm cut.
2. Burns wood badly all down the rail side of cut, waste side clean.
3. Saw line is around 0.5 - 1mm away from splinter guard, but only when bevel cutting!

Reading posts I've tried a number of things, some of which have been very helpful:

-  Avoiding sideways movements when cutting and using left hand pressure to hold the base plate flat.
-  Checking adjustment of the bevel locks.
-  Checked and cleaned the blade. It cuts nice and smooth at 90 so I think it's reasonably sharp.

Tightening the rear lock first seemed to help reduce the burn marks on the wood and help get the saw travel better down the stock but it still is burning somewhat and the saw line is still away from the splinter guard, which I can't understand.

I do notice that the rail has a tendency to bow up a little when being clamped, even though I support it at both ends of the work piece. Soon as I drop the saw on the rail that usually holds it down ok.

Any ideas where I'm going wrong ?

 
The rail should not bow up then clamping.

Try to set the bevel angle with the saw resting on the blade cover. Doing it while sitting on the rail (or the baseplate) the relatively heavy head will (as the center of gravity will not be over the baseplate) pull and you might end up with a twisted geometry. Doing it lying on the side only the light baseplate is in the air, it won't pull that hard and it'll be easier to tighten the knobs on both sides without introducing tension in the hinge.

On bevel cuts the kerf should still be directly at the splinter guard, in case yours isn't the saw might need a trip though festool service...
 
Thank you for your reply

Gregor said:
The rail should not bow up then clamping.

I'm thinking I may need to look again at the cutting surface and clamping strength I'm using just in case thats causing an issue, though it's never been a problem with 90 deg cuts. I've found some improvements already in the advice offered about adjusting the bevel off the guide rail.

On bevel cuts the kerf should still be directly at the splinter guard, in case yours isn't the saw might need a trip though festool service...

Well that's the thing that has me stumped - I haven't seen any reference to this in other posts. Don't know if it's related to the binding and burning or just an unrelated issue !

 
First of all - welcome to the FOG!

I am grateful that overs have over their thoughts in the usual Fogger way.

I haven't experienced your exact issue but I have one that might lead to this conclusion:  Sharpen or replace your blade.

I know when my blade is duller than I think by using the finger test when using my Kapex to bevel versus crosscut.  The blade is cutting at a higher resistance and any shortcomings will show themselves.

Just a suggestion.

Peter
 
Simo_Petar said:
Gregor said:
The rail should not bow up then clamping.

I'm thinking I may need to look again at the cutting surface and clamping strength I'm using just in case thats causing an issue, though it's never been a problem with 90 deg cuts.
On further thinking:

Changing the vertical distance of the saw to the workpiece on a 90° cut (through bow of the rail from not laying flat on the workpiece) will only change the depth of the cut but not the geometry or location of the cut. On a bevel cut on the other hand this will force the side of blade into contact with the side of the kerf and will move the kerf toward the side the blade is tilted to.

You described the rail to bow up when clamping, this would lead to the saw being lifted up in the course of the cut, which will result in binding with and burns on the rail side kerf face and the kerf will move toward under the rail (you didn't specify the direction the kerf is offset, but my guess is that it's under the splinter guard strip instead of adjacet to it as with a 90° cut).

Should my guess about the kerf location be correct: your error is in the clamping of the rail, sounds like you clamp outside the workpiece area and apply way to much pressure.

With sheet goods you can often simply place the rail onto the sheet and do the cut, clamping is to assist the black strips under the rail from stopping the rail from moving on the workpiece.

In case you need clamping, always position the clamps for the rail onto the workpiece and never outside the workpiece area (just onto the surface the workpiece rests on). In case the workpiece is shorter than the work surface (so that is in the way of the clamps) you must support the rail at the clamp location(s) with an offcut of the workpiece or something of the exact height (and clamp the workpiece individually to stop it from moving on the work surface) or you will introduce bow into the rail and bevel cuts will bind, burn and misalign the kerf to under the rails splinter guard.
 
Thank you for the warm welcome.

I have a new blade on order so I will see if that improves things.

The cut line is beyond the splinterguard, rather than underneath it - leaving the work .5-1mm oversize. From your explantion of the geometry I think (?) that would suggest the saw is tipping off the rail, even though I'm supporting it with my left hand.

As a lefty I must admit I find the plunge action awkward to control. Maybe I'm getting some deflection from the right hand ...
 
Simo_Petar said:
The cut line is beyond the splinterguard, rather than underneath it - leaving the work .5-1mm oversize.
Please do a 90° test cut with the rail in a piece of scrap, should the kerf be outside the splinter guard (or the splinter guard not being parallel to the kerf over the full cut) you most likely have lifted the saw from the rail while doing a bevel (which would have moved the kerf into the rail splinter guard, shortening it) at some point - you'll need a new splinter guard in that case (or detach the existing one and reattach it more outward, then cut it again to align it to the blade location).

From your explantion of the geometry I think (?) that would suggest the saw is tipping off the rail, even though I'm supporting it with my left hand.
In case I figured the geometry correctly in my head that couldn't put to the kerf outward of the splinter guard, at least not without massively changing the bevel angle (and you didn't report that to be off).

As a lefty I must admit I find the plunge action awkward to control. Maybe I'm getting some deflection from the right hand ...
Possibly, but you should be able to compensate by holding the baseplate onto the rail with your dominant hand and use your right only to do the plunge and hold the saw in that position, then gently push it forward on the rail.

On further thought, cleaning the sides of the current blade from any gunk that might have accumulated could also help reducing binding and burning (which would then ease the cut, which then reduces additional shear forces introduced by you needing to push harder).

Did you correctly tighten the #79 knobs (that are used to remove any lateral movement of the baseplate on the rail) when initially mating the saw to the rail? In case they're fully open the saw could move sideways a tad on the rail, which you might unknowingly compensate by pushing the saw towards the rail side of the kerf on normal cuts with your right while pushing it outward with your left hand (that you most likely won't use to hold the base plate down on 90° cuts) on bevel ones...

Please check for lateral movement on the rail and do the above mentioned 90° test cut.

01_491597.gif

 
Thanks Gregor, I really appreciate the detail you've put into your reply.

The blade is still cutting tight to the splinter guard edge when cutting at 90 so it's still intact ok.

I tightened the rail knobs as usual so they just allow for smooth movement on the rails. Still trying to get my head around the single point entry idea though. If there's room to make the saw eat into the splinter guard,maybe there's something I'm doing thats producing the opposite effect..

I'm on another job for a day or so, will report back once I've cut a few other pieces, such as a replacement blade as suggested by Festool UK.

 
Simo_Petar said:
The blade is still cutting tight to the splinter guard edge when cutting at 90 so it's still intact ok.
Regarding the 90° test cut: you could do one plunge (with anti-kickback insert on the rail) in the middle of a scrap, then you could check if the blade is parallel to the splinter guard.

Still trying to get my head around the single point entry idea though.
Now you lost me. 'single point entry'?

If there's room to make the saw eat into the splinter guard,maybe there's something I'm doing thats producing the opposite effect..
To cut into the splinter guard on a bevel cut you would have to lift the saw from the rail (as the cutting section of the blade twists to below the rail) which would move the kerf toward the rail. I'm at a loss how you should be able to move the kerf away from it, you would have to push the saw through the rail for that...

BTW: In case the saw is < 3 years old and you can live without it for a week... festool 'service all inclusive' is your friend.
 
I have also been using a TS55REBQ to cut quite long (1M-2.4M) 45 degree bevels recently in 18mm birch ply, and also have the saw struggling a little bit and also a shut off or two, and some burning at times. I have found using the 20 tooth blade to be much better than the 48 tooth on all counts, and the cut quality equitable, and superior on "rip" cuts.
 
Can we assume you are first making the cut to length or width at 90deg ?

Then , while leaving the rail in place , setting the angle and then making the bevel cut ?
 
Thanks for the reply.

Still trying to get my head around the single point entry idea though.
Now you lost me. 'single point entry'?

I was referring to the idea that the blade enters the workpiece at the edge of the splinterguard, regardless of the bevel angle used. My results are not doing that !

I did some more cuts yesterday. I got the middle section of the cut to align much better to the splinterguard edge, but the start and end were still running off by 1mm or so over the last couple of inches. Clamping seems to raise the front edge of the rail up as I apply pressure, which then drops down again as I lay the saw on the track. Maybe the rail is not kept consistently flat as I move the saw down the rail during the bevel cut.

I'm starting to think it's my clamping technique (as you pointed out in an earlier reply) that's at fault here rather than the saw ....

 
eddomak said:
I have also been using a TS55REBQ to cut quite long (1M-2.4M) 45 degree bevels recently in 18mm birch ply, and also have the saw struggling a little bit and also a shut off or two, and some burning at times. I have found using the 20 tooth blade to be much better than the 48 tooth on all counts, and the cut quality equitable, and superior on "rip" cuts.

Thanks - Festool UK also advised that if it's burning it may be blade that's blunt and to try the 28T blade instead for combination rip/cross cut as you'd get in plywood. Don't know if the bevel angle also affects that, but my 48T blade always gives a good finish at 90 degrees.

How clean do you find the cuts on the lower count blade ?
 
antss said:
Can we assume you are first making the cut to length or width at 90deg ?

Then , while leaving the rail in place , setting the angle and then making the bevel cut ?

Thank you.

Yes, I've tried yesterday with pretty similar results. It leaves a small 90 degree lip, about .5- 1mm on the edge of the plywood, indicating the bevel cut is entering slightly below where the 90 degree cut does.
 
Coming back to technique: do you plunge the blade into the materiaal, or do you plunge outside and saw into it? Makes a world of difference (the second one is what you need to do, if possible. This only applies to bevelled cuts, in my experience.)
 
Was at a local Festool Roadshow today and asked around a bit.

Possible scenarios for when you saw cuts exactly at the splinter guard on 90° but away from it on a 45° bevel:

1) You use a 'compatible' rail that is thinner than the Festool ones. The saw is created so that he blade will pivot (when tilting the blade to set the bevel) on an axis that is exactly 5mm below the baseplate (which is the exact height that a Festool rail adds to the baseplate), so while on the rail the pivot axis should be exactly on the surface of the material but as yours is thinner the pivot axis is below it (which would explain the outward kerf position on bevels but not on 90°).
Solution: use a rail with the right dimensions.

2) You clamp the rail so hard that you compress the anti-slip strips on the bottom of the rail to near nothing (or the black anti-slip strips or the green sliding strips on the top are missing), reducing the total height of the rail (between workpiece and baseplate) and through this you move the pivot axis to below the material surface.
Solution: clamp the rail as described in one of my prior posts (fully supported at workpiece height between the two positions where the clamps are) and only tighten the clamps to the point where you can't easily move the rail on the workpiece anymore. Don't overtighten, replace the strips in case they have collapsed.

3) The blade isn't parallel to the groove on the bottom of the baseplate (said to happen when you drop them) but further away on the front side (the side you move the saw when cutting). This leads to the saw being hard to move, binding and burning the on-cut face - by pulling away from the rail as the kerf is diagonal away from it. A non-moving plunge test in 90° should show this, if the kerf isn't 100% parallel to and directly at the splinter guard edge your saw needs adjustment.
Solution: unplug, set to 90°, use fast-fix to extend the blade, measure distance between the ends of the blade (a teeth where it vanishes into the saw housing) and the grove the saw is riding on. Front and back should be at identical distance, if they are not you can adjust it yourself (there are 4 screws visible from below the baseplate, two each at both ends, holding the bevel swivel points - untighten them, set the blade parallel to the groove, tighten) or send it in for service.

4) You sanded down the baseplate for some reason (I know, unlikely... but I heard that it happened)
Solution: get a new baseplate.

5) You have a dud saw, but the guy I talked to found that hightly unlikely as it would be difficult to impossible to assemble it in a way that would move the blade pivot axis downward below the intended point (and in 90° setting the cut most likely wouldn't be 90°).
Solution: send it in for service.

Simo_Petar said:
It leaves a small 90 degree lip, about .5- 1mm on the edge of the plywood, indicating the bevel cut is entering slightly below where the 90 degree cut does.
That is exactly the height that is missing in your rail for whatever reason.

You can test if the problem is the rail or the saw in a simple way:
Take a scrap, set the saw to >=6mm and 90°, then do two cuts - one with the rail and one without (be careful about kickback) without changing any setting on the saw. Measure the depth of the two cuts (in case you just did plunge cuts: measure in the center), in case they differ by exactly 5mm then your problem is in the saw, in case they're not exactly 5mm difference in dept (but less) then your problem is the rail.

Gregor
 
Simo_Petar said:
eddomak said:
I have found using the 20 tooth blade to be much better than the 48 tooth on all counts, and the cut quality equitable, and superior on "rip" cuts.
How clean do you find the cuts on the lower count blade ?

On plywood I find no difference at all, as I generally sand the exposed edge a little anyway (especially when there are burn marks).

I was just watching a video released this week by Chris Salome (FourEyes) on YouTube where he did a bevel cut (albeit in solid timber) and complained about the same thing - saw struggling/cutting out, burn marks.

 
Thank you both for your replys

Gregor - I'll run through your list of possible causes and let you know what I find. Definitely not sanded away the baseplate !

I'm really impressed with this forum. So much useful info and really keen to help
 
Gregor - I've done some tests checking the advice offered. Here's a pic of the problem I'm getting (workpiece flipped over):
View attachment 1

1) You use a 'compatible' rail that is thinner than the Festool ones. The saw is created so that he blade will pivot (when tilting the blade to set the bevel) on an axis that is exactly 5mm below the baseplate (which is the exact height that a Festool rail adds to the baseplate), so while on the rail the pivot axis should be exactly on the surface of the material but as yours is thinner the pivot axis is below it (which would explain the outward kerf position on bevels but not on 90°).
Solution: use a rail with the right dimensions.

It's a Festool 1400 rail I use.

You can test if the problem is the rail or the saw in a simple way:
Take a scrap, set the saw to >=6mm and 90°, then do two cuts - one with the rail and one without (be careful about kickback) without changing any setting on the saw. Measure the depth of the two cuts (in case you just did plunge cuts: measure in the center), in case they differ by exactly 5mm then your problem is in the saw, in case they're not exactly 5mm difference in dept (but less) then your problem is the rail.

I set the saw to 1mm depth and made 2 cuts with/without the rail:

The cut with rail: 1.2mm
The cut without the rail : 5.5mm
Offset = 4.3mm

Out of interest I measured the thickness of my rail at the splinterguard edge, and it came out at around 4.3mm - the same as the offset amount I got above.

I don't know if it makes a difference that my rail isn't exactly 5mm, but when I shimmed up the front edge of the rail using a scrap bit of formica about 0.9mm thick, this pretty much perfectly aligned a bevel cut to the splinterguard edge.


Attachments

  • bevel_edge.jpg
    bevel_edge.jpg
    101.1 KB · Views: 392
Back
Top