You are using an out of date browser. It may not display this or other websites correctly.
You should upgrade or use an alternative browser.
You should upgrade or use an alternative browser.
TSO Products GRS-16 Guide Rail Square video.
- Thread starter ThePoplarShop
- Start date
tazprime38
Member
- Joined
- Dec 27, 2008
- Messages
- 215
TSO Products said:[member=5519]tazprime38[/member] - good question Tariq. You'll have to make that judgment when you see what the accessory we are working on can do for you. Our accessory product is still in the development phase. We are more anxious even than you may be. Thank you for your continuing interest. For some reason did not see your post until just now.
Hans
Hi Hans
Another question comes to mind, will the psrallel guide attachment allow for narrow rips, ie thin strips smaller in width to the guide rail?
Tariq
[member=59331]TSO Products[/member]
TSO Products said:[member=18813]supimeister[/member] - see reply # 296 on the Thread about the original GRS-16 Post.
We will introduce an accessory for the GRS-16 and GRS-16 PE GUide Rail Squares which wwill permit you th not only square up the rail to the workpiece but simultaneously set the edge distance from the left side (call it a parallel guide accessory).
It will be designed to be usable at each end of a longer cut using the GRS-16 PE to which this accessory will also fit (designed to face in the opposite direction as well).
Putting the adapter holes in the production GRS-16 series "leaked" this piece of marketing information but "we cannot tell a lie" - so we patiently hear the question and answer it too. Too bad we're still using "old technology" where have to complete a design, prototype, Beta test it, go back and improve what comes up short, test some more,... finally get ready to launch production and eventually start shipping. That's why it will ship after Labor Day as far as we can see right now.
With the MTR-18 and PTR-18 Triangles in production and shipping now, we can turn our full attention to completing this GRS-16 accessory.
Hans
info@tsoproducts.com
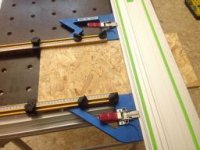
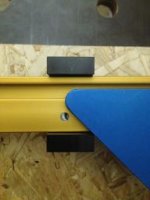
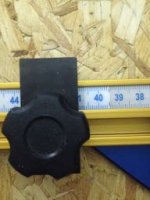
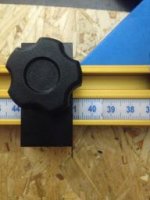
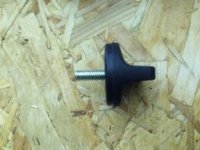
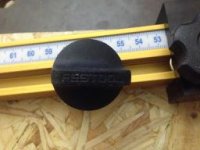
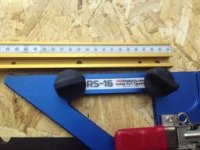
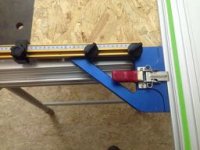
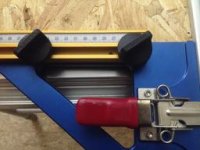
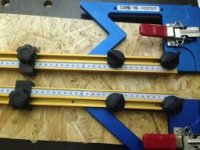
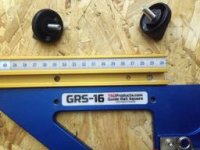
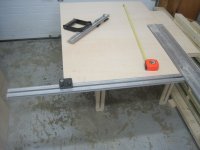
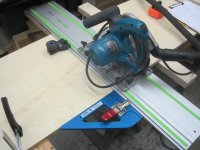
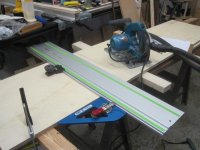
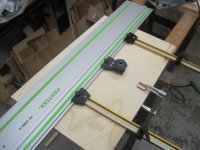
Decided to try and make my own GRS-16 and GRS-16PE parallel guides today with some Incra track, the Seneca parallel guides and some Festool knobs.
It works pretty well, only drawback I found so far is that the smallest width you can set is 410mm.
The tracks are also a bit long now, I think I will shorten them to about 1250mm as the standard width of plywood panels is 1220mm here in Europe.
here are the pictures:
View attachment 1View attachment 2View attachment 3View attachment 4View attachment 5View attachment 6View attachment 7View attachment 8View attachment 9View attachment 10View attachment 11View attachment 12View attachment 13View attachment 14View attachment 15
Attachments
-
 IMG_1902.jpg14.8 KB · Views: 478
 -
 IMG_1918.jpg14.8 KB · Views: 349
 -
 IMG_1917.jpg10.8 KB · Views: 296
 -
 IMG_1916.jpg12.8 KB · Views: 313
 -
 IMG_1915.jpg12.3 KB · Views: 340
 -
 IMG_1914.jpg11.4 KB · Views: 334
 -
 IMG_1912.jpg13.3 KB · Views: 330
 -
 IMG_1911.jpg12.2 KB · Views: 336
 -
 IMG_1910.jpg14.2 KB · Views: 341
 -
 IMG_1904.jpg13.8 KB · Views: 376
 -
 IMG_1905.jpg13.5 KB · Views: 358
 -
 IMG_1906.jpg13.7 KB · Views: 334
 -
 IMG_1907.jpg13.1 KB · Views: 337
 -
 IMG_1908.jpg15.8 KB · Views: 347
 -
 IMG_1909.jpg14.8 KB · Views: 332
wpz said:For a short rail it is probably not necessary, but I also have a 3m rail and with such long cuts I think it might increase the accuracy.
P
I am under the impression that you can clamp the guide rail on the other end once the square is set in the place on one end. Shouldn't that clamping keep the accuracy as well as maintain a square setting on a long board?
My intention is to use the guard rail square (if I decide to buy it) for long boards (anything under 4' can be handled with ease on my tablesaw), but if two squares are indeed required, I don't think I would give any further thought to this method.
- Joined
- Nov 21, 2015
- Messages
- 614
[member=66126]wpz[/member] - you have the right concept in mind. Our production tool is designed to cover the entire range from the narrowest stock all the way across the width of a full sheet and handle material thicknesses down to 12mm in a narrow strip underneath the guide rail.
[member=65072]tomp[/member] – good point you make.
[member=66126]wpz[/member] points out, that will probably work on shorter length cuts. We expect customers will want all the repeatability and accuracy they can achieve. A pair of flip-stop rails will make that possible. We’ll see what customers report.
Your two posts will probably net us some fresh inquiries: “. . . are we there yet? “ with the new product?
We’re going into BETA Testing with our parallel guide as I write this. Subscribers to our TSO INSIDER newsletter will be the first to hear when it becomes available.
[member=57948]ChuckM[/member] – you’re correct that clamping in the guide rail t-slot will lock down the far end of the guide rail once it’s positioned. But if you have a sliding table saw supporting the long workpiece throughout the cutting operation, we won’t surpass that.
To stay aabreast of our developments, you can subscribe to YOUR TSO INSIDER on the bottom of our web page using this link:https://tsoproducts.com/
We appreciate the dialog with you here on the FOG.
Thank you for posting the pictures
Hans
The WoodButcherer
Member
- Joined
- May 1, 2018
- Messages
- 1
The TSO squares look like great products but every video I've watched demonstrating their use shows the initial cut being referenced from an already square edge. How does it work if there is no square edge to reference off?
nclemmons
Member
Just lay your rail down and cut a straight edge if you don't have one. Then index the square off of a known straight edge, whether factory or one you cut.
And welcome to FOG!
Hope this answers your question.
neil
And welcome to FOG!
Hope this answers your question.
neil
tomp said:Just a thought - with the GRS-16 setting the rail perpendicular to the edge, why are two parallel guides needed? This is my adaptation of a different brand, same basic principle.
I've had the set-up shown in the photo for a while, and it works well, giving excellent repeatability when making multiple parts. However, particularly in my small shop, it is very cumbersome due to the length of the arm and moving it on and off the cutting table is a hassle. I've recently been thinking that a better (or perhaps more practical would be a better expression) design would be an adjustable stop arm which locates on the end of the part, extends towards the cut line and acts as a stop for the back edge of the rail. The distance from the cut line to the back of the rail is a fixed dimension (for the specific saw anyway), and the scale on the stop could be calibrated so that the zero point is the actual cut line so that no math would be required.
Without getting too fancy, the stop could be butted against the LH edge of the part, quickly fixed in place with a spring clamp and the rail butted against the end. After making the cut, the rail & square can easily be lifted off, the stop moved and the wood moved down to make the next cut. It is one more part (maybe two if you count the spring clamp) but it would seem to be more practical than the rail with a long stop attached when working in a small space.
fshanno said:My problem with these T-square things is that the friction tape is fighting me the whole time.
I guess nobody else has that problem. Everybody else just lays it down and bumps it to the mark and cuts.
Or is there a trick I'm missing.
You are not alone: I have the same problem.
Sent from my iPad using Tapatalk
When using the rail with the TSO square, temporarily put a few inches of blue painters tape over the anti-slip strips next to the square. This will allow the rail to slide easily over the material if it is tilted slightly so that the edge can be easily aligned with your cutting mark. I also put a moveable handle on the edge of the rail so I can apply pressure along the axis of the rail as well as downward while I'm cutting. The handle is used in your left hand to keep the outer end of the rail up off the surface while your right hand moves the other end to get aligned with the mark. It can also be used to apply pressure to the stops on your parallel guides to keep them tight to the edge.
Attachments
Sanderxpander
Member
- Joined
- Sep 19, 2017
- Messages
- 413
I guess the MTR-18 is out now, for my personal use I found it underwhelming but that's because I don't have/use an MFT. Very excited about the parallel guide option though! By the way I noticed that they are advertised as fitting in a systainer (a SYS-1 I guess) and you can get an insert that fits two. I can't be the only one who noticed that it fits almost like a glove behind my TS55 in its SYS-4. I totally assumed it was made to be that way until I saw the sales pitch about the systainer insert. It only fits one way (with the clamp to the box side, not the saw) and it's pretty stable. Good way to store it for those who hadn't noticed.
- Joined
- Nov 21, 2015
- Messages
- 614
Sanderxpander said:I guess the MTR-18 is out now, for my personal use I found it underwhelming but that's because I don't have/use an MFT. Very excited about the parallel guide option though! By the way I noticed that they are advertised as fitting in a systainer (a SYS-1 I guess) and you can get an insert that fits two. I can't be the only one who noticed that it fits almost like a glove behind my TS55 in its SYS-4. I totally assumed it was made to be that way until I saw the sales pitch about the systainer insert. It only fits one way (with the clamp to the box side, not the saw) and it's pretty stable. Good way to store it for those who hadn't noticed.
[member=66046]Sanderxpander[/member] – your point about the GRS-16 fitting well behind the TS55 in its SYSTAINER has been well known for several years. However, when I looked on our website I discovered that the pictures we took quite some time ago demonstrating this storage option are not on our product page (anymore). So thanks for commenting and we’ll put an illustration up there.
Since October 2017 we have been shipping a version of our GRS-16 series which features a tough but flexible coating on the Latch hook which engages the guide rail. This, along with other geometric refinements, makes it possible to have that hook engage and lock on the reference edge of the square when not in use. This makes it more convenient to store the GRS-16 when that hook portion is not sticking up. The Black coating prevents scratching the blue anodized aluminum.
Our Dual FoamPac for Sys 1 serves woodworkers who have a set of the GRS-16 and GRS-16 PE. For them we offer the Dual Foam Pac as a storage option.
Hans
Sanderxpander
Member
- Joined
- Sep 19, 2017
- Messages
- 413
It didn't seem accidental indeed, everything about it is too well designed!
I actually think I have that version (or at least there's a coating on the hook) but I haven't tried locking it without the rail.
Looking forward to the parallel guides thing!
I actually think I have that version (or at least there's a coating on the hook) but I haven't tried locking it without the rail.
Looking forward to the parallel guides thing!
Similar threads
- Replies
- 12
- Views
- 3K
- Replies
- 12
- Views
- 2K
- Replies
- 6
- Views
- 1K
- Replies
- 11
- Views
- 2K