TV or HiFi Cabinet - 4 Videos

Stone Message

Magazine/Blog Author
Member
Joined
Apr 13, 2011
Messages
4,550
Hi Everyone

We needed a new TV cabinet. I also wanted to have the recorder behind smoked glass that allowed the remote control to work through thus helping to keep the dust off.

The work is spread across 4 videos...

In Part 1 I build the main cabinet:


In Part 2 I make the drawers:


In Part 3 I fit the drawer slides kindly supplied by Accuride:


and finally, in Part 4 I make the top and pick up one or two items missed from the previous videos:


Peter
 
Excellent videos as usual Peter. Great documentation of the process.

I have a question though. On the central support in the front, you fix the screw from the front and then do a full veneer piece on it. Couldn't you have also fixed that piece from the back as well and eliminated the veneer band on the front? Did you not like the look of the continuous horizontal member when viewed from the front?

thanks.

Ron
 
Fantastic job Peter !  With the build and videos.      [thumbs up]

I will show my wife this piece.  We are looking for something similar, for me to make of coarse,  and I think she will very much like this piece. 

Thanks!

Eric
 
rvieceli said:
I have a question though. On the central support in the front, you fix the screw from the front and then do a full veneer piece on it. Couldn't you have also fixed that piece from the back as well and eliminated the veneer band on the front?

I wondered that also.

rvieceli said:
Did you not like the look of the continuous horizontal member when viewed from the front?

If that was the case, could you not just have reversed the joint & had the vertical running through at the front?
 
rvieceli said:
Excellent videos as usual Peter. Great documentation of the process.

I have a question though. On the central support in the front, you fix the screw from the front and then do a full veneer piece on it. Couldn't you have also fixed that piece from the back as well and eliminated the veneer band on the front? Did you not like the look of the continuous horizontal member when viewed from the front?

thanks.

Ron

Hi Ron,

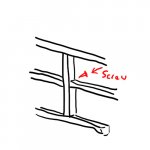
It is important (from a design perspective) that the central stile is not precluded by that rail. However, I could have made life slightly easier by having the rebate on the central stile on the inner side at the middle thus allowing the joint to be screwed, through the horizontal rail, from the rear.

[attachimg=1]

Many thanks for raising this. A YouTube viewer has also spotted it - I owned up straight away !

Peter
 

Attachments

  • TV Cab - FOG.jpg
    TV Cab - FOG.jpg
    74.9 KB · Views: 873
jonny round boy said:
rvieceli said:
I have a question though. On the central support in the front, you fix the screw from the front and then do a full veneer piece on it. Couldn't you have also fixed that piece from the back as well and eliminated the veneer band on the front?

I wondered that also.

rvieceli said:
Did you not like the look of the continuous horizontal member when viewed from the front?

If that was the case, could you not just have reversed the joint & had the vertical running through at the front?

To add to my previous reply...

I have just looked at my drawings trying to work out why I did it this way. My early sketch, before I created the drawing file, shows it the way that has been suggested and shown in my rough sketch above. I think that it must be an age thing but at least it does show another way of hiding a screw (and it does demonstrate that you have watched the video !).

Many thanks everyone.

Peter
 
Peter:
I understand why you added 20mm x 40mm edging to the top but, aren't you worried about expansion and contraction top because of the end grain edging?

Tim
 
Tim Raleigh said:
Peter:
I understand why you added 20mm x 40mm edging to the top but, aren't you worried about expansion and contraction top because of the end grain edging?

Tim

Hi Tim

I am not worried as I have taken some basic precautions...

I have had the wood for well over a year and have kept it in a dry place. I dimensioned the stock at least 2 months before using it (you will see it appearing in the background of all sorts of earlier videos) and then checked that it remained straight and flat before using it. You may have noticed that on the underside of one of the 3 boards for the top there was a large slice missing near the end - I did not intend to use that board but the one it replaced had moved very slightly over that 2 month period.

Doing this sort of thing can be a gamble but I am happy that I have done my best to minimise the risk and if I were to get an issue then I know that I could sort it out.

I have used this approach for many years and have yet (he says touching wood) to have any problems.

Peter
 
Nice looking cabinet and the video are great, Thanks

I might just get motivated to build one...
 
As usual excellent job Peter.  Walnut is my favorite wood, and the Osmo really does it justice.  Bill
 
Back
Top